Installing electric underfloor heating under tiles requires some skill, but you can do it yourself if you wish.
The installation process consists of several stages: surface preparation, thermal insulation, control unit connection, cable or mat installation, and finally, tiling. Sometimes, additional concrete screed pouring is required.
To properly install electric underfloor heating, it is recommended to study the installation sequence in advance, as well as prepare the necessary materials and tools.
- Types of structures
- How to install electric flooring yourself
- Leveling the base
- Materials and tools
- Wiring and floor cable capacity
- Surface thermal insulation
- Installing temperature sensors
- Preliminary preparation
- We choose a heat source - based on heating mats or electric heating cables
- Features of electric cable flooring
- Features of a floor based on heating mats
- How to install electric cable flooring
- How to install underfloor heating under tiles (tiles) - instructions
- Mat laying technology
- Pouring concrete screed
- Laying the tiles
- DIY Underfloor Heating Installation Under Tile - Video Tutorials
Types of structures
There are several types of structures that can be installed under tile. Before making a final decision on a specific type, it's important to carefully study the features and differences of these systems. The most commonly used types are:
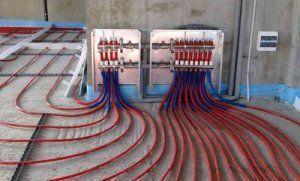
- water – requires a large, heavy screed into which the pipeline will be laid. The main drawback is that it places significant pressure on the original surface, requiring additional reinforcement. There is also the risk of flooding neighbors in the event of a pipe burst. Installation is quite complex and can only be performed by a professional (do-it-yourself installation is not possible). The process itself takes about a month, as it requires waiting for the screed to fully harden.
- Infrared – capable of delivering a large amount of infrared radiation at a relatively low heating temperature. This type is thin, so installation is possible even in apartments with low ceilings. The only drawback is that the infrared type is better suited for installation under laminate/parquet flooring rather than tile.
- Electric floor – operates from the main power grid, but its connection does not require specialized permission from the relevant authorities. The only drawback may be the cost of operating the system due to high electricity prices. The solution to this problem is the installation of special, advanced heating cables that automatically regulate energy consumption based on the ambient temperature.
Considering the pros and cons described above, we can identify the best option. In a multi-story building, installing electric underfloor heating is possible without obtaining any permits (which you'll inevitably encounter when installing hydronic underfloor heating). The installation process takes just a few days and can be carried out by the building owners.
How to install electric flooring yourself
Once you've selected the appropriate flooring type, you can begin installing the floor. The first step is clearing the room of furniture and preparing the surface where the flooring will be laid. It's also a good idea to gather all the necessary tools beforehand to avoid having to search for anything later and delay the installation process.
If you decide to do all the flooring and tiling work yourself, even though you don't have the necessary experience, we strongly recommend following the detailed instructions.
Leveling the base
First, the original flooring where the heating system will be installed must be prepared. The space must be completely cleared, and any furniture and other items previously placed in the room must be moved.
The old floor must be removed down to the concrete base. Only after the surface is prepared should you begin installing the heated flooring. After removing the previous floor base, it's a good idea to carefully inspect the cleared area for any damage. Unless the apartment is new, there will likely be some.
To level the base, you'll need a special product. When purchasing, make sure it's suitable for concrete surfaces. The product must dry quickly.
If you skip this step, there is a high probability that it will lead to a malfunction of the heating system in the future or will become the main reason for the unsuccessful completion of the installation.
This is because the system's functionality depends on the placement of electrical cables. It's important to note that even the slightest misalignment of the cable loops can compromise the system's proper operation.
If you don't take care to level the surface in advance, you will have to dismantle and reinstall the entire system in the future.
Materials and tools
To install cable flooring, you should prepare the following materials:
- A set of heating elements. Often, the kit also includes all additional components: a temperature controller and sensor, and an operating manual;
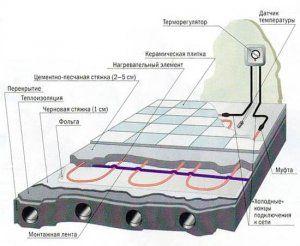
- Penofol or its equivalent for applying the insulating coating. Penofol is a sheet made of polyethylene and foil. The insulating material has an adhesive backing, making it easy to install. It is designed to prevent heat loss, preventing radiant heat from escaping into the flooring and to the level below, but rather rising and warming the room.
- ceramic tiles.
We'll need the following tools: a tape measure, a putty knife, a hacksaw, cross-shaped tile spacers, a screwdriver, a level, and adhesive tape. We'll also need floor leveling material and tile adhesive.
We invite you to familiarize yourself with Tips on how to choose tile adhesive for heated floors and rating of manufacturers.
We've listed the basic list of tools required to install an underfloor heating system. This list was calculated without taking into account the specific apartment and the tasks at hand. As you understand, this list is subject to change.
Wiring and floor cable capacity
It's important not only to install underfloor heating correctly but also to calculate the required heating cable cross-sectional area in advance. The system's efficiency depends on whether this system is the primary heat source, the quality of the building's thermal insulation, the average ambient temperature, and the room's humidity.
Basic rules for determining the power of cable components:
- To properly heat a room of 1 square meter, a heating element with a power of 140-185 W will be sufficient;
- When installing electric underfloor heating, consider whether there is an additional heating source. If the answer is "YES," then the power can be slightly reduced to 85 W.
- When calculating on your own, you need to know that one linear meter has a power of 15-20 W.
To lay the floor and tiles yourself correctly, it's important to accurately calculate the volume of material. Measure the total square footage of the room, counting off 10 cm increments, then multiply the square footage by the required power rating.
Surface thermal insulation
An important point is to carry out thermal insulationThis must be done before laying the cable on the floor. The quality of the thermal insulation work determines the subsequent installation and the efficiency of the entire system. A special foil coating that impermeable to heat is laid and secured to the cleaned surface.
This prevents radiant heat from being directed downward and heating the space below. Proper thermal insulation is especially important for apartments located above the basement or on the first floor.
Heating concrete slabs or the empty space below would require a huge amount of electricity. Consequently, operating the electrical system would be very expensive.
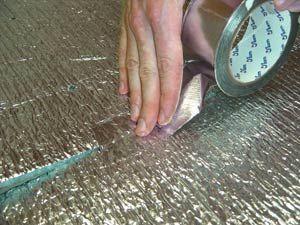
The most common material for installing thermal insulation is penofol. This foil-faced insulation has an adhesive layer, making it easy to secure to the surface.
The contractor needs to tightly seal the entire base with the adhesive and cover the joints with foil tape. It's best to position the sheet so that it overlaps the walls by 1-3 cm to ensure more effective thermal insulation.
Polypropylene or expanded polystyrene sheets can be used instead of penofol. However, the thickness of the materials must be taken into account. Penofol has the thinnest thickness, so if you use it, the distance from the floor to the ceiling will be the greatest. Using other materials will reduce this distance. This isn't critical, but it should be taken into account.
After installing the thermal insulation, a damper tape is applied around the perimeter. This will help compensate for the expansion of the insulation as the temperature increases.
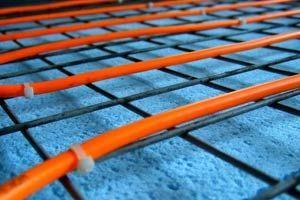
A metal mesh must be placed on the thermal insulation, which will significantly facilitate the installation of the floor and protect the surface from contact with the heating mats.
After installing the thermal insulation, a damper tape is applied around the perimeter. This will help compensate for the expansion of the insulation layer as the temperature increases. A metal mesh should be placed on the thermal insulation, which will significantly facilitate floor installation and protect the surface from contact with the heating mats.
Installing temperature sensors
The primary temperature controllers are temperature sensors and a thermostat. The former should be installed near an electrical outlet, while the latter should be installed in the floor and then connected to the thermostat via a small corrugated pipe.
The corrugated tube reliably protects the floor sensor and, if repairs are necessary, simplifies disassembly and allows for quick replacement. The end of the tube located between the cables must be tightly sealed.
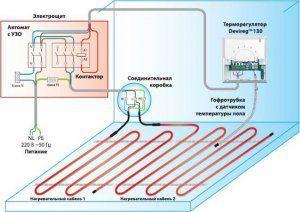
Once the heating cable layout has been marked on the screed, the correct location for the thermostat must be determined. The sensor must be positioned precisely midway between the cable loops. It is recommended to measure the distance between them rather than simply guessing the correct location.
Preliminary preparation
It's important to remember to check the electrical wiring in a private home, as installing cable flooring requires a significant amount of electricity. In most cases, there's no need to obtain any permits from the relevant utility companies before installation, but this doesn't relieve the contractor from the responsibility of checking the wiring.
The permissible power rating determines the power rating of the cables or mats that will need to be laid on the floor according to a specific pattern. Neglecting this installation step can result in a fire after completion, requiring a complete renovation of the premises.
If you lack the experience to perform the calculations yourself, it's recommended to consult a professional. If you have any doubts about the wiring's ability to withstand the voltage of the electric underfloor heating, it's best to replace it with a more reliable one. It's also advisable to check all outlets and switches, and verify the reliability of the circuit breakers on the control panel.
Before installing the cable, be sure to check the resistance of the single-core or double-core component you plan to install. After measuring, compare it with the value stated in the heating component's datasheet. If the error is within 10%, proceed with the installation of the electric underfloor heating system.
Resistance measurements should be taken with a multimeter. This specialized tool is also helpful when determining the phase of a cable without color coding.
We choose a heat source - based on heating mats or electric heating cables
The installation technology for cable systems and heating mats varies slightly. Therefore, it is recommended to first determine which type of elements will be used and then review the relevant underfloor heating installation instructions.
Apartment owners often don't know what type of underfloor heating element they want to use. Cables and heating mats each have their own advantages and disadvantages, which you should be aware of if you plan to install electric underfloor heating.
Features of electric cable flooring
- It's possible to independently regulate the amount of heat per square meter by decreasing the spacing of the cable loops. This will make certain areas warmer;
- Electric underfloor heating cables must be installed within the screed. Pouring the screed increases installation time and complicates the installation process somewhat, but it also acts as a heat accumulator. This reduces electricity costs without affecting heat output.
- Cable systems are less expensive than mats;
- the height of the base is raised by at least 4.5 cm;
- Operation is possible only 20-30 days after completion of installation.
Features of a floor based on heating mats
- this type warms up significantly faster than cable (tiles only need 15-25 minutes);
- does not lead to a decrease in room height;
- Operation is possible within 12 days after installation is completed;
- Installing underfloor heating under tiles using heating mats is much simpler and can be done by yourself, as there is no need to calculate the cable pitch and power yourself;
- there are restrictions on the size of mats;
- If you decide to lay the tiles yourself, a careless movement can damage the system.
How to install electric cable flooring
If you decide to install cable-based underfloor heating under tiles, you need to carefully study the installation technology according to the instructions below.
The cable installation procedure is more complex than installing mats, so if you have any doubts about your ability to carry out the installation yourself, it is recommended to contact qualified professionals.
It's advisable to have a temperature sensor connected to the corrugated tubing before installing the cable elements. This will allow the sensor to shut down the system if overheating occurs. The corrugated tubing should be securely fastened with tile adhesive.
How to install underfloor heating under tiles (tiles) - instructions
Before you begin installing underfloor heating under tiles, you must:
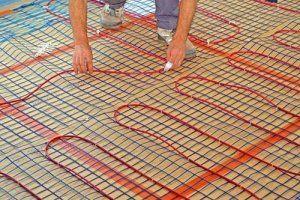
- Study the cable layout diagram and make marks on the base.
- Begin laying out the cable system according to the diagram. The most popular layout is a serpentine pattern. Typically, the distance between loops is at least 7.5 cm. To correctly determine this distance, multiply the room area by 100 and divide the resulting number by the total cable length.
- In most cases, the cable is secured with specialized mounting tape suitable for electric floors (often included). If the tape doesn't hold securely, tile adhesive can be used.
- Once the technician has finished laying the cable, one end of it needs to be fed through the groove into the wall box, in order to then connect it to the thermostat.
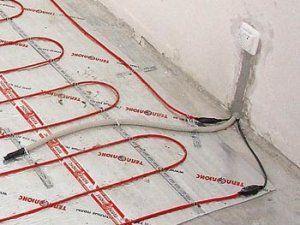
Cable elements must be laid strictly according to the diagram, avoiding any tension or kinks. Underfloor heating cables must be laid with extreme care to prevent damage to the system or the insulating substrate.
After installation is complete, connect the temperature controller. This should be done in accordance with the manufacturer's diagram and instructions.
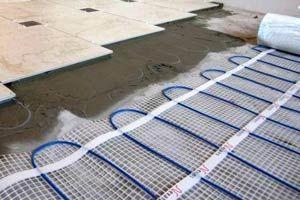
Mat laying technology

Once you've decided which technology to use for installing underfloor heating under tiles, and all the necessary preliminary work (thermal insulation and surface preparation) has been completed, you can begin the installation yourself.
Installing underfloor heating under tiles begins with determining the required number of mats. This is easiest to do by marking the floor surface with chalk. First, mark off any areas where the mats won't be installed (for example, where furniture and appliances are located) to prevent excess material usage.
Technology for installing electric underfloor heating using heating mats under tiles:
Before installing the elements, find a suitable layout. This layout should be marked on the floor to facilitate installation.
- Start laying the electric mats in strict accordance with the diagram.
- When the web needs to be turned, the reinforcing mesh is cut at the required point (it's important to do this carefully, without directly damaging the cable components). The cable should be turned so that it doesn't become twisted.
Once installation is complete, connect the temperature sensor and controller. All control unit components must be installed according to the cable color coding and the diagram provided by the manufacturer.
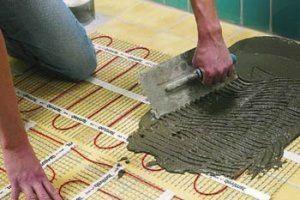
Pouring concrete screed
Once you've completed installing the cable flooring under the tiles using the specified technology, you should check the functionality of the entire system. If there are no operational issues, we recommend installing a cement screed. If you've chosen a mat-based underfloor heating system rather than a cable-based one, a screed is not required, and you can proceed directly to tiling.
It's advisable to mark the required screed height on the wall. The minimum thickness is 3 cm, and the maximum is 5 cm. The mortar shouldn't be too thick and should contain the following components: sand, cement, crushed stone, and water in a ratio of 4:5:0.9. Approximately 1% plasticizer (such as lime) should also be added.
To create a proper screed, it's important to ensure the mortar is distributed evenly. A roller can be used to redistribute the mixture. After pouring, allow the screed to dry completely for several days. Only after it's completely dry can you begin laying tiles.
Laying the tiles
Below is a brief instruction. If you are interested in a detailed and step-by-step guide on how to do this, Which tile or adhesive should I choose?, how to prepare the surface for further work, installation technology, etc.
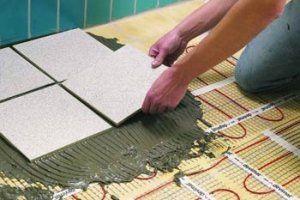
A manual tile cutter is used to cut tiles. Before cutting, prepare the tiles according to the instructions (pre-soak or wipe with a damp cloth). If you need to create a custom hole for a pipe, use a manual cutter and sandpaper to smooth the hole.
Once the underfloor heating is installed, it's time to determine the tile layout. This decision is typically driven by the apartment's design and the residents' personal preferences.
Brief instructions:
- Mix heat-resistant tile adhesive.
- Apply the adhesive mixture with a spatula. It's important to ensure there are no empty spaces under the tiles, otherwise they will cause wear.
- Carefully place the tiles on the adhesive, using a spirit level to ensure they are level. Insert plastic cross-shaped spacers between the tiles to ensure even spacing.
Once the tile installer has completed the installation, the surface can be varnished. This will extend the life of the tiles and improve their aesthetics.
Therefore, laying tiles on heated floors is easy, even for a novice. To do this, you just need to decide on the type of structure and then carefully study the provided installation instructions.
However, if you're unsure of your ability to install the structure yourself or haven't fully understood the installation process, it's best to entrust this procedure to a professional. Errors in the installation process will require the structure to be dismantled and reinstalled.
DIY Underfloor Heating Installation Under Tile - Video Tutorials
Video of DIY underfloor heating installation under tile


