Installing a chimney pipe through a metal-tiled roof requires a very careful approach during installation. A properly installed chimney pipe is essential for the safety of the entire structure.
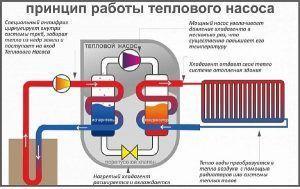
The installation of a chimney through a metal roof is calculated when developing the heating system. Most often, the chimney outlet is located near the ridge. This placement ensures that the pipe passes through the "warm zone," thus reducing the risk of condensation.
The simplest option is when the outlet passes through the ridge. This significantly simplifies the installation of the junction cover. Furthermore, in winter, this design prevents snow pockets from forming, preventing leaks.
Another placement option involves positioning the flue slightly away from the center of the roof. This is because stoves are built in any area of the home, making it easier to install the flue above them. During construction, it's important to properly arrange and route the connection between the ceiling and the chimney.
- The procedure for installing a chimney through a metal roof
- Recommended locations for chimneys
- Recommended chimney height
- External apron system at the junction area
- Bypassing a brick chimney and installing an apron
- Round and square chimney passage
- How to make a steel pipe pass through a roof
- Performing a pass without fluffing
- Ventilation passage
- How to install asbestos and sandwich flue pipes
The procedure for installing a chimney through a metal roof
The biggest problems can arise when arranging the passage of the pipe through insulated roofBecause it consists of a certain number of insulating layers, including roofing insulation material and roof sheathing.
Watch the video: Bypassing a chimney through metal roofing
Experienced professionals recommend building a separate box around the chimney's ceiling penetration in this situation. The key to remember when constructing this outlet is to maintain the safety of the wooden structure on the roof.
The box, passing through the ceiling, must be reliably protected from contact with the stove flue pipe. This is achieved by using mineral wool, which is based on basalt or fiberglass.
The chimney flue section of a building can have various shapes. These shapes depend on the type of material used to construct the ceiling penetration. Typically, chimney flues on roofs come in the following shapes:
- rectangular;
- square;
- round.
The first and second types are created by constructing a structure from brick and block. A circular chimney passage is created using metal and cement.
Recommended locations for chimneys
The area where the chimney passes through a metal roof must be determined at the initial stage of project development.
IMPORTANT! Do not route it through the valleys. In this case, the seal at the junction with the metal-tiled roof is uncertain.
In addition, the largest amount of snow accumulates in these areas on the roof, which will put a high load on the joints themselves, which can destroy the integrity of the entire roof.
It's also irrational to locate the chimney near the windows of attics. This option poses a high risk of smoke entering the rooms.
Watch the video: Bypassing a chimney through a metal roof
Experts recommend stopping at the chimney outlet near the ridge. In winter, some snow accumulates in this area. In this situation, the structure doesn't need to be as tall as possible, which minimizes the impact of precipitation.
Recommended chimney height
 Regardless of which chimney outlet option you choose, you need to remember one very important rule. A chimney pipe must be fitted with protective umbrella.
When installing a brick or other chimney through a flat roof, the flue outlet must be no lower than 0.5 m. If the installation is on a ridge roof, the chimney must be installed at a height that depends on the distance to the ridge.
If a brick or other chimney is located at a distance of 1.5 m, its height during installation should exceed the height of the ridge by at least 0.5 m. When the distance to the ridge is between 1.5 and 3 m, the structure is placed at the same height as the ridge.
In situations where the distance from a brick or any other chimney is more than three meters, the building's height is determined by an imaginary line. It runs at an angle of 100 from the ridge's escape to the horizon.
External apron system at the junction area
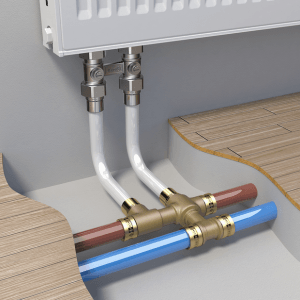
Experts highlight the chimney's connection to the metal roofing as a crucial factor. To ensure the necessary airtightness in this situation, an external flashing is installed. Installation begins with the internal flashing, with a flashing or steel sheet installed at the top and bottom, and similar elements on the sides.


The strip at the bottom is placed against the walls and a line is drawn with a marker.

The remaining pieces are also used as a template for subsequent marking. Once the perimeter line is completed, begin cutting the grooves. It's best to use a grinder to cut the grooves 15 cm deep.

At the end they are washed with water, the brick dust is washed off, and they wait until everything dries.
To ensure that the airtight seal is not compromised when connecting the flue gas exhaust system to the metal roof, it is important to ensure that the grooves are aligned precisely with the brickwork.

When installing the external flashing of a flue gas exhaust system through a soft roof, use a heat-resistant waterproofing barrier. It is inserted 5 cm into the pipe blank.
The cut end itself is glued to the pipe with construction tape. The area where the pipe extends beyond the roofing is covered with film. For a secure bond to the roofing, we recommend using Ecobit.
Ventilation between the structure and the rafters is ensured by maintaining an optimal distance between them. To prevent overheating of the brick chimney from the stove and cracking of the brick, the pipe is wrapped in a polymer-coated steel sheet. A 20 cm gap is left for ventilation.
Bypassing a brick chimney and installing an apron
To create a connection, two problems must be solved. The first is to divert water flowing down the slope and redirect it along both sides of the structure being constructed. It is then released onto the slope beneath the structure. The second is to prevent water from entering the dwelling and direct the liquid running down the flue walls to the roof.
To solve all this, a metal apron should be built. It should be installed on the roof surface and on the chimney (protruding 15-20 cm above the surface).
Before you start work the chimney is being plasteredAfterwards, a waterproofing membrane is installed on its sides. A gutter is built into the waterproofing membrane, no more than 80 cm deep, on the back edge, to drain water.
Before asbestos or other chimney pipes are routed through a metal-tiled chimney, the sheathing is installed and the bottom flashing is installed. For this, the left and right sheets are trimmed to the contour and then cut to width. The length is maintained at 5 cm from the point where the first wave begins, which will extend above the chimney on the house or bathhouse.
Watch the video: Brick chimney – how to install it on a metal roof
Lines are drawn on the sides, extending 15 cm above the roof's surface. These lines are then connected along the entire contour. 2 mm wide grooves are made along these lines.
The grooves should be made in the brickwork, not in the masonry. After finishing, the area should be cleaned of any dirt and thoroughly rinsed with water. Once dry, the grooves are filled with silicone-based sealant.
Next, the flashing and the necessary apron components are prepared. Next, the end of the flashing is inserted into the sealant and secured to the metal roofing with screws.
Round and square chimney passage
The problem of how to properly route a round pipe through a metal roofing tile is becoming quite pressing. If the round pipe is already insulated, the roofing pie must be protected from fire.
If flammable materials are used during installation through the ceiling, they must be at least 20 cm away from the flue. A wooden box-shaped opening is created for this purpose. The empty space is filled with thermal insulation material.
When arranging a flow channel for a round tubular blank, the following technological sequence is used:
- the waterproofing is cut into an envelope shape;
- the outer parts of the canvas are brought to the rafters and fixed to the structure that plays a supporting role with brackets;
- then the waterproofing film is pressed against the bars included in the lathing, and the vapor barrier layer is the base for installing the finishing material;
- To ensure maximum protection of the insulating material, the adjoining areas are sealed with a special tape;
- At the end, the surface where the work was carried out is covered with metal tiles.
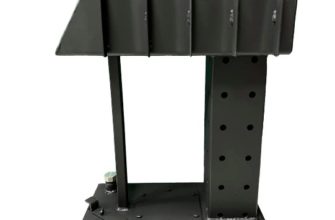
How to make a steel pipe pass through a roof
Work on such a structure requires careful consideration. The contractor who undertakes this project must clearly understand the specifics of each ceiling structure. For example, passing a brick structure through a wooden ceiling, or any other ceiling, must be accomplished without compromising the integrity of the roof.
Otherwise, the ceiling will leak after the first rains. It's also important to note that the waterproofing of a steel chimney on a slate ceiling will be different from that on a wooden or metal ceiling.
Single-layer steel pipes become very hot. Therefore, ceiling openings constructed of wood must be protected with a thermal barrier or a special box. This applies not only to wooden ceilings but to any other ceiling as well.
Performing a pass without fluffing
A brick chimney is designed to protect flammable materials from overheating. The part of the structure that extends through the ceiling becomes a fillet, called a "flaring." This element acts as a necessary thickening of the pipe walls, preventing overheating.
Recently, expanded clay or vermiculite has been used to penetrate brick smoke exhaust structures through ceilings without fluffing. These materials have excellent thermal insulation properties.
Ordinary sand is rarely used for this purpose. The problem lies in the fact that sand is too finely grained and too heavy. Its thermal conductivity is too high for this type of "fluffing" function.
A simpler and easier solution to this problem is to use a box filled with heat-resistant basalt wool. When installing mineral wool, the structure is provided with easy access from the attic.
In cases where the building extends to the second floor, the opening in the floor with insulation is covered with a sheet of metal.
Ventilation passage
Roof ventilation is a mandatory requirement during construction. A fully functional roof ventilation system is essential for long-term use of the home. Warm air circulating from within the building can cause condensation on cold surfaces.
The conclusion is simple. Under such influence, erected structures quickly lose their integrity. For this reason, forced ventilation is installed.
Ventilation systems of any type are readily available at hardware stores. Installing them doesn't require much time or effort. The installation is carried out as follows.
- The passage element is laid on a tiled base and its outline is traced. This determines the location where it will run.
- The metal roofing tiles are cut according to the markings.
- The rubber seal is secured to the metal profile with screws. It is then carefully treated with silicone.
- The ventilation duct passage piece is secured with a rubber seal and screwed to the roof.
How to install asbestos and sandwich flue pipes
In many situations sandwich pipe outlet to the roof A chimney flue through metal roofing is an excellent alternative to a brick stove flue. This type of structure is easy to install, as the main elements are two pipes of different diameters, with a basalt wool insulation layer between them.

Even someone without much construction experience can install a passageway for a sandwich structure on a metal roof.

And the ease of installation in this case is complemented by excellent performance indicators and a long service life.

Experts say it's hard to find a better option for removing flammable substances than a sandwich pipe. This material offers excellent protection against strong external heat buildup on the walls, as well as condensation.
To these advantages it is necessary to add that this structure looks very presentable.

To summarize, we can come to the following conclusion: this entire process does not involve any highly complex steps. The main thing is to follow the SNiP requirements step by step, maintain all dimensions, and adhere to recommendations.
If everything is done according to the rules, then the operation of the heating device will be absolutely safe, and there will be no problems with regulatory authorities.