A homemade waste oil stove is suitable for heating a garage, greenhouse, and other spaces. This article provides a detailed overview of homemade models, ratings of factory-made products on Yandex Market, and popular designs.
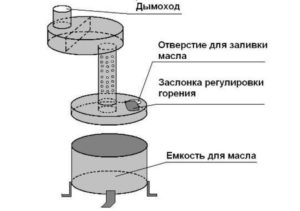
For those interested in how to make a furnace using waste oil, I'll give you a quick recommendation: you can weld the body from a cylinder, pipes, a fire extinguisher, or sheet steel. Organize the oil supply by dripping from the upper tank or by pyrolysis from the lower tank.
We'll dedicate a separate section of the text to detailed instructions on how to build the stove, complete with diagrams, explanatory photographs, and videos.
- Review of homemade stove models
- Rating of waste oil stoves
- On oil and diesel fuel without a water circuit
- On processing with a water circuit
- MULTEAT TEX 20 closed-type stainless steel
- Photos of the drawings
- A simple DIY waste oil stove for heating a garage
- A waste oil stove made from a gas cylinder with a water jacket
- Video instructions
- Answers to frequently asked questions
Review of homemade stove models
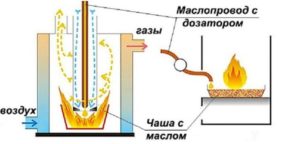
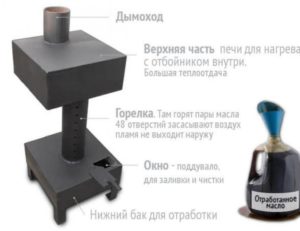
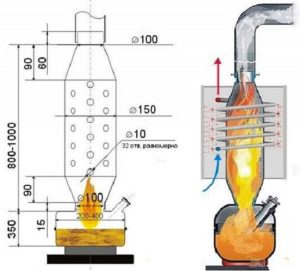
Craftsmen have come up with more than a dozen different types of furnaces. The most effective pyrolysis designs consist of three main components:
Depending on the design, the furnace device is supplemented fan, dripper, water circuit or heat exchangerThe presence of a chimney, legs, doors, and dampers is mandatory.
Conventionally, based on the operating principle and basic design, homemade stoves are divided into two types:
According to the general design, the following models are distinguished:
An open furnace for burning waste removes oxygen from the room. This design is easier to build yourself, but more dangerous to operate.
A closed furnace produces no soot, is less hazardous to operate, and has increased efficiency. Oxygen for combustion is supplied by a forced-air fan.
Rating of waste oil stoves
Yandex Market sells ready-made stoves that run on liquid fuel. They are similar in design to their homemade counterparts, but have a neater appearance.
Below we will consider a mini-rating of available models in more detail.
On oil and diesel fuel without a water circuit
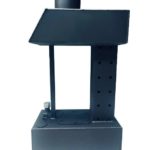
Among the simple, inexpensive options on Yandex Market, there's a furnace that runs on diesel fuel and waste oil. The model costs 7900 rublesDesigned for installation in a garage and designed to heat the room. area of 50 m2.

Fuel consumption ranges from 300 to 800 g/hour, depending on combustion intensity. A drip-feed oil system is provided.
Pros and cons:
- Low cost.
- Availability of control valves.
- Economical oil consumption.
- Long-term reach of operating power – 30 minutes after ignition.
- Poor stability of the body on the floor.
- In a closed room it burns oxygen, creating smoke.
- Fire hazardous.
A good option for DIY due to its simple design.
However, the fire hazard of the model raises doubts about its necessity.
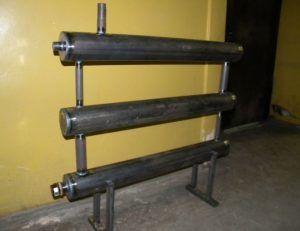
On processing with a water circuit
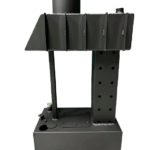
A mid-priced model on Yandex Market from 8900 rubles Equipped with a water circuit. The manufacturer has provided two radiators on the sides. A coil can be connected. The 4 mm steel body is coated with fire-resistant powder paint. The 8-liter waste oil tank holds enough waste oil. for 8-12 hours of workMaximum heating area – 50 m2.
Advantages and disadvantages:
- Affordable price for a model with a water circuit.
- Suitable for connecting water heating to a greenhouse, garage or other premises.
- A damper system has been installed.
- A fire hazardous structure that burns oxygen in a closed space.
- The body is unstable on its legs.
The model can also be made by hand. The design is complicated by the presence of a water circuit, which will additionally need to be welded from sheet metal.
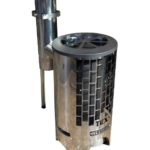
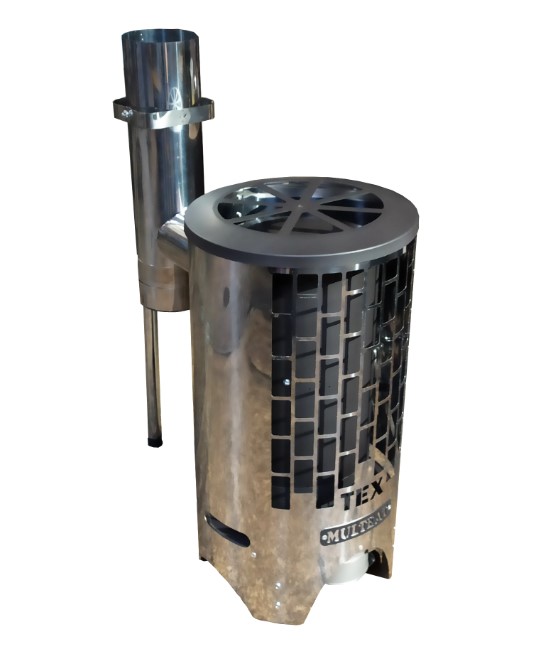
MULTEAT TEX 20 closed-type stainless steel
Among the reliable, aesthetically pleasing, and fire-safe models, the branded MULTEAT TEX 20 oven is worth a look. Its stainless steel construction. The equipment is sold on Yandex Market for 23,750 rubles.
The front of the case is perforated for infrared heating. The model is designed for a maximum power 20 kW.
Advantages and disadvantages:
- Fireproof beautiful stove.
- The manufacturer promises 7 years of operation and provides a 2-year warranty.
- Quick heating of the room after ignition.
- The kit does not include a fuel tank.
- High cost.
It is difficult to make the design yourself due to the need for a suitable grade of stainless steel and the requirement for perforation of the housing.
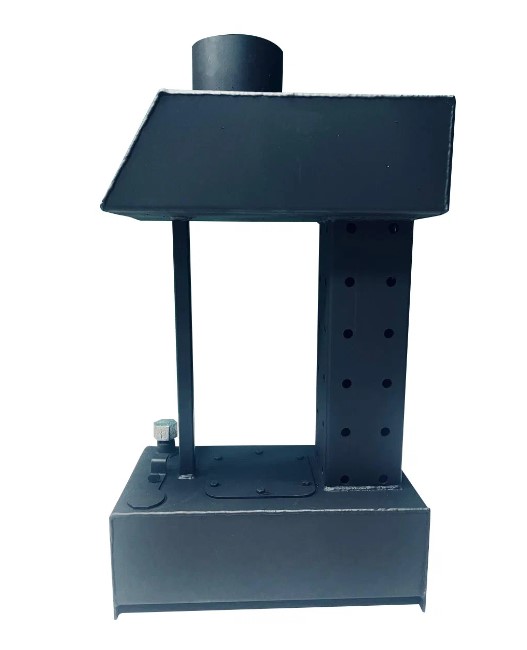
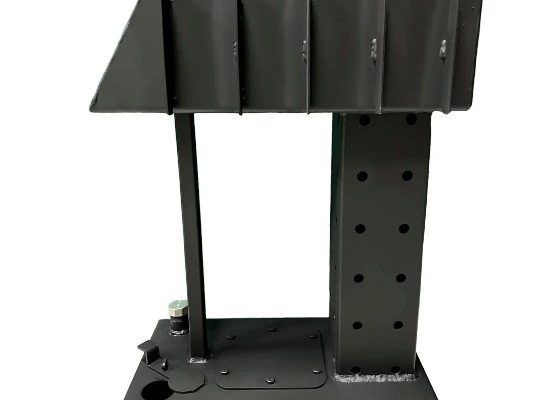
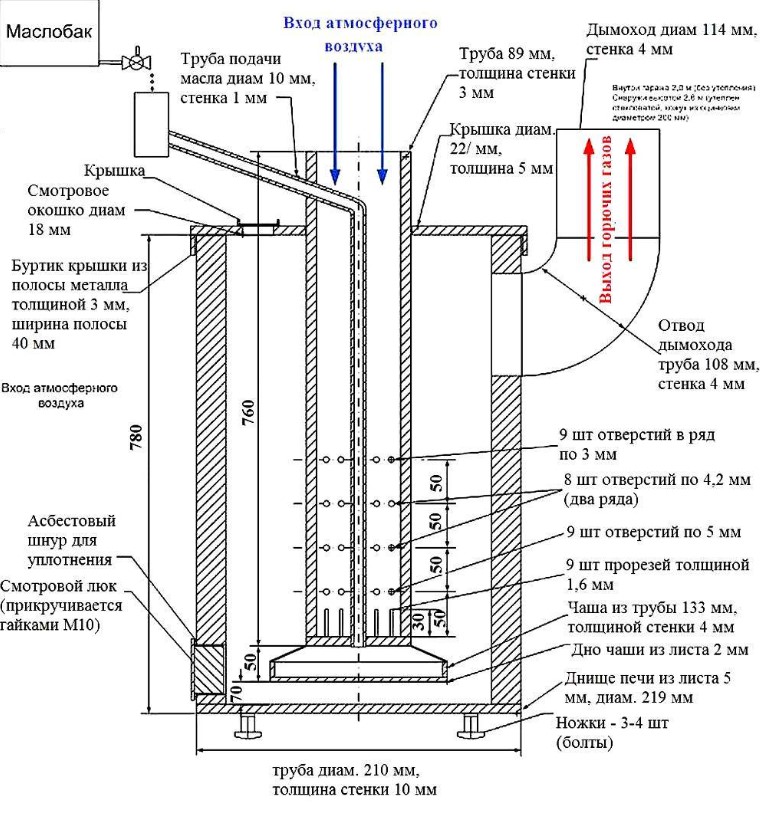
Photos of the drawings
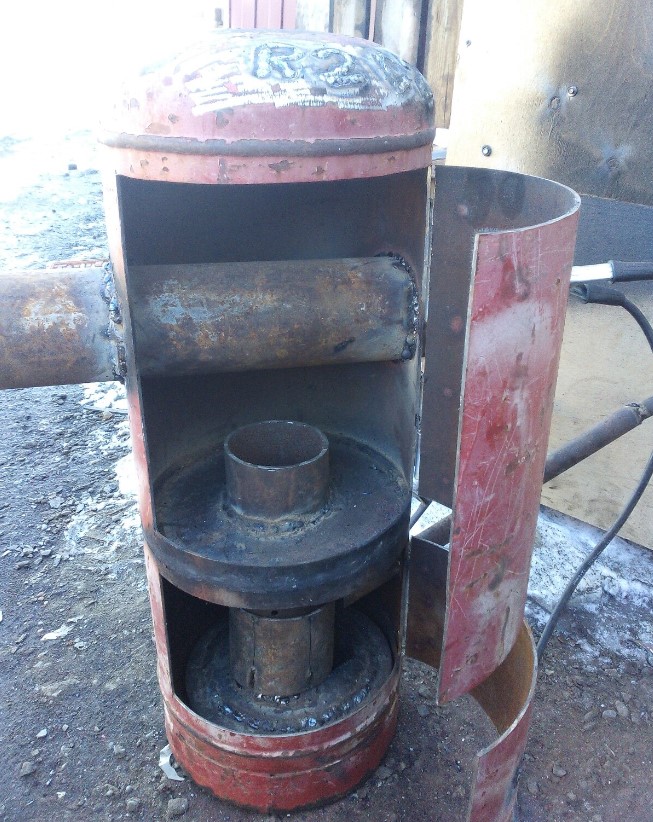
A homemade stove can be made from sheet steel, a gas cylinder, a fire extinguisher, or another metal container. DIYers use readily available materials, adapting the designed designs to suit their needs.
Popular waste oil furnace designs are freely available. Let's look at the most successful options.
To build a stove yourself, using each drawing, you'll need a welding machine and welding skills. It's best to use metal thicker than 3 mm to prevent it from burning through.
A simple DIY waste oil stove for heating a garage
First, let's look briefly at the entire process step by step, below will be a detailed description.
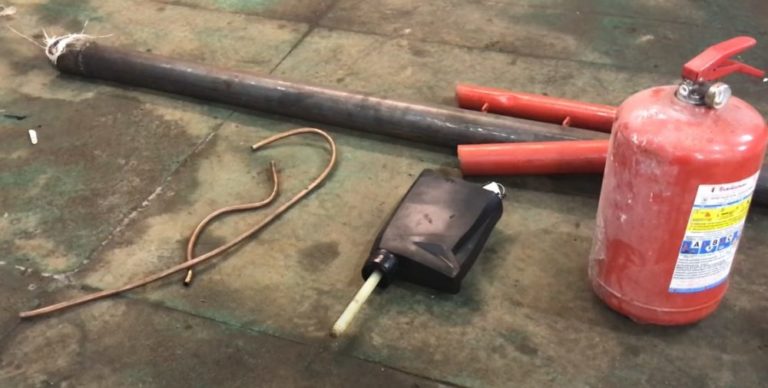
You can make a simple waste oil furnace for your garage yourself using a metal fire extinguisher body and a blower fan.
You'll also need a 50mm diameter steel pipe. Make a drip unit for the oil supply from copper tubing and a small canister. Tools needed include a welder, an angle grinder, pliers, a hammer, and a tape measure.
A complete guide to making your own stove.
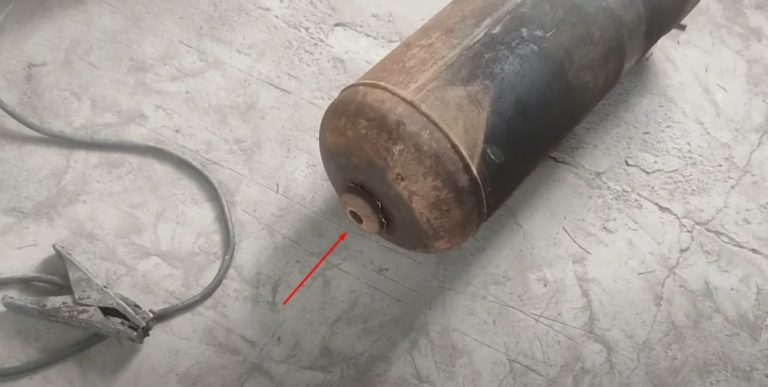
- Prepare your materials for the job. Use an old, expired fire extinguisher, after disassembling it and emptying its contents.
Assemble a fan for a small oven yourself from 3 computer coolers.
- At the bottom of the side wall of the fire extinguisher, mark a hole for a 50 mm diameter pipe for air supply and exhaust.
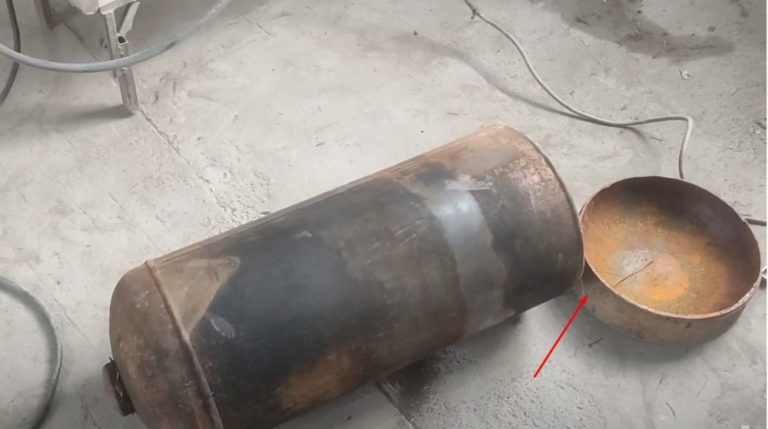
Use a grinder to cut the petals crosswise, staying within the marked circle boundaries. The more segments you cut, the smoother the hole will be.
Use a grinder to cut the petals at the base away from the main body. Smooth the edge of the hole with a sanding wheel.
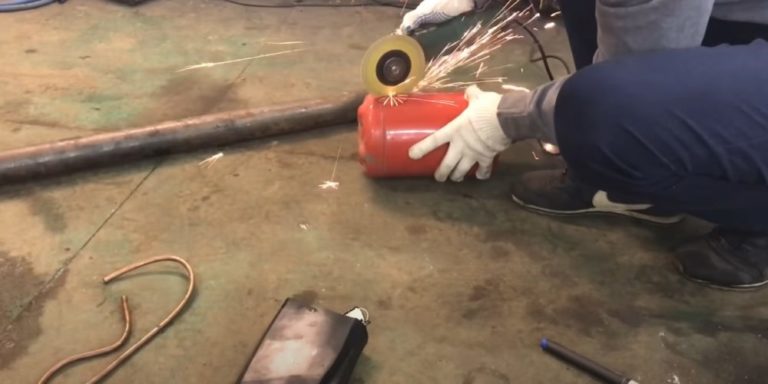
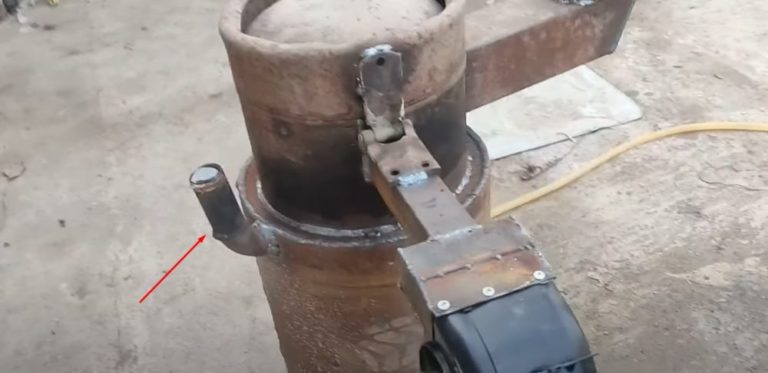
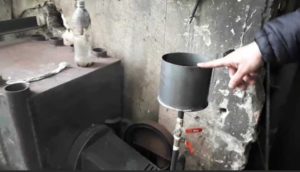
- At the top of the side wall of the fire extinguisher, on the opposite side, mark and cut out a second hole of the same diameter for connecting the chimney pipe.
Take a small pipe with a diameter of 50 mm. Make sure the pipe fits freely through the holes in the cylinder without leaving large gaps.

- Cut a piece of 50mm steel pipe at an angle. Join the pieces together using the angled cuts to create a chimney at approximately a 90° angle.O for removal through the garage ceiling.
Calculate the length of the pipes individually, taking into account the ceiling height and the installation location of the stove.

- Use a grinder to sand down the paint on the fire extinguisher body around the cut holes. Use a welding machine to weld the pipes in place.
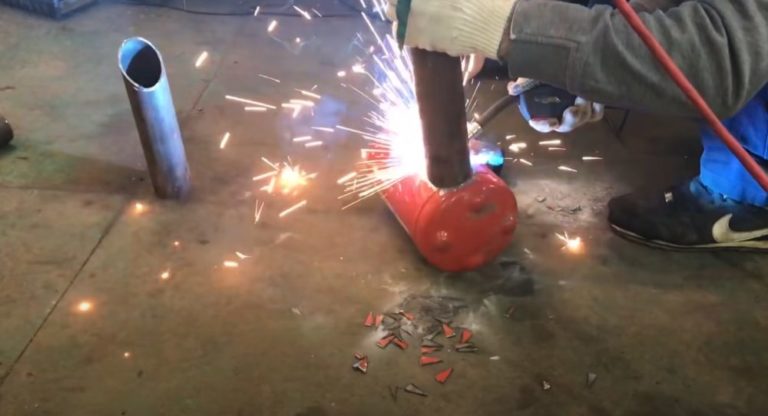
- Weld a straight section of pipe approximately 500 mm long to the bottom opening. This pipe will act as a channel for delivering fuel, which consists of a mixture of air and oil.
Weld the prepared chimney elbow to the upper opening on the cylinder body.
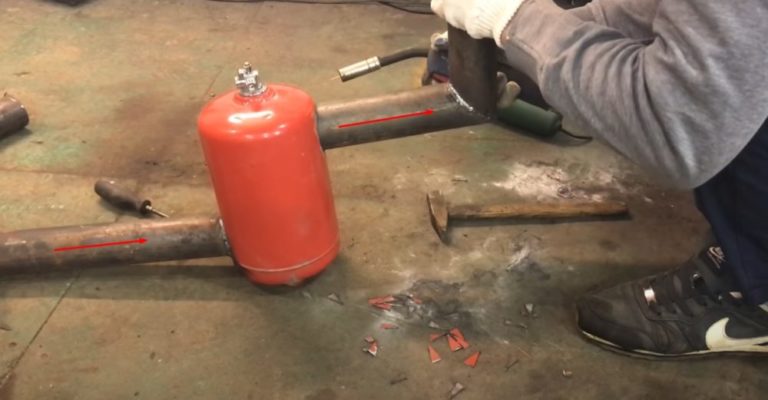
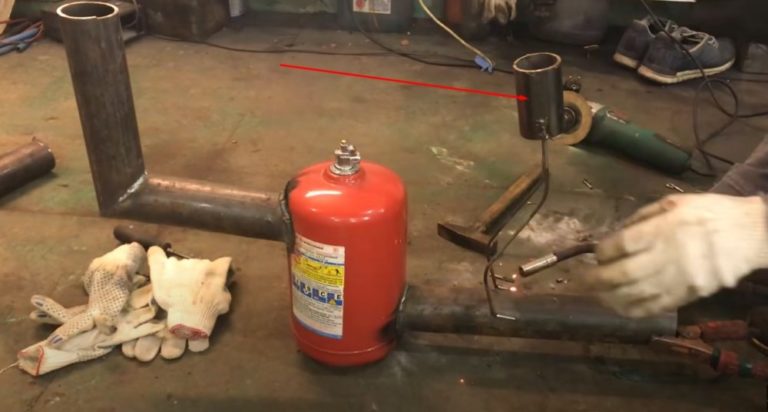
- Weld a fuel tank mount onto the straight downpipe, approximately halfway down. Make the assembly from a 40-50 mm long section of pipe and two rod legs.
- Drill a hole in the pipe between the fire extinguisher body and the fuel tank mount for the waste oil feed. The diameter should match the thickness of the copper pipe.
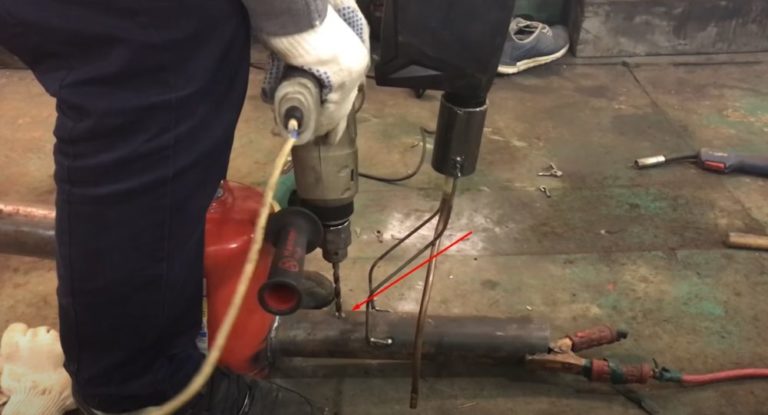
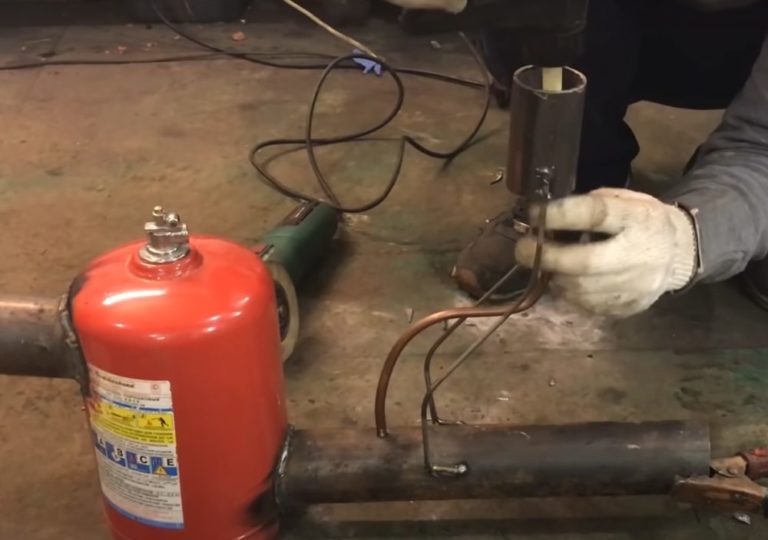
- Bend the copper tube in a zigzag pattern so that one end fits into the hole on the tube and the other end is located approximately in the center of the fuel tank mounting pipe.
Prepare a container for the waste oil. A small canister with a nipple cut into the lid will do. Connect the outlet of the canister to the copper pipe using a hose.
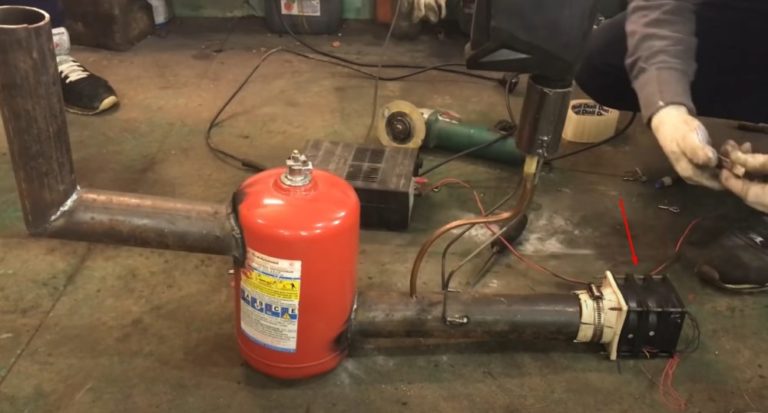
- To convert waste oil into fuel, compressed air must be supplied to the furnace's lower duct. Assemble your own fan from three computer coolers.
Secure the assembly with a clamp to the end of the pipe. Check the fan's operation and draw power by applying voltage to the motor through a step-down transformer.
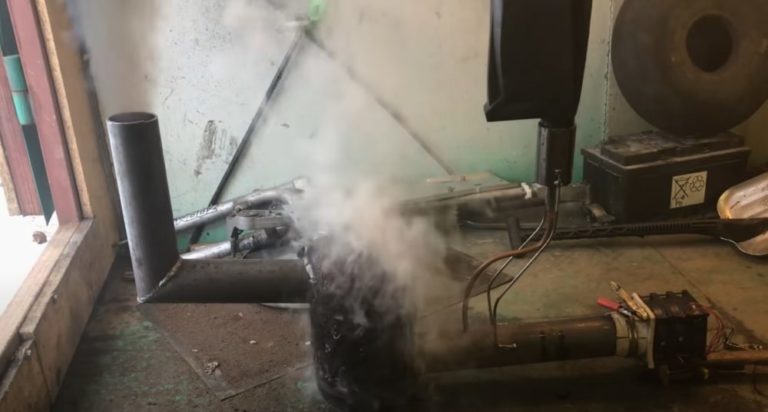
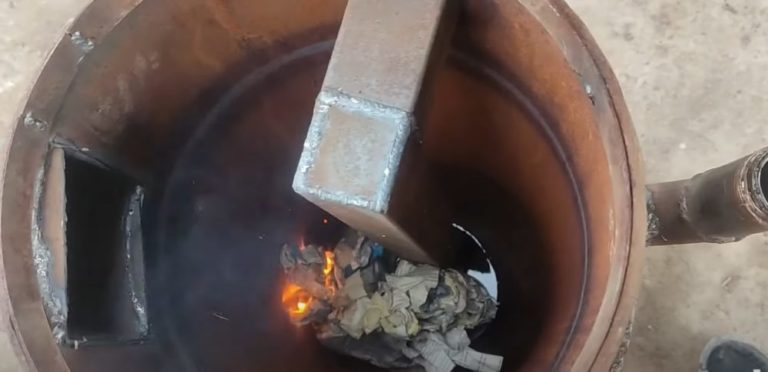
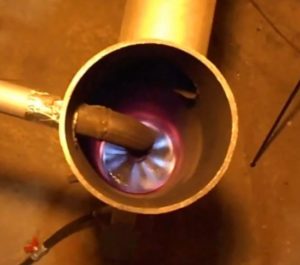
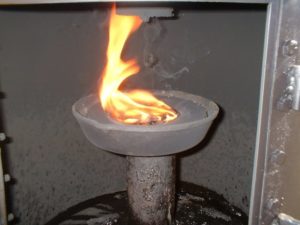
- Proceed with the fire test. Drop a lit rag into the neck of the fire extinguisher canister where the mechanism used to be.
For better combustion, soak a cloth in gasoline. Pour the used oil into the tank. The oil will flow by gravity through the copper tube.
In the steel pipe, the waste oil will mix with the forced-air flow. The fuel entering the cylinder will begin to burn.
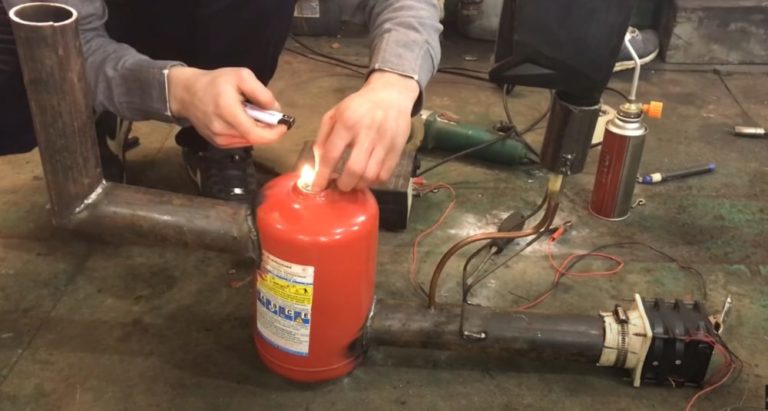
- Immediately after the fuel in the cylinder ignites, close the neck with the fire extinguisher's original mechanical unit to prevent flames from escaping from the firebox into the garage. For the first firing, take the stove outside or place it near an open door. Paint burning off the fire extinguisher body will create a lot of smoke.
- Scrape off any scorched paint from the can with a wire brush. Weld on legs from the corner for stability.

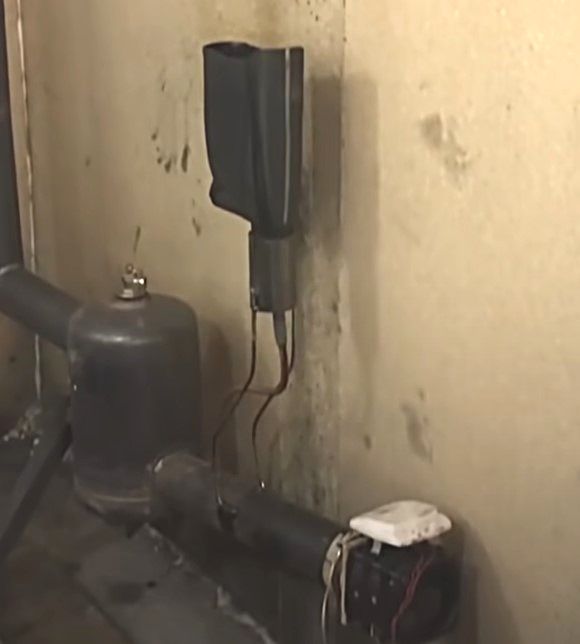
Install your homemade stove in a permanent location in the garage. Ensure fire safety. Remove flammable items. Create space between the stove and the walls.
Bring the chimney out through the ceiling by extending the pipe.
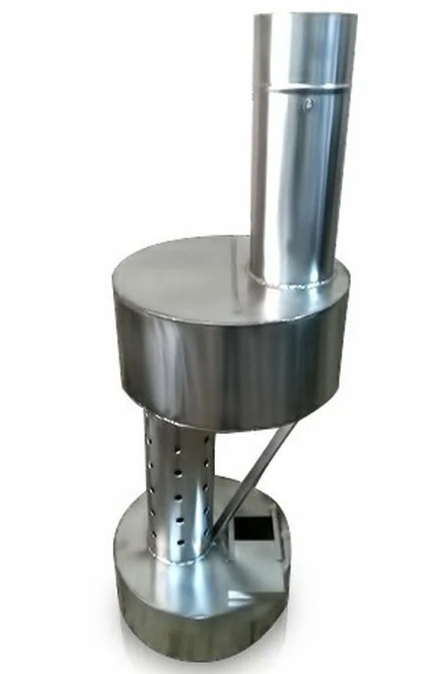
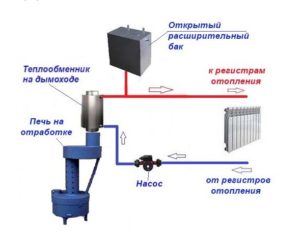
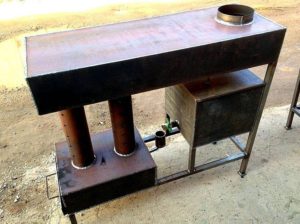
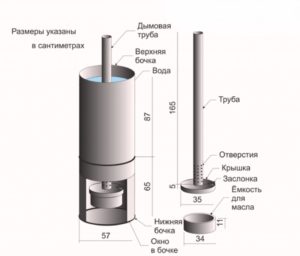
A waste oil stove made from a gas cylinder with a water jacket
A simple stove with a primitive design cannot be connected to a hot-water heating system. Burning waste produces a lot of soot. This is a drawback of even the simplest models.
If you want to build a reliable, smoke-free waste oil stove yourself, connected to a heating system, use a water jacket design. You'll need a gas cylinder, 3mm thick sheet steel, and a profile and round pipe.
Furnace assembly instructions:
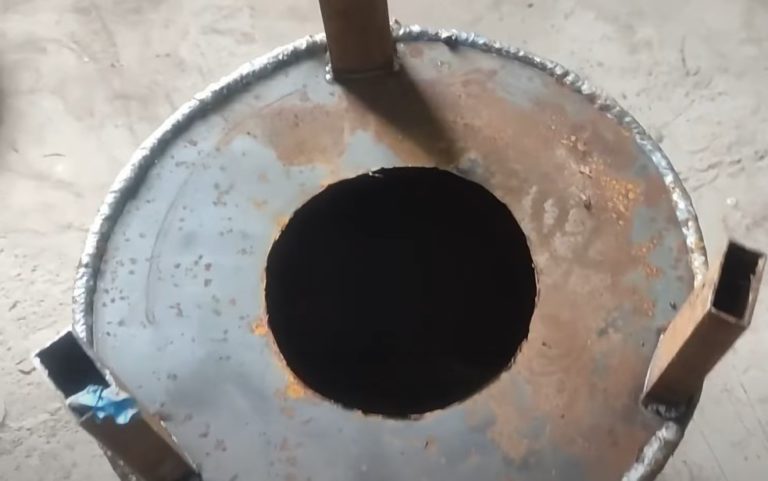
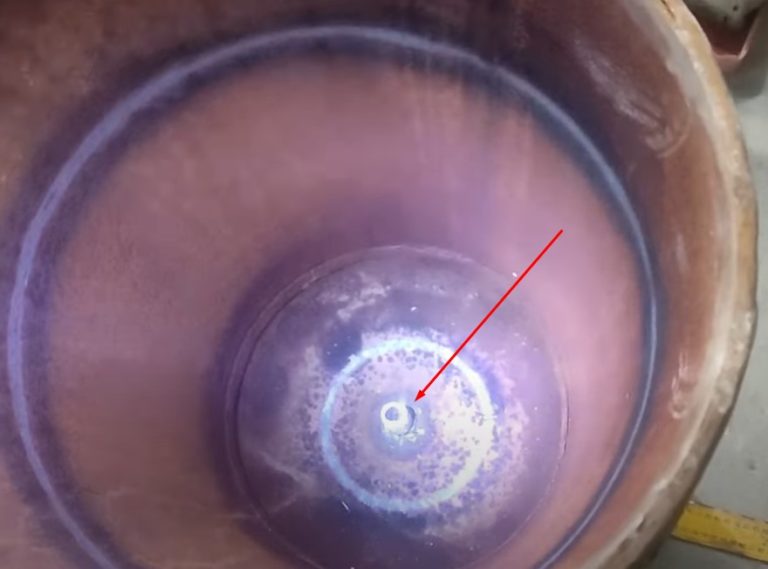
- Drain the condensate from a large gas cylinder and remove the valve. Light a large fire in a safe location. Place the empty cylinder, without the valve, on the fire to burn off any remaining gas condensate.
- Use a grinder to cut off the bottom of the cylinder. Make the cut along the perimeter of the factory weld at the bottom of the body.
- To make a water jacket from sheet steel, cut two rectangular sections. Bend the semicircles and weld them into a 530 mm high barrel.
The diameter of the structure should be 20 mm larger than the cylinder diameter. The gaps between the cylinder walls will act as a water jacket.
Weld a ring into the top of the barrel to create a 20mm wide edge for a tight fit with the walls of the gas cylinder.

- Weld the bottom of the barrel with a ring weld with a wide lip approximately 100 mm long. The opening left should be large enough for the convex top of the gas cylinder to exit.
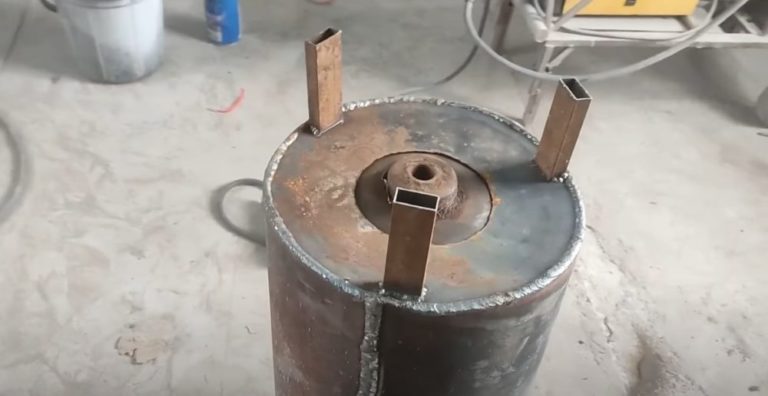
Weld 3 legs from the profile pipe along the edges.
- Place the gas cylinder vertically with the cut-off bottom facing down. Place the welded barrel on top, with the legs facing up.
Weld the top and bottom joints. This should create a sealed water jacket with the cylinder inside and the barrel outside.
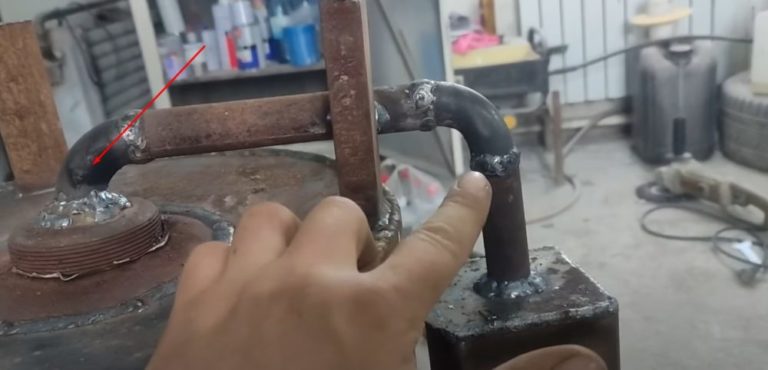
Weld a 15 mm diameter tube into the cylinder opening where the valve used to be, using elbows. Extend one end of the tube into the firebox to a height of 60 mm to prevent it from becoming clogged with scale.
Bring the other end of the tube to the side of the barrel, where you connect it to a metal waste container.
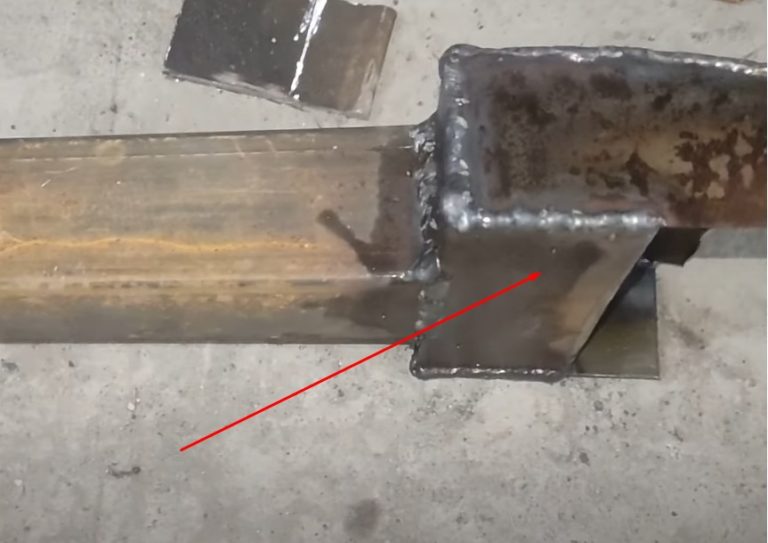
- Take two pieces of square pipe with a diameter of 50 mm, 600 and 300 mm long. Weld the pieces together at right angles.
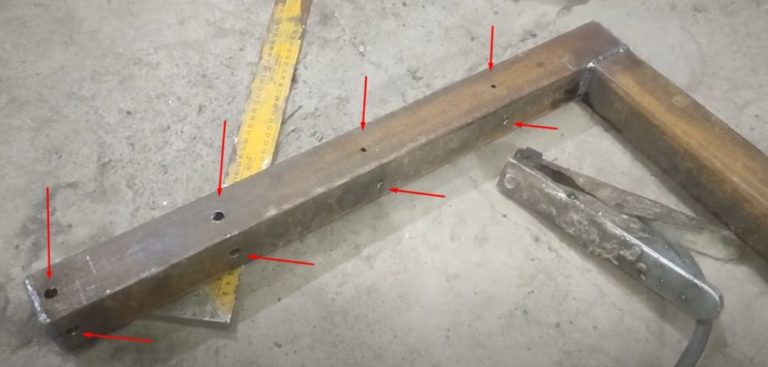
Weld the end of the 600 mm long pipe with a plug and drill two 6 mm diameter holes. Drill 150 mm holes in rows on all four side walls to supply air to the firebox.
Weld a fastener for the blower fan onto the end of a short 300 mm long pipe.
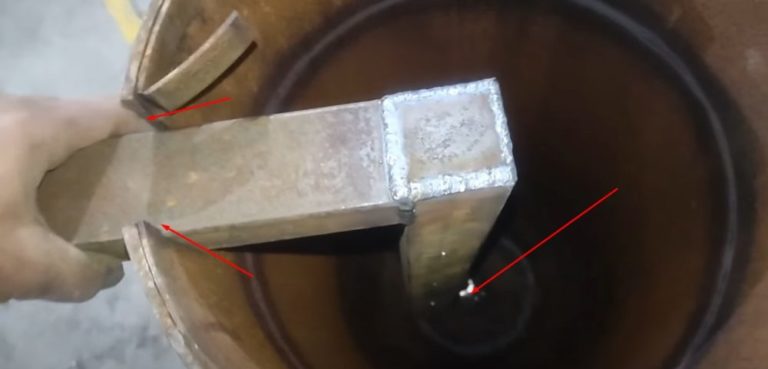
- Cut a slot for the air supply pipe at the bottom of the cylinder, which will be located at the top of the stove.
Insert the square elbow with the plug and holes. Slightly offset the end of the air supply pipe relative to the waste oil supply pipe.
Weld the square elbow that fits into the slot flush with the end of the cut cylinder.
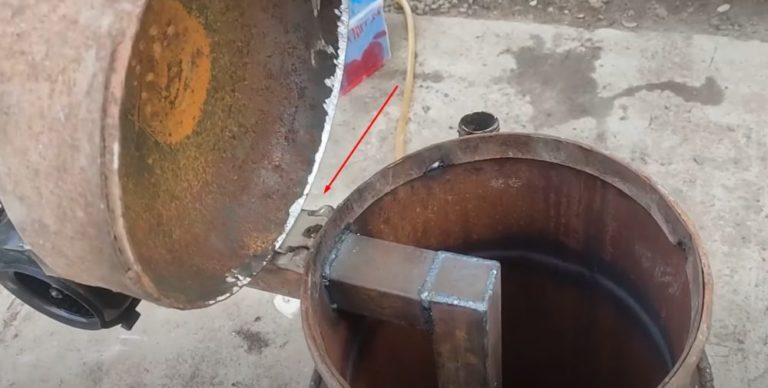
- Secure the cut-off cylinder bottom back into place with hinges. The resulting firebox lid should fit tightly to prevent soot buildup and air leaks.
- At the top of the barrel, weld an elbow into the water jacket for connection to the heating system's supply pipe. Weld the return pipe into the bottom of the water jacket.
- Assemble the stove for outdoor testing. Weld the flue pipe into the cylinder body at a convenient location above the water jacket. Install the blower fan. Temporarily plug the return line. Fill the water jacket with water. Check for leaks at the welds. Fill the water through the supply elbow, leaving it open during outdoor testing.

- To light the stove, pour waste oil into the tank. The oil will slowly begin to flow through the tube into the firebox. Add a few pieces of crumpled dry paper.
Light another sheet of paper separately and toss it onto the clumps that have already become soaked with waste oil. Wait until the fuel ignites. Close the firebox lid and turn on the air supply fan.
Burning waste oil in a homemade furnace will quickly heat the water in the water jacket. Since the furnace is not connected to the heating system during testing, the boiling coolant will spray out of the open supply pipe as boiling spray and steam.

Video instructions
Answers to frequently asked questions
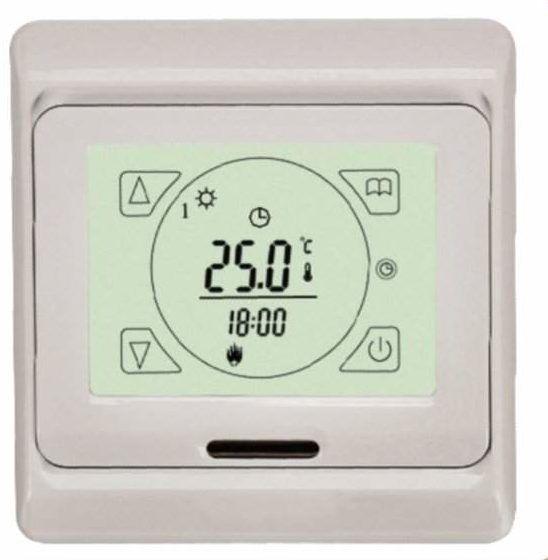
Fuel consumption depends on the quality of the waste oil, the furnace's power and design, and the size of the heated space. A homemade furnace with a minimum power of 20 kW burns approximately 2 liters of oil per hour. If the power is increased to the maximum of 30 kW, the consumption increases to 3 liters per hour. Factory-made furnaces have adjustable combustion modes, allowing you to vary the amount of oil burned.
A simple garage stove operates on the principle of an old kerosene lamp. Burning waste oil produces heat, but also a lot of smoke and soot. A properly designed stove operates through pyrolysis. When heated, the molecules of the waste oil break down into chemical elements. These elements are oxidized by the oxygen present. After cooling, the chemical components are converted into water vapor and nitrogen, which are safe for humans.
The minimum price for a standard oven without a water circuit is around 7,900 rubles. Models with a water circuit have a mid-price range, starting at 8,900 rubles. Stainless steel ovens with automatic controls and a power output greater than 20 watts are considered the most expensive, starting at 23,700 rubles.
For the first ignition, fill the fuel tank with 2/3 of the waste oil and add 20 grams of gasoline. Light the gasoline in the firebox near the oil inlet using a cloth or paper wick. Once the injector tube heats up, the fuel vapor will begin to evaporate, forming a steady flame. Average heating time is 10 minutes.
The optimal combustion temperature for waste oil without the formation of smoke and soot is 180°C.