As large household appliances wear out, owners often discard them and replace them with new ones. DIYers are reluctant to scrap old appliances without removing their working electric motors. Connecting a washing machine motor to various homemade devices can save significant money.
Using a washing machine motor, you can build a sharpener for sharpening tools, knives, various machines, circular saws, forage cutters, concrete mixers, and many other different devices and homemade appliances.
Before connecting a motor, you need to know what type it is and what it can do. This will determine how the motor is connected to the household electrical network.
After reading this article, you'll learn about the different types of washing machine electric motors, how to connect a washing machine motor to a 220-volt network, and whether it's an asynchronous, commutator, or inverter type. And most importantly, you'll learn how to connect it yourself.
Existing types of electric motors
Modern washing machines are typically equipped with single-phase electric motors with tachogenerators that regulate the speed. Soviet-era electric motors are now considered rare; they are distinguished by a two-speed mode. Motors installed in modern washing machines can be divided into three types:
- asynchronous;
- collector;
- inverter.
Asynchronous
In this type of motor, the rotor speed differs from the speed of the stator winding's magnetic field. This is the most common type of electric motor. Washing machines use asynchronous capacitor motors powered by a single-phase household electrical network.
The stator has two windings, one of which is connected directly to the network, and the second winding is connected to the starting capacitor, forming a starting rotating magnetic field.
The advantage of asynchronous motors is their simple design and low maintenance. With proper maintenance, these wear-resistant electric motors can last for decades.
TO disadvantages of asynchronous motors One should note the sensitivity to fluctuations in the frequency of the mains current and the impossibility of changing the shaft rotation speed during operation, however, this does not prevent them from being used in various homemade devices.
Collector
Many washing machines today are equipped with commutator motors. Their distinctive feature is the presence of two brushes. The brushes are attached to the rotor's commutator, supplying it with electrical energy, which causes the rotor to rotate in the magnetic field of the stator winding. Commutator power units operate using a belt drive.
The advantages include the presence of a pulley on the motor shaft, which makes it easier for DIYers to create belt-driven devices, and the ability to operate on DC current. These motors are typically small in size and controlled by a simple circuit.
The disadvantage can be considered Rapid belt wear and the tendency of the brushes to fail at the most unexpected moment. Still, these can be considered minor issues compared to the benefits.
Inverter
The first inverter motor was installed in a washing machine by LG in 2005. Since then, inverter motors have become widely used in household washing machines by leading manufacturers. Unlike their counterparts, the inverter motor is attached directly to the machine drum and does not require a belt drive or bearings.
The advantages of a direct-drive inverter include its simple design, compact size, the ability to assign various operating modes, low noise, and high efficiency due to the absence of friction loads from the belt drive.
A disadvantage is the impracticality of repair if the electric motor fails. The cost of repair can exceed the cost of the motor itself. Another drawback is the inability to use them in various homemade machines and mechanical devices due to the design features of inverters.
How to connect a washing machine's electric motor to a 220-volt network
Before planning a washing machine motor connection, you need to determine its type. Then, determine which parts of the motor the wires are connected to. If the terminal block is still in place, this can be easily determined by testing the contacts with a multimeter.
Look how connect the dishwasher to the sewer and water supply.
It's important to properly design the 220-volt power supply connection diagram to fully utilize the electric motor's capabilities in the new device. If the motor is needed for a constant-speed spindle drive, a capacitor is not required. Otherwise, the complex power supply connection must be maintained to ensure the speed controller functions. Below, we'll discuss connection methods for asynchronous, commutator, and inverter motors removed from washing machines.
Connecting an asynchronous motor
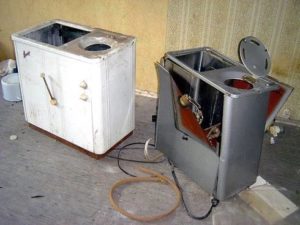
Old Soviet-era washing machines had asynchronous electric motors installed in the washing tub, and commutator motors powered the centrifuges used to spin the laundry. If you're sure the power units were removed from such a machine, it becomes clear what type each one is.
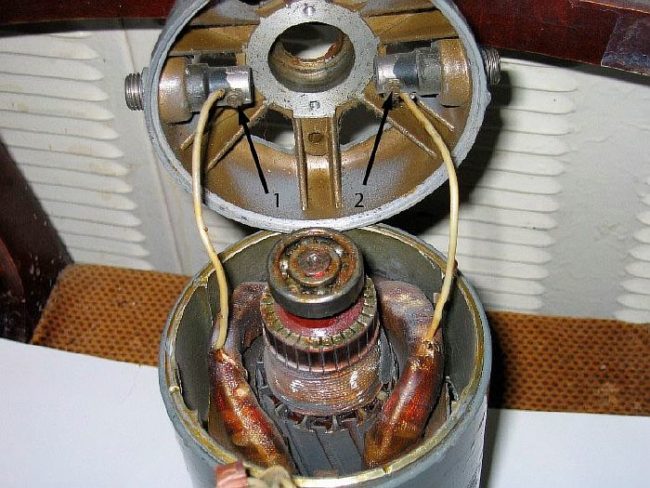
An asynchronous motor has two windings, one of which starts the motor, while the other maintains the motor spindle rotation. Their terminals can be found on the transfer case. To determine which pair of terminals corresponds to which winding, use a tester (multimeter). First, test all the wires one by one.
As a result, two pairs of terminals of both windings are identified. The higher resistance of one of the pairs indicates that it belongs to the starting winding, while the lower resistance will belong to the secondary working winding.
To operate the motor, simply connecting the operating winding will be sufficient. However, starting the motor immediately becomes a problem. The spindle will need to be manually spun each time. However, this is far from safe and cumbersome, especially under heavy loads on the motor shaft.
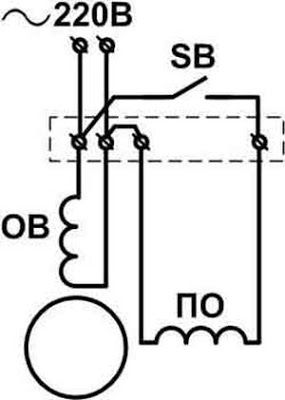
Therefore, a starting winding and a capacitor will have to be used. To illustrate how an asynchronous electric motor should be connected, a universal circuit diagram is shown below, where ОВ is the excitation (working) winding, ПО is the starting winding, and SB is the contactor (a small non-polar capacitor of 2–4 μF can be used instead).
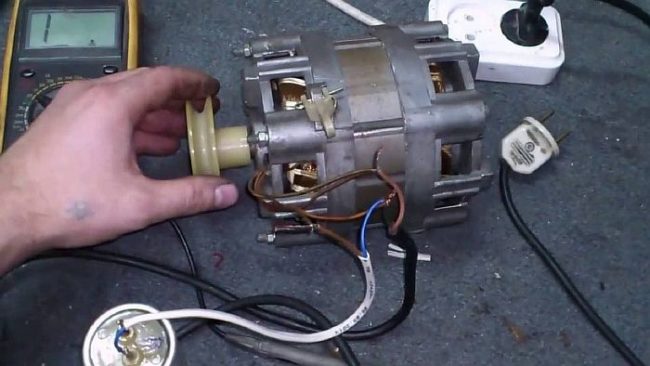
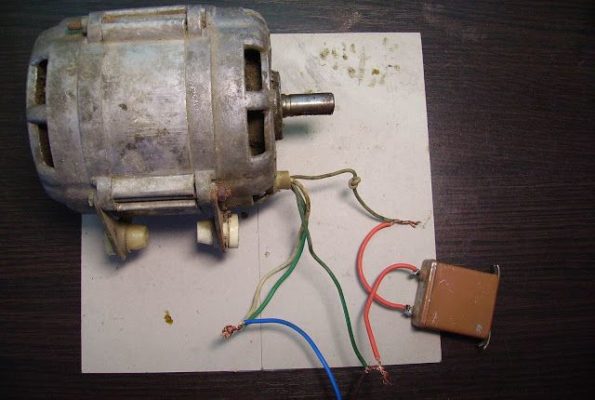
You can use the old capacitor that was removed with the motor. Connect it to one of the software terminals. The photo below shows the motor being pre-connected to test its functionality.
When first starting the motor, try turning it on without the starting winding. If the motor starts turning the spindle and the load is light, you can do without the starting device. Otherwise, the software in the circuit will be essential.
Since the motor from an old washing machine is itself an old power unit, the motor may overheat during initial startup. This can be caused by worn bearings or an oversized capacitor.
This is easy to check. If operating with the capacitor disconnected doesn't cause the motor to overheat, then the capacitor should be replaced with one with a smaller capacity. If a worn bearing is the cause, the question arises whether it should be replaced or repaired.
You can do without the capacitor. Instead, connect a non-latching contactor to one of the software terminals. A simple doorbell button is most often used for this purpose.
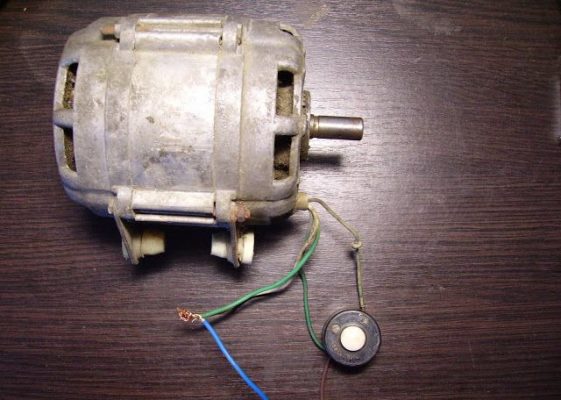
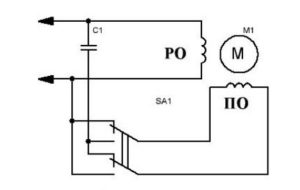
At startup, the button is pressed and held until the spindle starts spinning. After this, the button is released, which disables the software. If the rotor's direction of rotation needs to be changed, the starting winding terminals are reversed. The diagram below shows how to reverse an asynchronous motor.
If, for example, the starting winding is not used, the direction of rotation of the rotor can be changed by pushing it with your hand.
How to connect a brushed motor
These motors were installed in top-loading washing machines. Commutator motors do not require forced starting, so they do not have a starting winding.
You can determine whether an electric motor belongs to this type by looking at the terminal box. Typically, it contains 5 to 8 terminals. Most of these are used to control washing modes and will not be needed later. Commutator motors also have brushes, the mounting holes for which are visible on the motor housing.
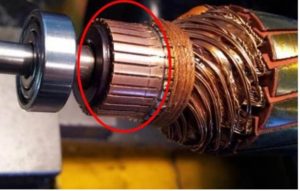
If you disassemble the motor, you'll see the armature (rotor) with a winding made of steel frames, the ends of which are connected to form a commutator ring. The commutator, in contact with energized graphite brushes, excites the winding. The electromagnetic field of the stator generates an electromotive force (EMF) in the armature, causing it to rotate.
To understand the structure of a collector electric motor, it is necessary to consider the standard diagram of the arrangement of all parts of the collector motor.

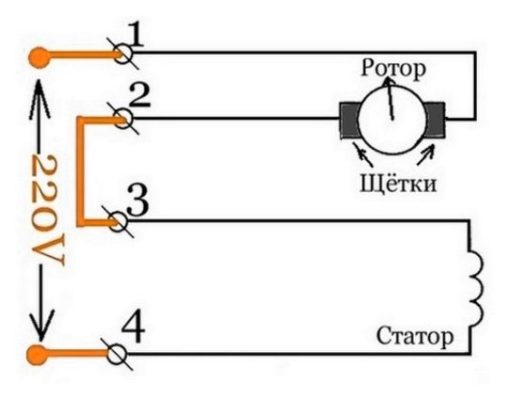
An engine of this type is connected in the following manner:
- It is necessary to find one of the stator winding terminals and connect it directly to the phase wire of the electrical network;
- The second terminal of the stator winding will be connected to one of the rotor brushes;
- At the same time, the other brush is connected to the neutral wire of the electrical network;
- To ensure correct switching on/off, a household light switch is soldered into the circuit of branch 1 or 2 (see diagram below).
To change the direction of rotation of the electric motor spindle, simply change the connection points of the brushes.
For this purpose, you can assemble a simple circuit with a single pass-through switch. Since the motor starts with a jerk, its housing should be firmly secured to a tabletop, workbench, or other surface. For this purpose, use the mounting holes in the motor housing castings.
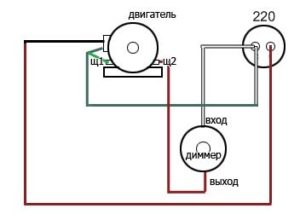
DIYers often install motors with a spindle speed controller in their projects. To control the speed, a dimmer is soldered into the power supply between the outlet and one of the commutator brushes. This is a common household light dimmer. The dimmer must be slightly more powerful than the electric motor.
Before starting the collector motor from an old washing machine, you need to disassemble it and check the condition of the two rotor support bearings, replace worn brushes, and clean the copper surface of the collector with zero-grit sandpaper.
Connecting an inverter motor
Engines of this type are new-generation electric motors. Therefore, the power units cannot be significantly worn out, and therefore all their components are fully suitable for further use.
Unlike asynchronous and commutator motors, which use belt drives, direct-acting inverter motors do not require one. They are mounted directly on the washing machine drum shaft, eliminating the need for transmission elements such as V-belts, rollers, and pulleys.
In an inverter, the drum, bearings, and rotor are mounted on a common shaft, eliminating the need for friction between the motor parts. A distinctive feature is the use of electromagnetic induction to convert AC to DC current.
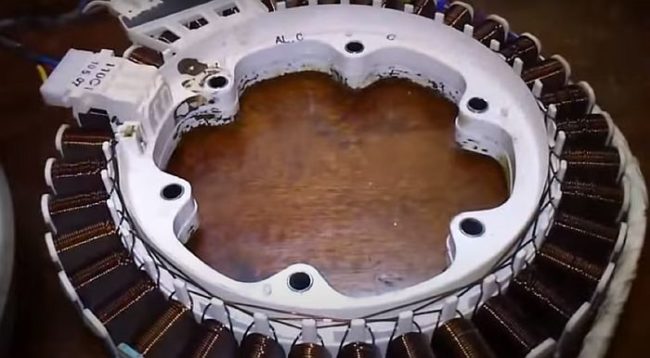
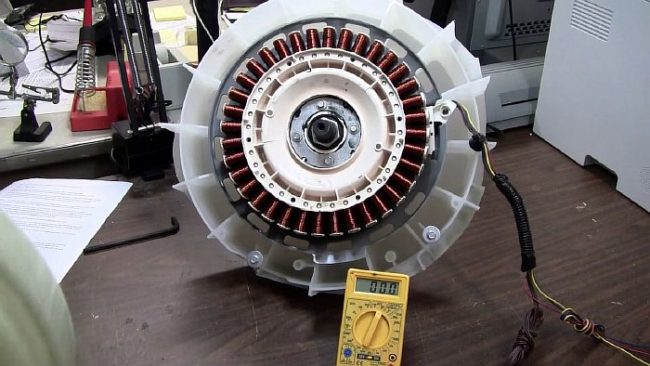
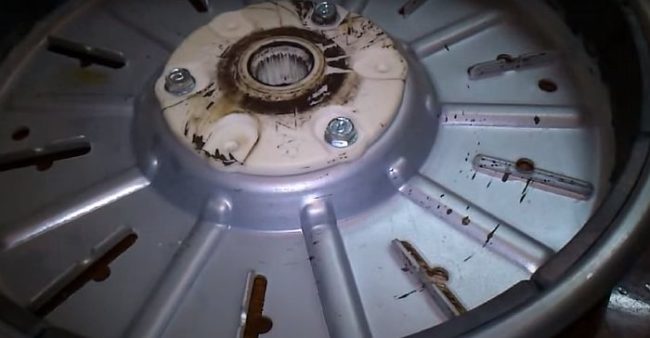
The inverter motor consists of two main parts: the stator, which is attached directly to the washing machine's drum, and the rotating disk. The rotating disk has 36 coils located around the stator's rim, along with connectors with wires leading to the machine's control unit.
A movable flywheel disc is mounted on it. Twelve magnets are glued to the inside of its housing. The flywheel's plastic insert fits onto the drum shaft. The photo shows perforated holes with flanges that provide effective ventilation and cooling for the motor during operation.
The operating principle of the inverter is that a moving electromagnetic field is excited in the coils, which, through the magnets, causes an EMF, causing the rotor to rotate together with the drum.
Only qualified professionals or home DIYers with extensive knowledge of electronics should properly connect an inverter motor. This type of motor can be used, for example, as a butter separator, a concrete mixer, or even a lawn mower.
To learn how to turn on and start the inverter for the first time, as well as adjust the reverse and the number of revolutions of the inverter, we recommend using the following link to watch the corresponding video.