Building a country toilet yourself does not require significant construction experience or professional equipment.
Before starting the procedure, it is recommended that you carefully study all the information provided about the design and installation of the toilet, as well as understand the drawings and diagrams of the future structure.
This article will help you choose the right material for your toilet, learn about the key differences between septic and non-septic systems, and provide complete instructions for building a country toilet.
- Sanitary and hygienic standards for a country toilet
- Choosing a location for the toilet
- Selection of material
- Choosing a toilet house for your dacha
- Cabin drawings with dimensions
- Building a Wooden Pit Toilet – Step-by-Step Instructions
- Digging a pit for a hole
- We are building a toilet frame
- Assembling the frame
- Sheathing and roof construction
- We install doors
- Making a toilet seat
- Exhaust ventilation
- Wooden toilet without a pit
- Pros and cons of a cesspool
Sanitary and hygienic standards for a country toilet
Before beginning installation work on a DIY toilet at your dacha, you should carefully review the regulations governing the construction process. There are certain requirements that must be followed:
- Check that the toilet doesn't disturb the neighbors. Otherwise, they have the right to complain to the appropriate authorities, and there's a risk that the structure will need to be relocated;
- Select a location, taking into account all regulations and site standards. Failure to do so will result in serious environmental degradation in the area, contamination of the soil, nearby bodies of water, and water sources. The site owner will be subject to fines, and health risks may also arise due to environmental pollution.
- When designing, it is necessary to take into account the issue of waste removal from the cesspool;
- When selecting a suitable design, it's important to consider the site's characteristics, particularly the water table. If groundwater is close to the surface, a completely sealed system is required.
Following these requirements will help prevent various operational problems in the future.

Choosing a location for the toilet
The main factor to consider when choosing a location is the type of structure used. It's especially important to consider whether a waste collection pit is included, as well as whether the storage container will be completely sealed.
To build a toilet in your dacha yourself, it's important to know a few things about finding the right location:
- The groundwater depth of the land plot must be taken into account. If the groundwater level is greater than 2.5-3 meters, then a cesspool cannot be constructed. In such a situation, a powder closet is typically installed. This type involves treating toilet waste with a special powder solution;
- It's important to consider the convenience of neighbors and residents of the house. In most cases, a toilet in a summer house is built away from other structures;
- It is imperative to take sanitary and hygienic standards into account. For example, installation should not be carried out closer than 12 meters from a house, 20 meters from drinking wells and other water sources, and 1.5 meters from a fence dividing property lines.
- When constructing a toilet with a cesspool, it is important to immediately provide access for special sewage disposal equipment;
- It's advisable to consider the local landscape. When used at the lowest point of the site, the structure will be subject to flooding in the spring and fall. If a wooden country outhouse is built at the highest point, the person using the structure will be bothered by constant winds and drafts.
Selection of material
Another important consideration is determining the material to be used for the exterior, as well as the type of stall itself. A DIY summer cottage toilet can be made from:
- Metal profile. The base is made of wood or metal profile pipes welded together. The base is then covered with metal sheets. This material is also coated with a special compound that protects the outdoor toilet from the negative effects of high humidity. The main advantage of using corrugated sheets is the ability to quickly construct them.
- Brick. These toilets can be used for a long time, but require labor-intensive and expensive installation. The structure is heavy and can only be installed on a foundation, so a strip or columnar foundation will be required.
- Wood planks are the most common option for a country house toilet. Their main advantages include availability and low cost, the ability to create a variety of designs, and portability. Their only drawback is their susceptibility to moisture, but today there are many ways to minimize this. For example, the lifespan can be significantly extended by priming and painting. If the owner doesn't want to spoil the natural look of the wood, there are numerous transparent moisture-repellent finishes available.
Choosing a toilet house for your dacha
The next step is choosing the desired cabin shape. The main types include:
- The "Birdhouse" has a pitched roof and is simple in design and cost-effective. It's ideal if the toilet is used only in the summer;
- "Izbushka" (hut) has a more complex structure. It retains heat even in winter, but requires more materials;
- "Hut" - is distinguished by its protection from the winds and has a roof with two slopes;
- "House" - this variety is highly durable and can retain heat.
There are also complex cabins with a second shower compartment or additional space for other needs. Separately, there are composting toilets of electric or chemical types, as well as those that process waste using peat.
Composting toilets are built when it is impossible to install a waste pit or septic tank. The most suitable option in terms of affordability and practicality is a wooden toilet with a cesspool and a "Birdhouse"-type cabin.
Cabin drawings with dimensions
To ensure proper installation, it's important to find and study the correct drawings with the dimensions of the future outhouse. The simplest type is the "Birdhouse" outhouse, which can be erected even by a complete construction novice. We'll explain the installation process using this type as an example.

The following elements are numbered in the drawing above:
- Binding (for connecting several components).
- Rack.
- Door.
- Door handle.
- Door crossbar.
- Front wall.
- Roof truss system.
- Roof covering.
- Ventilation.
- Deflector.
- Side wall.
- The top cover that covers the cesspool.
- Support system (usually made of brick).
- Back wall.
If the person building the toilet at the dacha is experienced enough and has engineering knowledge, they can create their own plans for the toilet. Otherwise, it's better for the builder to use ready-made designs.
Building a Wooden Pit Toilet – Step-by-Step Instructions
Once the owner of a summer cottage has chosen a suitable location that meets all requirements and regulations, and has selected the desired cabin shape, they can begin building the summer cottage toilet. This process involves several stages, but first, they need to gather all the necessary materials.
To build a toilet we will need the following tools and materials:
- 2 square meters of roofing felt (for roofing and waterproofing);
- sand;
- cement block (4 pieces) or concrete curb (2 pieces, 2 meters long);
- 40 pieces of lining;
- electric jigsaw;
- door with necessary components;
- 4 pcs. edged boards;
- galvanized metal profile;
- wooden beam;
- nails, screws and other fastening elements;
- building level;
- varnish or paint for finishing.
For additional insulation of the toilet, foam may be needed. Also, the list does not include materials for attractive interior lining.
Digging a pit for a hole
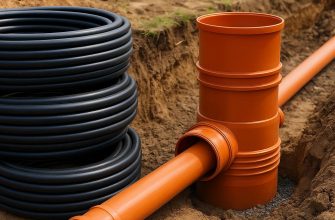
The depth of a cesspool should be at least 2 meters. It can be constructed from a variety of materials. The most popular are:
- plastic;
- brick;
- concrete rings;
- monolithic concrete.
 Each type has its own characteristics, advantages, and disadvantages. One of the most common options is a brick pit. It can last for a long time and is resistant to adverse environmental influences. Red brick is most often used for this purpose; silicate brick is best avoided.
What to install a country toilet on: the cesspool depth must be at least 2 meters. The most popular materials for constructing the cesspool are: brick, plastic, concrete rings, and monolithic concrete.
Instructions on how to make a brick pit for a country outhouse yourself:
- A square or rectangular hole is dug using specialized equipment or by hand. When planning the dimensions, it's important to consider not only the width of the walls but also the additional space between them and the pit. This gap will be needed for additional waterproofing.
- A layer of sand (150 mm thick) is poured and firmly compacted.
- The bottom is laid with bricks, and a reinforcing mesh is placed on top (it can be made by hand by fastening several reinforcing rods together with wire).
- Crushed stone is poured and a concrete screed is made (width 150 mm).
- To build the walls around the perimeter, a small foundation is made of cement and reinforcement.
- After 10 days, when the concrete has completely hardened, the brick walls are laid.
- On both sides of the walls, all joints must be treated with a special sealant and plastered.
- All this is covered with a concrete slab with a special hole for the hatch.
See the article where it is described A step-by-step algorithm for constructing cesspools different modifications.
We are building a toilet frame
 The next step in building a DIY country outhouse is installing a concrete curb. It's installed no more than 20 cm from the edge of the septic tank. To do this, dig 40-centimeter holes in the corners and line the bottom with crushed stone and sand.
The curb will then need to be dug in; the base should be approximately 15 cm above the surface, no more. Sometimes, cement blocks are used to create a cap, placed at the corners.
When installing the foundation, it's important to ensure the elements are level; this is easiest to do with a spirit level. Then, roofing felt should be laid on the created floor. This should be done in 3-5 layers to ensure maximum waterproofing.
Assembling the frame
It is worth noting that before assembly, wooden elements should be treated with a special compound that will prevent the material from rotting and significantly increase its service life.
 Step-by-step construction of a country toilet frame:
- We build a rectangular base from timber. The joints can be either butt-jointed or half-jointed. Be sure to reinforce the corners with screws.
- We install vertical elements at the corners. They are also reinforced with screws or diagonals.
- We build the base for the roof, for this the upper part of the vertical posts is tied together.
- The front part of the country toilet is equipped with a door frame: 2 posts and a crossbar are mounted on top.
- Let's create a window frame that will be located in the side or rear wall of the toilet. To do this, attach two crossbars and install two posts between them. Keep in mind that the distance between the vertical elements will determine the window width, and the distance between the crossbars will determine the height.

Sheathing and roof construction
The cladding is mainly done using boards or clapboards, which gives the building a more aesthetic appearance.
The lining can be positioned vertically or horizontally, depending on the preference and convenience of the owner of the summer cottage, who is constructing the wooden toilet himself.
The elements are attached to the frame base with nails, screws or other fasteners.
The flooring is made of thick planks of wood, which is characterized by increased durability. The permissible thickness should be minimum 4 cm.
Once the sheathing is complete, you can begin to equip the roof:
- A sheathing of wooden boards or slats is placed on the top frame created in the previous step. If flexible shingles were used, sheets of plywood, which has increased moisture resistance, must be attached instead of sheathing.
- A special waterproofing film is installed on the lathing and secured with slats or nails.
- The roof is being laid.
Roofing materials can vary depending on budget and desired properties. Ceramic tiles are used in most cases.
It can last for 75-100 years and is resistant to adverse environmental influences. Another advantage of ceramic tiles is their ease of installation and removal, as well as a wide variety of colors and shades.
We install doors
The door size is determined based on the wooden toilet drawings during the design stage. Once the frame is installed and assembled, the door unit can be installed.
The procedure is quite simple. First, a rectangular frame is made from timber based on the dimensions of the door frame. Then, the door is covered with paneling or boards. The process is essentially the same as covering a frame. The door is then mounted on hinges.
Sometimes owners want a small window in the door to allow sunlight into the room. This should be done before installing the door.
Quite often, this window is additionally glazed. This requires ordering or cutting glass to the required size, then installing it in the door and securing it with slats (narrow glazing beads) located on both sides of the window.
Making a toilet seat
The final, mandatory step in the step-by-step construction of a country outhouse is constructing the toilet seat. This procedure is fairly quick and requires no professional construction tools or equipment other than a jigsaw.
 How to make a toilet seat for a country house toilet:
- To construct the frame, two crossbars must be placed on the left and right sides. The length from the floor covering to the horizontal members equals the height of the future toilet seat.
- The posts are attached at the bottom to the base and at the top to the crossbars installed in the previous step.
- In the upper plane, the posts must be connected with a crossbar, which must be located at a right angle to the horizontal side posts.
- The constructed frame is covered with boards.
- A toilet board is placed in the center of the top surface, and the dimensions of the toilet should be marked with a pencil.
- A small hole is drilled, large enough to accommodate a jigsaw. Then, using the traced marks, a full-size hole is created using a jigsaw.
- The toilet board is secured with screws or nails.
We suggest you read the article as How to make a toilet seat for an outdoor toilet or what types of ready-made toilet models are available select and install them.
After completing all work, it is recommended to cover the toilet with varnish or paint.
Exhaust ventilation
The final step to ensuring maximum comfort in your self-built toilet is installing a ventilation system. This is essential to prevent the stench from toilet waste from spreading throughout the entire area.
Interesting: how to make it effective ventilation in the country toilet — device, installation instructions.
There are two types of ventilation: natural and forced. Natural ventilation depends on the direction of air flow, internal and external pressure, and the location of the cabin.
This type of ventilation is provided by an unglazed window with a small overhang to prevent leaves and other debris from entering. A forced-air system requires the installation of a specialized system. Some of these systems operate on electrical power, so a power supply should be planned in advance.

In most cases, cottage owners building a wooden outhouse themselves include ventilation. Installing it is a fairly simple process: place one end of the pipe inside the outbuilding, and the other outside, positioned a meter above the roof of the outbuilding.
Wooden toilet without a pit
Building a cesspool yourself is the simplest and most effective way to implement a sewer system. However, this is impossible if the following conditions are met:
- shale or limestone type soil;
- The water level in the ground is more than 3 meters;
- A large number of people visit the dacha, therefore a significant load is planned.
In such a situation, the only solution is to build an outdoor outhouse without a pit. The following varieties of this type exist:
- powder closet;
- lavatory closet;
- bio-toilet.
A powder closet is usually installed when groundwater levels are high. Typically, the tank is located under the toilet and has a small capacity (up to 18-20 liters).
The basic principle of operation is that the wastewater is coated with a powdery substance (usually peat-based), which prevents the formation and spread of unpleasant odors. After this treatment, the wastewater is transferred to compost.
The main advantage of this type of outdoor toilet without a cesspool is the simplicity of the structure and low construction costs.

- Viewing window.
- Toilet seat cover.
- Toilet seat
- Storage tank.
- Entrance door
- Underlayment for support joists
- Cesspool
- Ventilation window
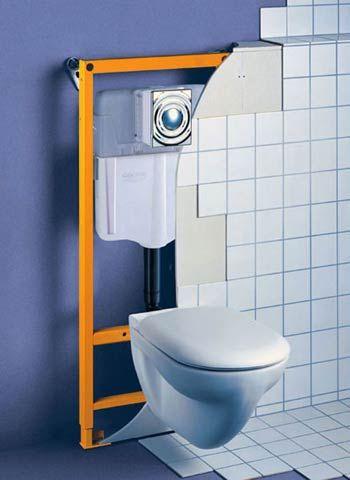
A flush toilet features a completely sealed container that holds waste and wastewater. Wastewater from such a toilet does not leak into the soil, and therefore cannot pollute the environment.
Periodic cleaning will be required, using specialized sewage disposal equipment. The design of a vent closet allows the main holding tank to be located some distance from the upper stall, which is why such toilets are often installed indoors.
A disadvantage is that the structure cannot be used in winter, as the wastewater freezes and is difficult to pump out. The solution is to install a special heating system.
Bio-toilets are quite common in summer cottages. They operate on a similar principle to powder closets, and waste is also treated with peat. In some cases, biological preparations containing microorganisms that accelerate waste processing, or chemical agents, are used.
When using a chemical toilet, it is important to use only safe products.
Pros and cons of a cesspool
The benefits of building a pit toilet yourself:
- The ability to create a filtration system that can independently remove waste and sewage. This eliminates the need for regular septic tanker calls and access to the pit;
- You can use such a toilet all year round.
Flaws:
- more time is required to construct and equip the drain;
- installation and creation of a toilet pit is more expensive;
- Possible soil contamination due to high groundwater levels.
The advantages of a self-built country toilet without a cesspool:
- mobility, which allows the structure to be moved without any problems, as well as the tank to be placed at some distance from the cabin;
- the possibility of construction in areas where groundwater is close to the surface;
- easy installation;
- less stringent requirements for location on the site, in particular, for distances to water sources, since the sealed system does not lead to environmental pollution;
- If necessary, the structure can be easily dismantled or completely removed.
Disadvantages of such toilets:
- The risk of stench. This doesn't apply to all types of toilets (if the toilet is recycled using peat, this problem doesn't arise). The unpleasant odor quickly develops due to the small volume of the waste and sewage storage tank. The solution is to install a forced ventilation system.
- The need for regular emptying of the tank. This is accomplished by using a sewage disposal vehicle or by ensuring complete processing and transfer of waste to compost;
- impossibility of use in winter.
First, it's advisable to decide on the material and type of stall, then design the sewer system. This will ensure high-quality construction, resulting in a toilet that will last for decades.
Yes, indeed. Everything said above is true.
You missed the most important thing.
Please tell us more..
This is a truly detailed guide. Many thanks to the author. Everything was clear to me. I've been interested in this topic for a long time. And here everything is laid out step by step, with pictures and detailed descriptions. Keep up the good work.
Thank you) Visit more often, a lot of interesting material is published on the site every day