A cesspool is the simplest, stand-alone method of waste disposal and collection in the absence of a central sewer system. It can be a simple bottomless pit or a waterproof structure. Its volume and other parameters depend on the amount of sewage discharge.
A cesspool for a private home can be built by hand using a variety of materials. Each material has its own characteristics, advantages, and disadvantages, which it's advisable to familiarize yourself with beforehand. For example, a brick cesspool requires bricklaying skills.
Cesspools made from tires or concrete rings are the most common options today. Read on for more information on how to install these structures.
Before installation, it's also important to conduct a high-quality design. Specifically, select a suitable location for the structure, calculate the required capacity of the cesspool, and adhere to SNiP (Building Code) standards.
Design and types of drainage pits
A cesspool for a country house is considered a relatively simple method of wastewater disposal. In most cases, they are installed in summer cottages where no one lives permanently, so there is no need to install complex septic tanks or connect to a centralized sewer system.
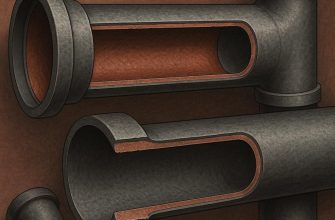
Installing a cesspool in a private home isn't particularly difficult. This structure consists of the following components:
- dug pit;
- a special container that will contain waste liquids;
- pipeline;
- a system of fasteners and anchors to prevent the container from floating;
- wastewater filters;
- sealants and other mounting compounds.
The advantage of a homemade cesspool for a private home is cost savings and the ability to choose the type of device depending on the site's characteristics (soil, proximity to groundwater, etc.).

The choice of construction method also depends on the frequency of use, the required service life, and financial capabilities. To make the right choice, it is recommended to thoroughly research the options available on the market and create a list of the features of your own sewer system.
If the wrong type of cesspool is chosen or if there are errors in the installation, the property owner will likely encounter several unpleasant consequences. These include waste leaking into the environment (degrading the local environment), damage to property, the development of unpleasant odors, etc.
Types of cesspools and septic tanks
Structures are classified according to the material used for their construction:
- car tires of various diameters;
- wood (this includes chipboard, plywood, boards, fiberboard, etc.);
- brick;
- concrete rings and slabs;
- plastic, metal-plastic, MDF, plastic.
The above materials are affordable and easy to find. It's worth noting that high-quality used products, rather than new ones, are acceptable. Models are also categorized by period of use:
- all seasonal;
- summer models.
 According to the operating principle, structures are divided into sealed and filtration. In the first case, regular waste disposal will be required., because the wastewater is not processed, but simply accumulates.
In the second case waste liquids are processed through the proliferation of bacteriaWaste is not only treated but also released into the soil, eliminating the need for constant pumping. Calls to a sewage disposal truck will be required rarely, and only to remove inorganic waste.
The main disadvantage of filtration cesspools is their low environmental friendlinessPoorly treated wastewater entering the ground can directly contribute to the pollution of nearby reservoirs, wells, etc. However, if such facilities are located remotely from the site, the best solution is to construct a filtration structure.
The advantage of sealed pits is that there are no strict requirements for the system's location. However, the main disadvantage is the need for regular wastewater pumping. If a house has about five residents, the pit will need to be pumped out every one to two weeks.
Design principles
Some homeowners believe that design is not worth the time and resources, as it's possible to install a cesspool themselves without any assistance. This is a common misconception. This stage is just as important as the actual installation.

Before installation, it's important to choose the right location for the structure, study its design, and calculate the tank's capacity. Failure to do so can lead to several problems:
- If the placement is incorrect, the owner will bear administrative responsibility, and the building will have to be destroyed and rebuilt in another location;
- the system will not function correctly;
- Frequent pumping of the contents (using a sewage pump) or the use of specialized equipment for sewage disposal will be required. This will therefore lead to significant financial and time losses;
- Incorrect preparation for installation work may result in ineffective functioning of the cesspool.
Therefore, it is advisable to immediately pay special attention to the design stage of the future system.
Location
Selecting a location requires following certain requirements and standards that are regulated by current legislation.
Please note! If this is not done, then during the inspection the structure may need to be moved, and the owner of the site will be fined.
It is advisable to pay special attention to the design and choice of location.
The structure must be located at a certain distance from the walls of houses, other buildings and objects:
- 3 m from trees and vegetable gardens;
- 4-5 m from the road;
- 10 m from various rivers, streams and foundations;
- 30 m from the reservoir;
- 50 meters from a well where drinking water is obtained. If the soil is clayey, a distance of 20 meters is acceptable.
It is recommended to avoid installing a cesspool at the lowest point of a property. Otherwise, such a location could lead to flooding from heavy rains and heavy rains. It is also undesirable to place the structure on a property where the groundwater level is less than 4 meters.
 When choosing a location, it is essential to take into account the possibility of unimpeded access for special equipment for sewage disposal.
It's worth noting that the above requirements apply primarily to DIY drainage cesspools. If you plan to install sealed tanks for a private home, then precise distances to other structures may not be necessary.
Another factor determining the location is the slope of the site. It is recommended to install a septic tank for a private home below the drain point. This is necessary to ensure gravity drainage. When laying the pipeline, the slope should be 3 cm for every meter of pipe to ensure wastewater flows naturally into the tank.
Device
Once you've determined the location for your DIY cesspool, you can begin planning the installation process. There are certain considerations that are important to consider before beginning the process.
If the pit is planned to be used exclusively in the summer, the excavation depth should be approximately 1-1.5 meters. If the structure will be used in the winter or year-round, it's important to consider the soil characteristics when calculating the depth.
For example, in winter, the soil's volume will expand due to freezing, and during heavy rainfall, the soil will become soggy. The minimum permissible reservoir depth is 0.5 meters.
During installation, it is essential to provide a ventilation pipe and drainage system. The ventilation should be located approximately 40-70 cm from the surface.
 When building a cesspool for a country house or private home, it is recommended to choose a non-sealed model, rather than one with a reservoir equipped with a filtration bottom.
However, it's advisable to keep in mind that the total volume of wastewater and waste should be less than 1 cubic meter per day. This type of sewer system is the best choice for sandy soils where the groundwater depth is greater than 2.5 meters.
The question of how to properly construct a cesspool is a concern for all homeowners planning this project. It's important to know the specific installation and selection considerations for a sealed model:
- The areas of application and design of concrete and plastic tanks are somewhat different;
- wells have worse tightness compared to plastic containers;
- The best value for money is a Eurocube container. It's completely sealed, can hold up to 1,000 liters of wastewater, is available in many hardware stores, and is affordable.
- the cross-section of the ventilation pipe should be approximately 10 cm, and the distance from the surface should be more than 40 cm;
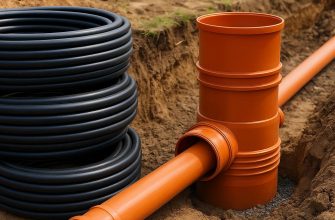
- The pipeline should be laid with consideration for possible future repairs or replacement. Therefore, it is recommended to design it so that it is not obstructed by various shrubs, roots, and trees.
 A diagram of how to create a cesspool in a private home, built with your own hands:
- A pit of the required dimensions is dug.
- The walls are constructed and a pipe is installed to carry wastewater into the tank. It's important to maintain a slope to ensure immediate gravity drainage and prevent clogging.
- An outgoing pipe is connected to a special hole in the tank, through which wastewater leaves the reservoir.
- The installation of sewerage components is carried out directly.
- Installation of hatches is in progress.
- When installing a brick cesspool yourself, an additional 30-centimeter trench is made on top, on which a concrete slab is then placed.
- The slab is covered with earth, and the surface is leveled. The hatch is usually left open.
Dimensions
One of the most important design stages is calculating the required volume of a do-it-yourself cesspool for a private home. A general rule of thumb is that the capacity should be able to hold approximately two days' worth of wastewater.
This means you'll need to know how much water is drained per day on average (from the kitchen, sauna, bath or shower, sinks, etc.). If a hot water tank is used, its capacity is multiplied by 2, resulting in the required tank size.
However, it is important to note that the above calculation can only be used if the filtration cesspool is planned to be used during the warm season.
If year-round use or winter use of a sealed model is required, the required liquid capacity will need to be calculated using the formula: Volume = N * X * V.
Where:
- N – how many days the tank must be filled before pumping is carried out;
- X is the number of people living in the house;
- V – the volume of liquid used by 1 family member (measured in liters).
For example, four people live in a private home, each of whom wastes approximately 200 liters per day. If wastewater pumping is planned to be performed once every 30 days, this data can be inserted into the formula.
It turns out that Capacity = 30*4*200 = 24 cubic meters.

It's advisable to personally analyze how much water you use per day, but if that's not possible, an average of 150-200 cubic meters per person can be used. This figure is largely based on the habits and lifestyle of the residents. Statistics show, for example, that city dwellers use more water than those living in rural areas.
Installation of cesspools - preliminary planning
After calculating and selecting the location for a cesspool for a private home, we install it ourselves. Once the owner has chosen the material for the sewer system, construction can begin. First, a suitable pit must be dug for the future cesspool.
This stage can be accomplished using specialized equipment and a team of workers, or completely independently. The latter option will require more time, but sometimes it's the only option.
For example, when it is impossible for special equipment to access the area or the power lines are located too low.
To properly install a cesspool for a private home yourself, you need to follow a specific algorithm:
- The first ring is installed, a person climbs inside it and begins to dig underneath it, throwing soil to the surface.
- As you dig deeper, the soil underneath the walls is also removed.
- It is essential to maintain uniform removal of soil from under the ring, as it is important to ensure the product is positioned vertically.
- When the ring is located in line with the ground surface, the next ring is installed.
- The soil continues to be removed evenly until the appropriate depth is reached.
Once the preparatory excavation work is complete, it's time to prepare the materials for constructing the cesspool. Depending on the soil type, the required structure, and other factors, concrete rings, car tires, plastic containers, or bricks can be used. Planks are required for the formwork.
 In addition to using the basic materials, you will also need the following tools:
- components for creating cement mortar;
- crushed stone and small gravel to equip the drainage area;
- reinforcement bars for mounting the top concrete cover;
- waterproofing materials;
- a ready-made metal hatch or components for making it yourself;
- shovels, hammer;
- level, plumb line and cord;
- several containers for different needs, for example, making a solution;
- trowel.
It's a good idea to plan the entire job in advance and prepare the necessary tools based on that plan. If the project involves a lot of concrete work, it's best to purchase, rent, or borrow a concrete mixer.
We make a concrete cesspool ourselves
Such structures can be used throughout the year; they are resistant to the lowest temperatures and high humidity, and do not deform under the influence of high soil viscosity during a long rainy season.
Advantages of choosing concrete as a manufacturing material:
- you can quickly build a structure;
- long service life (up to 50 years);
- reliability, manifested in resistance to negative environmental influences;
- no regular maintenance, repair or restoration work required;
- It is easy to find and purchase building materials.
 Disadvantages of building such a cesspool:
- the large weight of the rings, which requires the assistance of several people or special equipment to carry out installation (especially if the diameter is more than one and a half meters);
- the cost of concrete materials is higher than the price of plastic analogues;
- the need to strictly follow the drawings.
The installation procedure consists of the following stages:
- A layer of crushed stone is placed at the bottom of the excavated pit to create a filtration element.
- A concrete screed is laid or a prefabricated reinforced concrete slab is installed to serve as the foundation for the structure. This step must be checked with a level.
- The required number of reinforced concrete rings (usually 3-4) are placed on top of each other. If the required height is not reached, a low brick layer is sometimes laid on top.
- Using a hammer drill, create holes through which the sewer lines will be connected. The hole cross-section must be calculated based on the diameter of the pipeline and must take into account the settlement of the pit.
- Concrete joints, as well as all pipe connections, must be sealed with a special sealant. Once the sealant has dried, the exterior must be coated with a water-repellent compound. The interior surface must be plastered.
- The floor (the top horizontal slab) is installed. You can either build it yourself or purchase a pre-fabricated one, but the latter will be more expensive.
- Cover with soil on top.
We make a cesspool with our own hands from bricks
 The use of product varieties that exhibit poor resistance to high-humidity environments is prohibited. This category includes, for example, silicate products.
Key features of a brick cesspool for a private home:
- the constructed pit will have a long service life;
- is distinguished by excellent tightness and the ability to reliably retain waste liquids;
- brick allows you to create a hole of any shape and volume, and also build it on any type of soil (both clay and sandy);
- in terms of labor intensity and time spent on construction, the work is approximately equal to the construction of a system of concrete rings;
- A cesspool can be built even in areas where groundwater is close to the surface. This material also reliably protects against soil heaving during the winter;
- Brickwork should be laid carefully, as improper installation can lead to subsequent collapse. However, some aesthetic imperfections are still acceptable, as they will be completely hidden beneath the ground surface.
- a rectangular or square shaped pit is not capable of withstanding heavy loads;
- It is quite difficult to build a round structure on your own; most likely, you will need the help of professionals;
- The cost of a brick pit is higher than building plastic structures. You can save money by using recycled materials in the process.
If you plan to build a closed tank, you'll need to prepare a large amount of sand and cement in advance. In most cases, a cylindrical or cubic pit is constructed by hand.
 It is recommended not to make the septic tank deeper than 3 meters. The acceptable septic tank capacity depends not only on the water consumption of the residents but also on the distance of the septic tank from the building.
How to make a brick cesspool yourself:
- Dig a pit of the required dimensions.
- Level the bottom and create a cushion of crushed stone on top (approximately 50 cm wide) or concrete it (in this case, reinforcement is also used for additional strengthening).
- Lay brick walls in a rectangular, round, or square shape. The brickwork is continuous, and all joints are filled with a sand-cement mixture. When constructing a drainage structure without pumping, lay the bricks in a staggered pattern to enhance the pit's drainage capacity.
- It is recommended to create a small "pocket" between the brickwork and the pipeline, approximately 6-10 cm. This will not affect the tightness of the septic tank, but will prevent the structure from deforming during settling.
- 25 cm below the surface level, they begin laying the walls, then they begin constructing the floor: they install the lathing (sealed grating) with a ready-made opening for the hatch, create a reinforced belt and the entire slab is filled with concrete.
- The slab must be covered with soil and leveled with the surface. If installation is taking place in an area where temperatures drop to -20°C, the topsoil must be raised to prevent the pit from freezing in winter. In this case, the distance from the site surface to the slab is 50 cm.
Making a cesspool with your own hands from tires
Building a septic tank using tires is becoming quite popular. Tires from large vehicles, such as buses or trucks, are used for this purpose. Since the diameter is not very large, a deep pit will be required for a private home. The required number of tires is 9-10.

Before building a septic tank from tires, it's recommended to familiarize yourself with the advantages and disadvantages of this material. The advantages include:
- tires are not subject to aggressive environmental influences and are not subject to corrosion;
- low price of products;
- light weight, which allows for easy movement of components;
- The material is easily processed using available tools; no special instruments are required.
Flaws:
- small cross-section of tires compared to reinforced concrete rings or brickwork;
- Suitable only for creating small cesspools. For a country house with five or more people, a different material will likely be required;
- Additional assistance is required to handle large tires.

The pit can be dug manually or with the help of an excavator. Typically, the pit is 30 cm larger than the dimensions of the pipes themselves. This will significantly simplify the installation process and also increase the filtration capacity of the sewer system.
Some experts recommend removing the sidewalls of the tires to increase the drainage area and prevent waste from accumulating on the surface. However, this can reduce the system's strength and make installation more difficult.
If the property owner decides to do this, it will take about 45 minutes to prepare one tire. The procedure is as follows: a hole is made in the sidewall, through which a hacksaw is inserted, and then the remaining unnecessary elements are removed using the saw.
 A sheet of high-strength, corrosion-resistant material is then installed over the constructed pit. A thick, galvanized sheet is preferred. After the lid is installed, the structure is covered with a layer of soil and compacted.
After some time, sod will form on top, making the hole less visible on the property. Such a structure can function effectively for a decade, handling a daily flow of approximately 70-100 liters of water. If you only need to build a drain for a sauna, 4-6 large tires will suffice.
A structure made from Eurocubes is considered the most reliable and durable, but additional assistance will be required. If daily water consumption is low, a better solution is to construct a pit from tires.
I'm glad I found this site; it's so full of useful and relevant information—I can't stop reading. I'm currently renovating my house and need to build a cesspool, so I read the article and realized I was about to make some mistakes.
Hello. Check back often, we post new articles almost daily.