Properly installed and connected heating radiators are crucial. How well they are installed determines how comfortable the room will be.
Correct placement consumes less fuel, while keeping the home warm in any weather.
- Installation Features of Different Types of Radiators
- Aluminum
- Steel
- Bimetallic
- Models made of cast iron material
- Copper
- Plastic
- What is required for installation?
- Brackets
- Mayevsky crane or automatic air vent
- Plugs
- Shut-off valves
- Related materials and tools
- Where and how to place?
- How to install correctly?
- Wall mounting
- Floor mounting
- Heating radiator piping diagrams
- Binding with one-sided connection
- Strapping for diagonal connection
- Saddle connection harness
- Helpful Tips
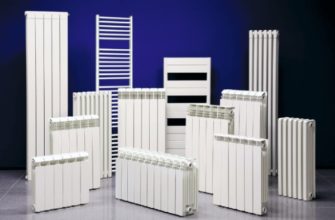
Installation Features of Different Types of Radiators
Indoor heating radiators are divided into several types based on the material they are made of. Each has its own installation requirements.
Let's list them.
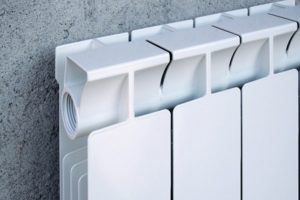
Aluminum
The most affordable heating devices. Model characteristics:
- The body is made by pressing molten metal into a mold, a process that occurs under high pressure;
- the structure is one-piece, lightweight, with flow channels inside;
- The surface is aluminum, protected by a durable film.
A particular installation challenge is connecting an aluminum pipe to a steel heating network. Direct contact between the two metals causes destructive processes in the aluminum.
Solution: Connect the appliances by screwing on specialized adapters to the coolant pipes. Shut-off valves with bronze fittings can be used.
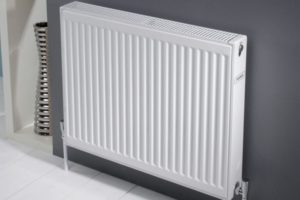
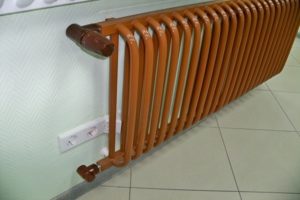
Steel
These are among the most popular heating models, as their steel radiators heat up in minutes. They come in two types: monolithic and sectional tubular.
The installation feature is that it is always possible to increase or decrease the number of registers in one radiator, or replace a damaged part with a new segment.
Bimetallic
A heating radiator consisting of two metals:
- the base is a frame in the form of a steel tube, where horizontal collectors are connected to each other by vertical channels;
- The body is made of aluminum, which improves the thermal performance of the device.
Bimetallic radiators are easiest to install yourself. All you need is the instructions included with any device.
The ease of installation means that bimetallic radiators are often chosen to replace outdated radiators without changing the location of hot water supply lines.
Couplings and adapters, which are installed during connection, connect the device to the heating pipe without welding mechanisms.
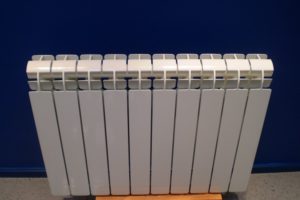
Models made of cast iron material
The devices don't look very attractive in appearance, but it's not always worth focusing on this and refusing an inexpensive, effective, and easy-to-use device.
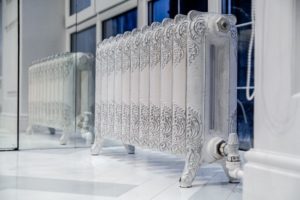
The device consists of individual components. A radiator is typically assembled from varying numbers of registers, with a minimum of 2-4. Sections can be removed or added to a cast-iron radiator. This is how the heating device's performance is adjusted and repaired.
Copper
The most expensive type of radiator. The price is high due to its characteristics:
- copper – conducts thermal energy well;
- service life is about 30 years;
- the internal filling consists of vertical copper pipes that repel harmful impurities from the coolant;
- The metal is resistant to rust.
Connection feature – the option of attaching the device to the heating system pipeline. For installation, you'll need special fittings, elbows, and adapters. This is necessary to avoid direct contact between copper and iron.
If the system uses polypropylene pipes, you will need to purchase a specialized set of fittings.
Plastic
These radiators have only recently entered the Russian market. These models are considered trial models, and their highest heating level is 80.0C. The maximum pressure is limited and should not exceed 3 atm.
These units can be installed in any residential building. Little is known about the installation details, as these radiators are not in demand. It is recommended to follow the instructions for installation or entrust the job to an experienced professional.
What is required for installation?
To properly install a heating radiator yourself, a homeowner will need special tools and some consumables. The type and size depend on the type of radiator being installed, the connection method, etc. But some components are always necessary.
Brackets
Some radiator models come with brackets included. If not, they're available at almost any hardware store.
There are many different types and shapes of brackets available on the market. All of them feature high load-bearing capacity and transfer the load from the radiator's weight to the wall. Brackets can be fixed, equipped with an adjustment mechanism, and come in various lengths and heights.
Mayevsky crane or automatic air vent
When the heating system starts (after the summer period), as the coolant passes through the system, trapped air gets into the batteries. Air pockets formed partially block the passage of warm water in the upper radiator manifold, i.e. the water will remain cooled.
Initially, classic water taps are installed at the top of the heating appliance. Air release with these taps is accompanied by the discharge of a large volume of water. All new radiator models include air vents or Mayevsky crane - find out how to choose and install and release the air.
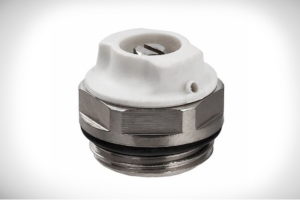
Characteristics of the Mayevsky crane:
- small size;
- screwed into one side of the upper distributor into a free hole;
- can be mounted using a special adapter if the circumference of the tap differs from the size of the threaded inlet to the distributor;
- During installation, a sanitary seal is wound onto the tap;
- Installation is impossible without a wrench, it helps to tighten the tap until it stops.
The Mayevsky valve releases air by loosening the screw or handle. Turning the ring changes the direction of the air flow. The air is released when a stream of water appears.
Peculiarities:
- If the radiator is equipped with an automatic air vent, then it operates on the float principle.
- The float, under air pressure, begins to act on the nipple, which opens until the air lock is completely removed from the heating device.
- It is better to purchase and install batteries with an air vent in autonomous heating systems.
- The machine quickly gets dirty and breaks down.
The video explains how to properly bleed air and why it's necessary:
Plugs
Modern heating radiators have a side connection and four inlet ports—two each on the lower and upper manifolds. Two of these ports are occupied by the supply and return pipes.
The Mayevsky valve is installed in hole 3. Hole 4 is closed with a threaded plug, commonly called a stopper. The element is screwed into the distributor opening using a wrench with a threaded thread lock.
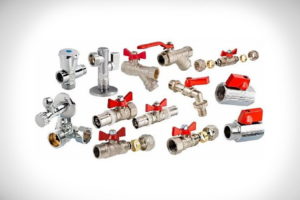
Shut-off valves
In the case of heating radiators, shut-off valves are 3 types of taps:
- Ball. They are used in two positions: open and closed. They are installed at the inlet and outlet of the heating appliance. The valve in this case is a rotating metal ball with a through hole. It is turned by an external lever.
- Stock. Shut-off is achieved by a sliding stem, which is aligned with the rotating head. This valve allows you to control the flow rate of hot water.
- Check valve. Shuts off the coolant flow in a specific section of the heating system. Used only in complex, stand-alone systems.
Related materials and tools
Most radiator models are mounted to the wall, so for installation you will need:
- hammer drill;
- drill or powerful screwdriver;
- welding machine, needed for polypropylene pipes;
- hammer;
- mechanism for assessing the surface ratio (level);
- any measuring instrument;
- marker or felt-tip pen;
- spanner and pipe wrench;
- socket wrench for assembling sections;
- cord or winding for threaded connections;
- sealant.
Where and how to place?
Heating radiators in both residential and commercial buildings are typically installed under windows. This is because the rising flow of warm air blocks the cold air coming from outside windows. The warm air warms the glass, allowing condensation to form.
The main requirement is that the radiator should not take up more than 70% of the window's width. This is the only way to prevent the window from fogging up.
What distances should be taken into account when choosing the location of the radiator:
- The distance from the battery to the floor should be about 8-12 cm. If you lower the unit too low, it will be difficult to clean the floor, and if you lower it too high, the warm air flow will not reach the floor covering, resulting in cold feet.
- About 12 cm to the windowsill. With this installation, warm air will bypass the obstacle – the window sill – and rise along the glass, spreading throughout the entire room.
- About 5 cm to the wall. If you press the battery more tightly against the partition, the heating speed may decrease significantly.
How to install correctly?
There are two mounting options for the radiators: wall-mounted and floor-mounted. The former requires a bracket, while the latter requires the included feet. The shape and design of the supports may vary, but the main criterion is that they should easily support the appliance model.
Wall mounting
The elements to which you attach the radiator to the wall depend on the type of partition:
- concrete, brick, cinder block, foam block walls – anchor bolts;
- Another material of the partition is the supports, which are both anchor bolts and brackets.
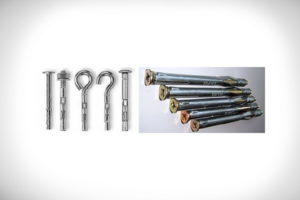
There are standards that determine the number of supports for sectional heating radiators. For cast iron radiators, brackets are installed between every six sections.
Panel-mounted units are designed to be mounted to the wall from the rear. This is specified by the manufacturer.
Radiators are mounted on the wall in strictly defined places in the home, these are:
- niches under the window;
- extended distance between windows;
- partitions without windows in rooms in the corner of the building;
- secondary-purpose premises, the adjacent walls of which are external enclosures;
- areas between floors and entrance to the building.
How to hang a radiator:
- Draw the markings.
- Using the marks you made, drill pilot holes in the wall finish and plaster layer using a punch. This is necessary to prevent the drill bit from shifting during drilling.
- Take a hammer drill and the appropriate drill bit. Drill holes for the fasteners. The depth should be slightly greater than the length of the dowel you'll be using.
- Clean the resulting holes and hammer in anchors. These can be either metal or plastic.
- If metal elements are selected, screw them into the sleeves installed in the walls.
Secure the plate brackets using locking screws, after aligning them vertically and diagonally.
Once all the fasteners are in place, attach the protective covers and hang the heater. The fasteners should not deform.
How to install a radiator on a wall is shown in the video:
Floor mounting
There are radiator models on the market that don't require wall mounting but can be placed on the floor. These are typically tall cast iron radiators.
Although heating units are relatively heavy, they can shift. Therefore, sometimes the included feet need to be secured to the floor.
This happens as follows:
- Mark the holes for the fasteners through the holes in the legs.
- Using the markings, drill holes for mounting the anchors.
- Hammer plastic sleeves into the holes you've made. Metal parts are rarely used in this case.
- Install the vertical supports and secure them to the floor with screws.
- If necessary, fix the hooks at the desired height and place the radiator on them.
After completing the procedure, apply a screed to the flooring. This will not only conceal the fasteners but also serve as an additional reinforcing element.
Instructions are provided in the video:
Heating radiator piping diagrams
Installing heating radiators involves connecting them to the pipelines. There are only three ways to do this.
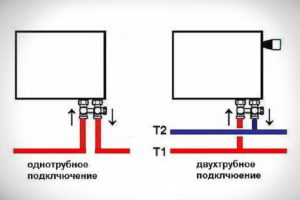
Binding with one-sided connection
A single-pipe radiator connection is most often used in apartments. It can be either two-pipe or single-pipe. The second option is the most common.
Since all the pipes in the apartments are made of metal, the battery is connected with steel pipes on couplings.
For installation you will need:
- pipes of the required size;
- 2 ball valves;
- 2 tees;
- 2 couplings are elements with external threads on both ends.
The connection process is as shown in the diagram. A single-pipe system requires a bypass (a bypass section of pipe installed parallel to the main line). This allows the heating appliance to be shut off without shutting down or draining the system.
Installing a valve on the bypass section of the pipe is prohibited. This will block the flow of coolant through the riser. Such actions are punishable by a fine.
All existing threaded connections must be sealed with fluoroplastic sealant. Flax wrapping can be used as a substitute, but packing paste must be used after use. A large amount of sealant is not required when screwing the valve into the heating appliance manifold.
Too much winding can lead to the formation of microcracks and subsequent deformation.
Strapping for diagonal connection
Installing a radiator diagonally is the best option in terms of heat output. It offers the highest heat transfer. With bottom-mounted wiring, the diagonal connection is simple: the supply is on one side at the top, and the return is on the other side at the bottom.
In a single-pipe heating system, diagonal connection piping must be done using a bypass.
This option for connecting a heating device can be implemented in 2 ways:
- the coolant enters the upper opening, circulates through it and exits from the lower opening located on the other side;
- Water enters the lower compartment from one side, passes through the entire battery and leaves it from the upper opposite hole.
Diagonal connection is especially effective when installing long radiators with more than 12 sections.

Saddle connection harness
This option is the least efficient, with heat loss of approximately 14%. A seat connection is the most discreet option. Pipes are laid on or under the floor covering.
To prevent losses from affecting the temperature in your home, it is recommended to purchase a radiator that is more powerful than necessary.

In systems with natural circulation, this type of system is not necessary. The exception is the presence of a pump.
The saddle connection piping can be installed with or without a bypass. In the latter case, all the valves are aligned, the heating element can be removed, and a temporary jumper (a coupling) can be installed between the valves.
Helpful Tips
In order to properly install a heating radiator yourself, it is recommended to familiarize yourself with some installation details:
- The most important thing when working with batteries is to calculate, mark, and install everything correctly. It doesn't matter which model you choose or which connection diagram you follow.
- If you have a large private home, it's best to consult a radiator installation specialist. The connection system is selected based on the building's specific features, and for more expensive buildings, the design scheme is quite complex.
- In a small house, it's possible to install a radiator yourself, but be sure to follow a specific procedure and follow the instructions provided with the device.
- When installing a radiator, remember that the material of the appliance and the pipes must be the same. Plastic pipes connected to cast iron radiators can damage the heating system.
- Don't forget to install ball valves to bleed air.
Check out this helpful video on the topic:
A radiator is a fixture found in every home. It's essential to create a comfortable temperature without one. You can install and connect it yourself, taking into account the installation requirements of individual radiator types, the type of wiring, and the placement nuances.