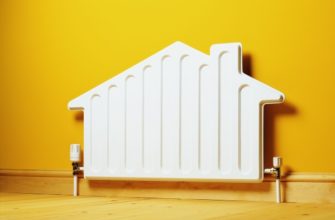
Warmth in an apartment is one of the main components of comfort and a cozy atmosphere. Achieving this desired result is impossible without a radiator.
Heating systems are installed during the construction phase of a home. But even the highest-quality radiators eventually fail and require replacement.
- When should heating radiators be replaced?
- Preparatory work
- Selecting radiators
- Necessary tools and consumables
- Removing old batteries
- Transferring the markings to the wall
- Step-by-step instructions for replacing a radiator
- Replacing radiators with shut-off valves
- Features of marking and fastening schemes
- Replacing old radiators without taps
- How to use sanitary flax correctly?
- System testing
- Average cost of heating battery replacement
When should heating radiators be replaced?
Initially, high-rise buildings built during the Soviet era were not designed for long-term use. This meant that engineers did not consider the possibility of simply shutting off the water supply to replace a radiator.
Because of this, batteries aren't always replaced. Often, the device only needs to be replaced when absolutely necessary.
There are several reasons for dismantling and installation:
- Wear. Metal pipes that are in close contact with hot water for several months each year corrode from the inside and wear out. As a result, the radiator will begin to leak during operation in the fall, making it impossible to use for its intended purpose.
- Reducing the heating levelThis is because deposits accumulate inside the radiator over the years, thickening the radiator walls. As a result, the heat doesn't reach the room but remains within the radiator system.
- Coloring. Sometimes, after buying an apartment, you discover that the radiator is painted with ordinary enamel, in several layers. While the appearance is neater, the paint prevents heat from entering the room.
- Impressive dimensions. Apartment owners often replace their radiators because older cast-iron models are bulky. More efficient and compact heating units are now available.
Sometimes batteries are changed because they do not fit into the overall interior of the apartment.
It's best to replace a radiator during the warmer months, when the heating isn't yet turned on. This is convenient because you don't have to turn off the riser. However, it's important to keep in mind that management companies may carry out maintenance during the off-season. hydraulic testing heating systems and other works.
Before you begin replacing your battery, check to see if any system testing work is planned for your home.
Every owner should remember that if a radiator needs to be replaced during the heating season due to a breakdown, the Management Company will only perform repairs for a fee, as the owner must monitor the condition of the pipes and submit a replacement request in advance.
Preparatory work
The most crucial part of radiator installation is the preparation. The outcome of the replacement depends on how correctly the radiator is removed and the tools available.
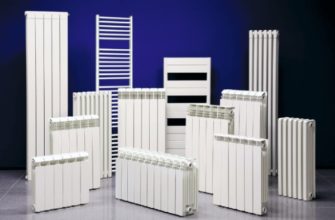
Selecting radiators
The first thing you need to do is decide, which radiator exactly? will be installed instead of the old one. The choice is made based on:
- appearance;
- pressure indicator in the heating system;
- chemical composition of the coolant;
- prices;
- heat transfer level;
- heating time, etc.
Improved cast iron radiator models have become especially popular in recent years. Buyers highly value the device's cost-to-quality ratio. However, the choice lies between steel, aluminum, and biometric radiators.
Necessary tools and consumables
Installing heating radiators involves several stages. For each stage, you'll need the following tools:
- Two keys: a spanner and an adjustable wrench;
- Machine for cutting metal pipes;
- A die for cutting threads or a die with a holder of the required circle;
- Welding for polypropylene pipes;
- Scissors or hacksaw for cutting polypropylene pipes;
- Level, pencil, ruler;
- Plumbing flax;
- Material for sealing joints;
- Cement solution.
The following components will be required during the installation of the radiator:
- the heating battery itself;
- ball valves;
- brackets for hanging a radiator;
- plugs;
- Mayevsky taps for bleeding air;
- pipes: can be made of metal-plastic, polypropylene or steel;
- Accessories for pipe installation – tees, adapters, bends and fittings.
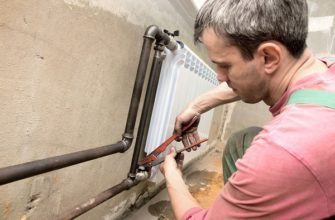
Removing old batteries
The procedure for removing a damaged battery depends on the subsequent work plan. If only the radiator needs to be replaced, remove the battery threads or use a grinder if the threaded connections are damaged and no longer functional.
If a heating pipe needs to be replaced along with the heating appliance, cut the entire structure. This procedure should be performed at a distance of 15-20 cm from the floor and ceiling.
Transferring the markings to the wall
Prepare the base by transferring the markings to the wall. To do this:
- Use a pencil to outline the location where you plan to place the battery.
- Make a hole for the retaining brackets.
- Take a level and check that all lines are level.
As a final step, you can glue foil (or other foil-coated material) to the wall over the entire radiator surface. This will increase the radiator's heat output.
Step-by-step instructions for replacing a radiator
It doesn't matter who installs the radiator—you or a professional. Everyone should read the replacement instructions. In the first case, the procedure is necessary to ensure proper execution, while in the second, it helps you understand how long the work will take.
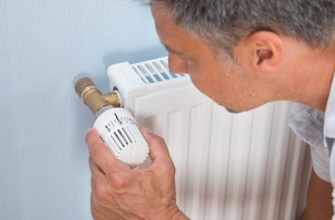
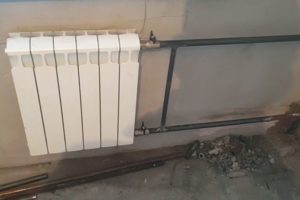
Replacing radiators with shut-off valves
Replacement takes no more than 20 minutes. This is the easiest replacement option. Detailed instructions are provided below.
- Turn off the taps.
- Place a container under the bottom faucet and spread any absorbent cloth on the floor.
- Open the Mayevsky tap, which is located at the top of the battery (but on older models it may not be there at all).
- Using a wrench, gradually begin to loosen the lower connection.
- Drain the coolant from the radiator. Each compartment contains between 170 and 400 ml of fluid. Take this into account when preparing the drain container.
- Disconnect the battery completely.
- Assemble the new heating unit. Install the plug, threaded adapters, and Mayevsky valve.
- Without installing new gaskets, attach the new radiator. Place a support under the unit—do not hang the radiator supported only by the pipes.
- Mark the mounting locations, but only if they need to be replaced.
- Mount the brackets.
- Hang the radiator, check the horizontal installation using a building level.
- Take new gaskets for the union nut and screw on the new heater. Do not use force. Once the union nut is in place, turn it 3/4 of a turn.
- Open the supply valve and check for leaks. This step is especially important for private and multi-story buildings during the heating season. If the radiators were replaced during the warmer months, it's best to leave the valves closed.
- Bleed the air from the heating appliance using the Mayevsky tap.
If the replacement was performed during the warm season, open the valves on the day of the pressure testing, check the connections for leaks, and bleed the air. Repeat the same procedure at the beginning of the heating season.
You can find out when the pressure testing will be carried out by visiting the management company’s office in person (or by calling).
Features of marking and fastening schemes
Radiators are heavy. This is due to the material used to construct the device and the coolant. Simply hanging the radiator on the supply pipes is prohibited. Wall mounting requires brackets.
Cast iron models can be equipped with legs for installation on the floor covering.
Professional installers recommend using two brackets under the upper manifold for radiators with up to eight sections. If there are more than eight sections, increase the number of supports. Calculate as follows: one bracket per five sections.
It is recommended to install hooks at the bottom of the heating unit. This method helps completely eliminate vibration from the ceiling and extend the life of the radiator.
If you're replacing just one battery, mark the mounting location using a level. If you need to install multiple batteries, you'll need to create a template.
How to make a template is shown in the video:
Replacing old radiators without taps
Removing old Soviet-era cast iron radiators is quite difficult. Care must be taken during the work and these instructions must be followed. The radiator itself is connected to a steel pipe, which complicates the replacement process.
The algorithm in this case is as follows:
- Drain the water from the riser. You can't do this yourself in an apartment building. You'll need to contact the management company. Plumbers will perform the work for a fee. The price varies by region, from 200 to 1,200 rubles per riser.
- Prepare a drainage bucket (or other container) and an absorbent cloth.
- Try unscrewing the lock nut and bushing. Be careful not to damage the pipe.
- Remove the radiator by cutting the pipes with a grinder.
- Cut new threads on the pipe. You'll need a ratcheting die for this job. Screw shutoff valves onto the finished threads. A thermostat can replace them.
- Try on the radiator, make markings, and secure the brackets.
- Screw on the battery and check for leaks.
- Paint the pipe sections.
- Try to start the system.
- Let the air out.
When cutting a pipe, you can use several tools:
- the cutter is ready, but it will emit a lot of soot and smoke;
- grinder, these are sparks, the smell of burning and a smoke screen;
- an electric reciprocating saw for metal (the power is selected depending on the thickness of the pipe), this eliminates dust and dirt;
- a metal saw that silently cuts pipes of any diameter.
If couplings are installed, you won't need to cut the pipes at all. Simply mark them and cut them.
How to use sanitary flax correctly?
When connecting the faucet to the threads on the steel pipe, plumbing flax, also known as "tow," is used as a sealant. This material is not picky, but the radiator's efficiency depends on its proper use.
How to work with sanitary flax:
- Take a needle file or a small triangular file. Make notches on the threads. These notches are already present on store-bought parts.
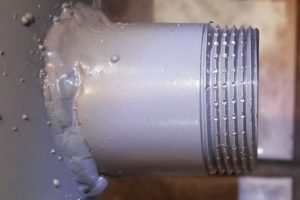
- Clean the threads from plaque, dirt, and dust using a wire brush.

- Determine which direction the threads will be located.
- Apply a thin layer of plumbing paste.
- Separate a strand of flax about 35 cm long from the skein. This will be enough for threading up to 2.5 cm. Flatten the section into a flat strip.
- Press the tow onto the spigot with your finger and wind the piece in the direction of the thread in one strand.
- Compact with your finger.
- Apply a thin layer of plumbing paste.
- Screw the required part onto the thread.
An alternative option is to use fluoroplastic tape. Where pressure is low, the material will last about 10 years, but this is not practical for apartments in multi-story buildings.
System testing
Testing can be performed in the presence of housing office staff or independently. Algorithm:
- Resume the supply of coolant to the riser.
- Begin bleeding the new radiator gradually using the Mayevsky valve. Once the air is replaced by water, the coolant has reached the room.
- Close the Mayevsky valve. Open the valve that controls the water inlet to the radiator.
- Wait a few minutes. This is necessary to ensure the radiator is fully filled with fluid.
If there are no leaks and no strange phenomena, then the replacement was carried out correctly.
If the radiator replacement work was carried out in the summer, it's best to close the valves after checking. Otherwise, the water in the radiator may negatively affect the appliance. At the start of the heating season, open the valves again and let water into the radiator.
Average cost of heating battery replacement
It doesn't matter who does the replacement work, the price for the components will be the same:
- the cost of a radiator is from 750 to 5000 rubles per 1 section;
- installation kit – from 250 roubles;
- flax, paste, pads – from 200 rubles for the whole set;
- taps with "American" - from 400 rubles per piece;
- thermostat – from 700 rubles per unit;
- additional mounting brackets (if necessary) – from 50 rubles per piece;
- Adjustable brackets – from 380 rubles per one.
The cost of the master's work is as follows:
- draining water from a riser – from 500 to 2000 rubles;
- replacement of 1 radiator the easiest way - from 1500 rubles per unit;
- Battery replacement with thread cutting or welding of a coupling on metal pipes - from 2,500 rubles, from self-employed specialists from 4,000 rubles.
If you have no experience working with plumbing equipment, it's best to seek professional help. This is because there are a number of mistakes you can make on your own:
- purchase expensive components that will not meet the requirements;
- the impossibility of installing a special valve to regulate the water flow;
- violation of the action algorithm, which leads to an incorrect connection;
- incorrect use of the thermal head (it is installed only in a one-pipe system);
- Violations during operation of the Mayevsky crane (it is attached to each radiator).
A radiator is a heating appliance installed in every apartment. Sooner or later, it will need to be replaced. There may be several reasons for this, but installation follows a clear procedure. A technician can perform the replacement for a fee; the price depends on the region and other important factors.