A deflector is an aerodynamic device installed at the highest point of a chimney outlet. It creates a constant draft in the ventilation duct and protects the chimney from precipitation and debris. It consists of a diffuser, an umbrella or cap, and an outer cylinder or housing.
The ventilation system of a country house must ensure its proper functioning under all conditions. This is necessary for a number of reasons: to ensure the well-being of residents, to ensure the proper combustion of heating units, and to remove oxygen-poor air from the premises. To achieve this, a ventilation duct system is created, culminating in a deflector on the exhaust pipe.

The deflectors are intended for use of wind loads in order to ensure normal ventilation of residential, commercial or industrial premises.
However, it is known that under certain wind directions and strengths, a decrease in draft in the ventilation system may occur, even to the point of its reversal, that is, a change in the direction of air movement.
The operating principle of an exhaust ventilation deflector
It is based on the creation of an aerodynamic resolution of the air above the mouth of the ventilation pipe, which promotes accelerated air movement in this direction from the bottom up from the high pressure zone.

Note that the caps on the deflectors are more convex upward. This means that when the air goes around such an obstacle, a vacuum is created at its bottom, which generates thrust.
Which deflector is best for a range hood?
The construction market offers a wide range of different designs for these products. Each has its own operating characteristics, which are important to know before purchasing. The following types are the most popular:
- Rotary ventilation structures.
- Rotating ventilation deflectors.
- Grigorovich deflectors.
- Models developed by TsAGI (Central Aerohydrodynamic Institute).
- Volpert deflectors.
- H-shaped.

Let's look at some of them in more detail.
Find out all about turbo deflector for ventilation: rating, operating principle, installation instructions and much more.
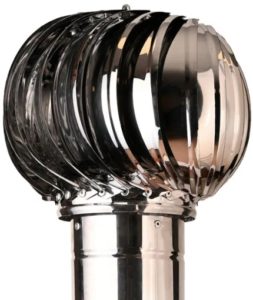
Rotary turbines for exhaust systems
These are the most popular devices for this purpose. Compared to other designs, their performance is 20-25% higher.
The advantage of using them is that they do not use any energy source during operation.

Always rotating in one direction under the influence of the wind, the turbine head creates a vacuum inside the ventilation pipe, facilitating the active process of air circulation.
In addition, elegantly made of steel, it also serves the function of protecting the mouth of the pipe from precipitation.
The head section is made from aluminum strips up to 0.5 mm thick, and the base is made from steel sheet painted in RAL colors.
Rotary turbines can be used on round, square or rectangular ducts or chimneys. In addition, they can be used for smoke exhaust systems..
Rotating deflector
They are represented on the market by rotary deflectors with an exhaust fan. To increase performance, they use nozzles with an impeller at the end. These devices are somewhat more complex in design. The rotating head is mounted on a vertical axis and equipped with two sealed, maintenance-free bearings.
The impeller, which delivers air through the exhaust duct, is also mounted on this axis. This is facilitated by the constant rotation of the device's head, regardless of wind direction.
The material used is most often aluminum sheet, less often stainless sheet steel with a thickness of 0.4 mm.
Grigorovich deflectors
Simple in design, these devices are worth considering as DIY projects. At the same time, they are quite effective, increasing exhaust duct draft by at least 20%.
 To make one yourself, cut a circle out of galvanized steel and remove a sector. This creates a conical cap, which is the purpose of this project. It can be secured to the end of the exhaust pipe using three supports made from strips of the same metal.
In addition to its primary function, this product also protects the exhaust duct opening from debris. To achieve this, the sides of the unit are covered with a metal mesh with a mesh size of no more than 5 millimeters.
Deflectors - weather vanes
 The design of this device is based on the same principle – change in air flow velocity as it passes around the diffuserAs a result, a vacuum is created above the outlet of the exhaust pipe, facilitating the accelerated extraction of air from the system.
But these devices are the forerunner and most prominent representative of the class of deflectors—weather vanes. Their distinctive feature is their ability to orient themselves with the wind, for which purpose a special keel is used in their design.
The entire device is mounted on a vertical axis, but the requirements for it are much lower than for rotary devices, since the axis is used only to orient the product in space.
The shapes of weather vanes can be very diverse, but the operating principle does not change.
 It's important to note that the variety of designs for traction enhancement devices is endless. The combination of factors and the variety of designs is so extensive that in some cases it's impossible to classify a device as belonging to one type or another. This isn't necessary—the main thing is that it functions properly. The appearance of the product is also an important factor.
Therefore, choosing a ventilation deflector comes down to a purely aesthetic decision based on personal preference. And, of course, the depth of the pocket matters.
DIY exhaust pipe deflector

To make a chimney deflector yourself, you'll need a drawing. We suggest using the drawing provided on our website, but first, you'll need to decide on the design. It's also easy to make the drawing yourself, following the instructions in the table provided.

The tools we will need in the process of making the device:
- Metal shears. Manual ones can be used, but mechanical ones are better if available.

- Wooden mallet for performing tinsmith work.
- Electric drill for drilling holes for rivets during assembly and installation of the product.
- Riveter for installing blind rivets.

- Center punch – for marking the location of holes to be drilled in a metal sheet.
- A mechanic's hammer.
To carry out sheet metal work, you will need a workbench with a countersink, which is a 50x50 mm steel angle, fixed lengthwise along the edge.
Materials required for making your own exhaust pipe deflector:
- Sheet metal. Steel, galvanized steel, copper, aluminum, and other metals can be used, depending on the craftsman's preference. The thickness of the material should be between 0.5 and 1.0 mm.
- Aluminum pull-out rivets, approximately three millimeters thick.
- Cardboard for making patterns of parts and forming a model of the product.
- A stapler for fastening cardboard parts.
- Measuring tool: ruler, tape measure, square or protractor (school one is sufficient).
- Pencil or marker for marking.
Pre-assembling a cardboard model will help avoid errors in the production of the main product and avoid the loss of the main material.
Making a rotary deflector yourself
These types of devices are the most difficult to manufacture, so it's best to develop the designs yourself. And to create a finished product, you'll need at least intermediate metalworking skills.
One of the complex design elements of a rotary exhaust deflector is the slats—plate-shaped components that are affected by the wind flow. They must be manufactured to be perfectly uniform to avoid imbalance of the entire assembly during rotation.
At the same time, it's necessary to monitor the device's balance and performance. This work should result in the refinement of the slat shape and effectiveness.
But the main task is to calculate the true dimensions of the head base depending on the size and shape of the air duct.

As is known, the base for installing a rotary fan is the outer part of the exhaust pipe.
But there are also some positives for craftsmen. There's no need to fiddle with the complex spherical shape of such a device. At one time, in the navy, where interior ventilation was a crucial factor, similar devices were widely used, but with a cylindrical rotor. This shape makes it easy to manufacture a high-quality rotating part.
- Make cylindrical support disks for the rotor. The upper one is made as a disk with a hole in the center for the axle, and the lower one is made as a ring.
- Cut rectangular slats of specific sizes from a metal strip.
- Secure them between the two parts. The fixing method depends on the material used to make the rotor. This can include welding for steel parts and rivets for non-ferrous metal components.
- During assembly, provision must be made for the installation of the supporting axle. Creating bearing seats on it can be challenging, as their use is essential for a rapidly rotating, massive component (the rotor).
- Fabricate a landing platform connecting the rotor and the air duct. Its shape depends on the shape of the outer part and provides for a bearing mount along the axis.
The complexity of execution lies in the need to manufacture turned parts – axles and bearing housings.
Home lathes are typically unavailable. Hand-crafting is labor-intensive and offers no guarantee of quality. The only option is to find a specialist and order the parts from an outside source.
Installation works
It's great if you've managed to produce a high-quality exhaust system device. But you need to understand that a very important task lies ahead—installing it at the point of use. And that location is always at a height, which places additional responsibility on the installer.
Installing ventilation pipe caps is always done at the final stage of roof installation. Roof ladders are used for this purpose, positioned over the finished roofing. Additionally, before installing the cap, a scaffold must be constructed around the pipe, from which the installation is performed.
To install the cap onto a brick chimney, self-tapping screws are used:
- Holes are drilled 12-15 centimeters apart, avoiding the joints between bricks. Depending on the size of the tool, a drill bit with a diameter of 5-8 millimeters can be used.
- Plastic inserts (dowels) are installed into the holes.
- The deflector body is placed on the pipe and secured with self-tapping screws.
Thin-wall metal pipes are often used for air ducts. In this case, installation is accomplished using a metal clamp tightened with a screw.
Working at height requires careful preparation and adherence to certain safety rules, which can be summarized as follows:
- Before starting work at height, do not take strong medications that may cause dizziness.
- It is strictly forbidden to consume alcohol in any quantities.
- Before climbing to a height, you must ensure that the roof ladder is securely fastened.
- When performing work, it is necessary to use a safety halyard.
- The area on the ground directly under the pipe must first be cleared of construction debris, equipment and other foreign objects.
- Do not carry out work at height in strong winds, rain or other precipitation conditions.


