To remove moisture from the room, you can assemble a dehumidifier with your own hands. condensation and adsorption action.
In the first option, you need to remake an old refrigerator, window air conditioner, or use Peltier elements. In second This method requires passing moist air through a container with a moisture-absorbing substance – a sorbent.
This article will detail the nuances of dehumidifying air in different rooms, as well as step-by-step instructions for building your own condensation and adsorption units. Answers to frequently asked questions are included at the end of the article.
- Features of dehumidification of premises for different purposes
- Manufacturing of adsorption dryer
- Making a condensation dryer from an air conditioner
- Peltier condensation dehumidifier
- Adsorption dehumidifier from a bottle
- Tips for using a dehumidifier
- What other ways can you dehumidify the air?
- Answers to frequently asked questions
- Video materials
Features of dehumidification of premises for different purposes
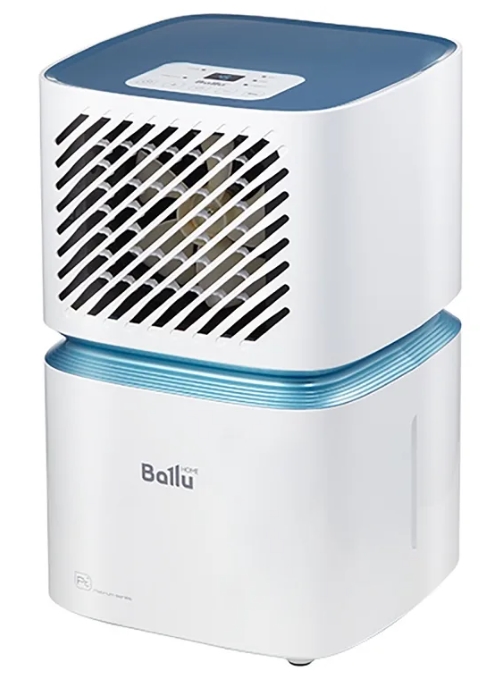
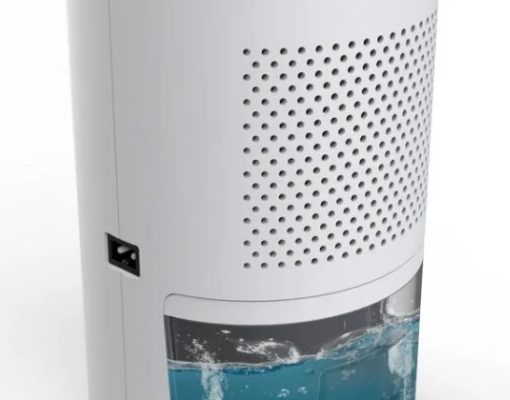
Factory-made dehumidifiers vary in design and operation. However, the general operating principle is the same. The device extracts moisture from the air and transfers it to a special reservoir. The dehumidification method determines the intended use of the device.
The technology of extracting moisture from the air is implemented in two ways:
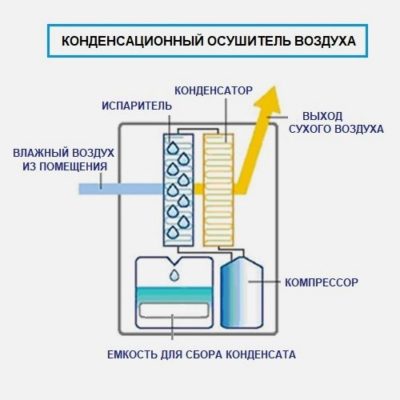
- A condensation dehumidifier is equipped with a compressor and a fan that forces air through a heat exchanger. As it passes through the cold circuit, the condensate extracted from the air settles in the evaporator. The water drains into a reservoir, which must be emptied manually periodically. The dehumidified air enters the warm circuit and, after being heated, is released into the room.
- A Peltier dehumidifier does not have a compressor. Instead, it functions as a heat exchanger, with one side heated and the other cold. Dehumidification occurs similarly, using the principle of moisture condensation.

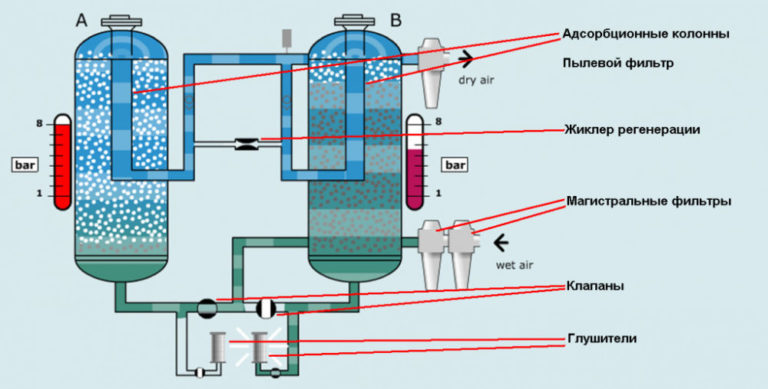
- An adsorption dehumidifier does not condense moisture. A fan forces air through a tank filled with a hygroscopic material. The desiccant can be a substrate, special tablets, or other substances. Over time, the dehumidifier, once saturated with water, is dried out or replaced with a new one.
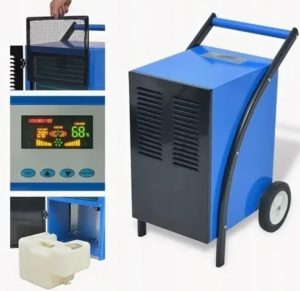
A condensation dehumidifier is ideal for basements, garages, and other large spaces with high humidity. The unit will dehumidify in 24 hours. up to ten liters of water.
The device can be used in a living space, but the noise of the compressor can be disturbing. Power consumption depends on the model's power, ranging from 300 to 600 watts.
The device with Peltier elements has low efficiency. Over the course of a day, the device collects 200-700 ml of waterHowever, this is usually sufficient for an apartment or a private house. An additional advantage is low noise level Due to the lack of a compressor and low power consumption, the power of devices with Peltier elements ranges from 20 to 45 watts.
An adsorption dehumidifier for a household has low efficiency. This type of dehumidifier is suitable for an apartment or a private home. It is used to reduce humidity in a small room, closet, or linen closet.
An industrial desiccant dehumidifier boasts high efficiency. This equipment is ideal for use in warehouses, garages, and basements. Common advantages of both domestic and industrial dehumidifiers include quiet operation, low energy consumption, and the ability to dehumidify air without heating or cooling.
If you're installing the appliance in a garage, workshop, or cellar, check the permissible operating temperature range before purchasing. For winter use, choose a model with a defrost mode.
The equipment is capable of operating at temperatures up to -5OWITHIn addition to moisture, the air in utility rooms is saturated with dust and other pollutants. Choose a device with the highest possible level of dust and moisture protection.
When purchasing a dehumidifier for your home or apartment, choose models with lower noise levels. An additional HEPA filter is useful for removing mold spores and pathogenic bacteria from the air.
This feature is important for living spaces, but it's not useful in basements or garages. A built-in ionizer in a dehumidifier can improve the microclimate in an apartment or house.
Manufacturing of adsorption dryer
If you're looking to build a small dehumidifier for your home or apartment, consider a desiccant model. You can place this homemade unit in a bathroom, kitchen, or living room with high humidity.
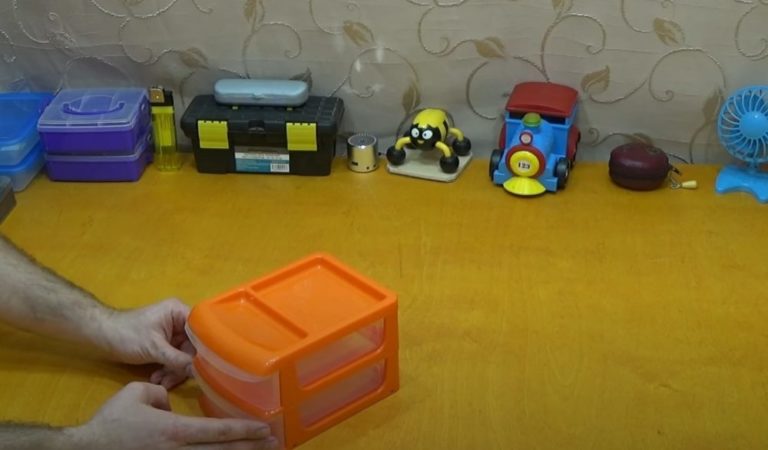
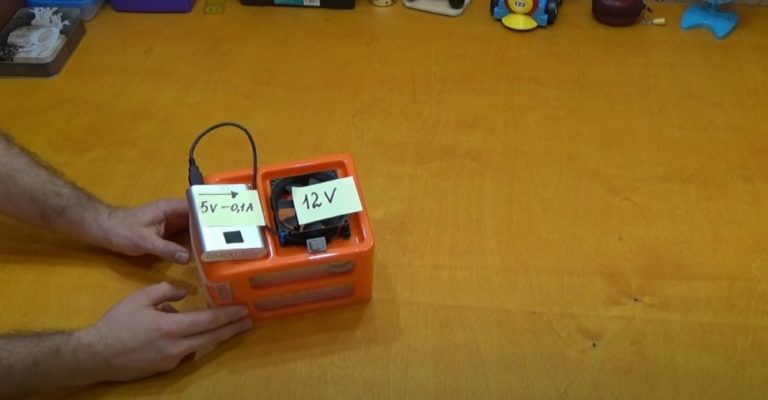
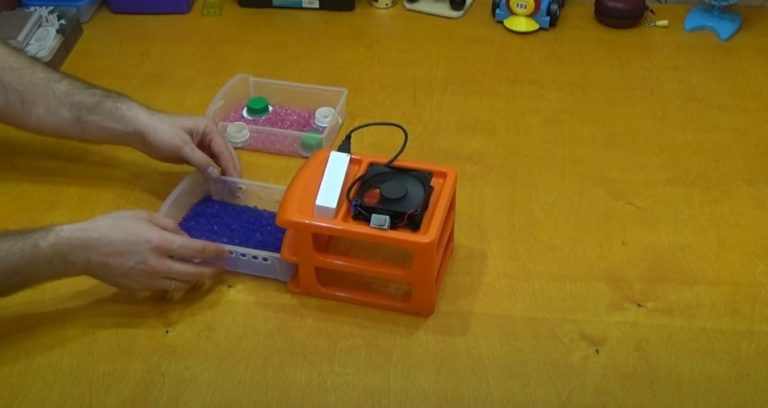
To assemble the device yourself, you'll need a plastic organizer with two pull-out drawers. Use silica gel as a moisture absorbent.
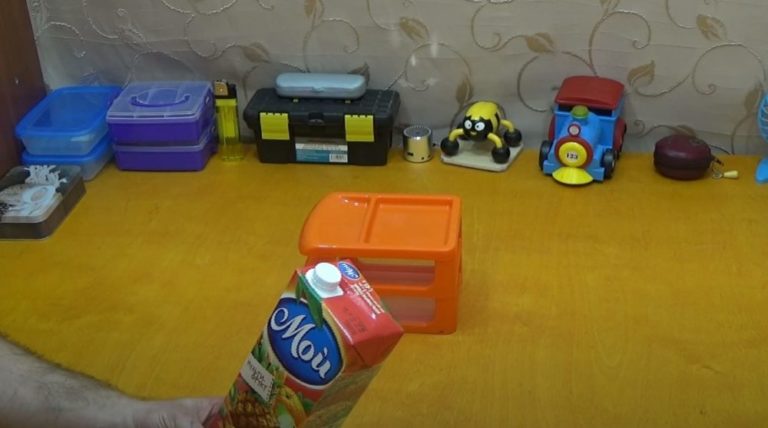
To ensure air circulation, install a computer cooler and power supply. Additional materials include 4 juice boxes and double-sided tape.
Video instructions on how to make a dehumidifier.
Let's start assembling it ourselves:
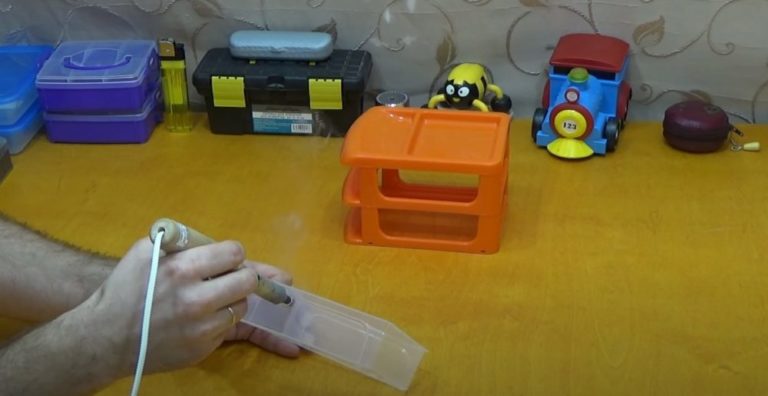
- Buy an organizer with two pull-out drawers. The drawers will serve as storage compartments for silica gel.
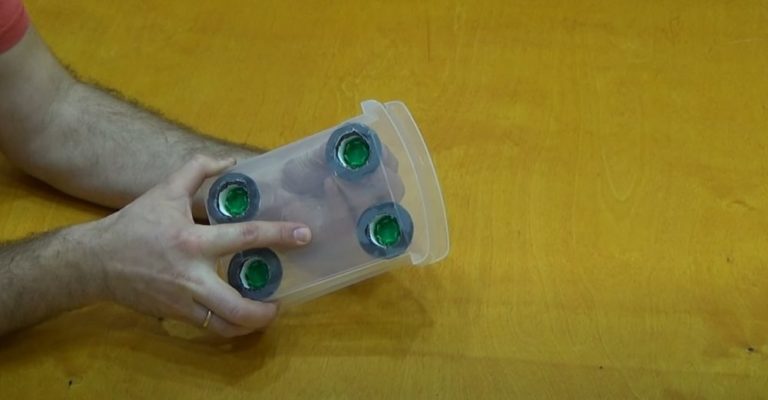
- Take four empty juice cartons. Using a knife or scissors, carefully cut off the tops, caps, and threads.
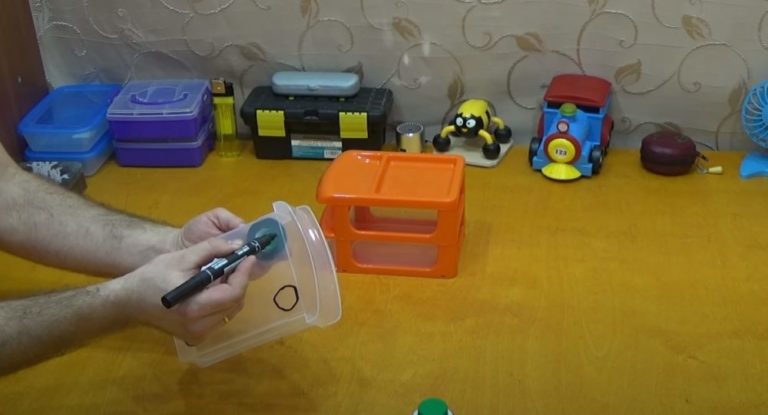
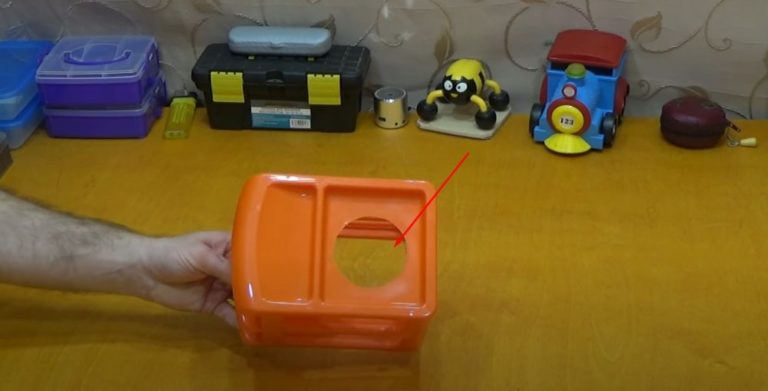
- Remove the top drawer from the organizer. Use a marker to mark the corners of the bottom where the juice box necks will be glued. Use a knife or soldering iron to cut holes along the marks.
- Remove the bottom drawer from the organizer. Using a soldering iron, randomly burn two rows of holes on the sides to allow dry air to escape into the room.
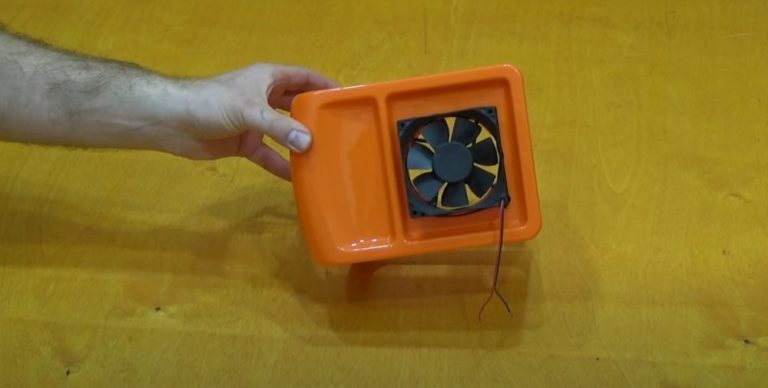
- On the organizer lid, mark a large hole the size of the computer cooler. Carefully cut out the piece along the mark using a knife, a hole saw, or another suitable cutting tool.
- In the top drawer, use double-sided tape to attach a juice box spout to each hole in the bottom. The threaded cap should protrude into the container.
- Tape the cooler to the organizer lid. Make sure there are no gaps at the joints to prevent air leaks.
- To operate the cooler, install a power button. Connect a power bank or power supply using a USB cable. Connect in series. Test the cooler's operation.
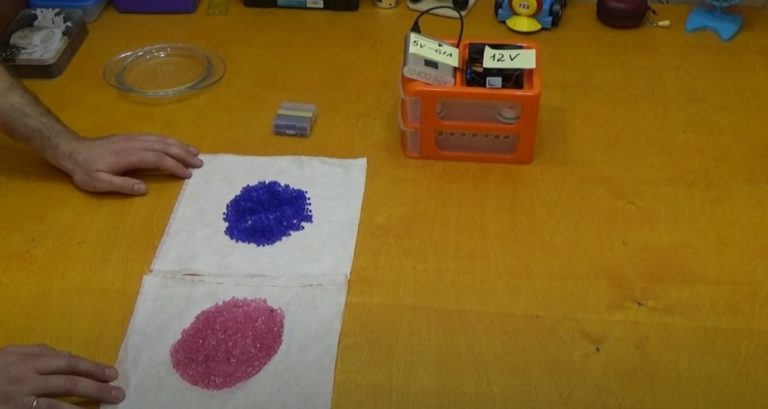
- To fill the organizer drawers, prepare silica gel. It's helpful to use a filler with a color indicator to indicate moisture content. For example, dry balls are blue, while moistened ones turn pink.
- Prepare your homemade dehumidifier for use. Fill the top and bottom drawers of the organizer with a thin layer of silica gel. To allow air circulation between the compartments, unscrew the two plugs glued to the bottom of the top tray. You can adjust the dehumidification intensity later by increasing or decreasing the number of open plugs. Place the drawers in the organizer and turn on the fan.
The color of the silica gel indicates that your homemade dehumidifier is working. The top drawer absorbs the bulk of the moisture coming from the room air. The filler will take on a pink tint.
Silica gel in the lower drawer absorbs residual moisture from the air entering through the open vents. The double-dehumidified air flows into the room through the side openings of the lower tray.
The silica gel in the bottom drawer retains its blue color longer because it absorbs less moisture. When the litter turns pink, remove the balls from the trays.
Dry the silica gel in the microwave at the lowest temperature and pour it into the device you assembled yourself for reuse.
Making a condensation dryer from an air conditioner
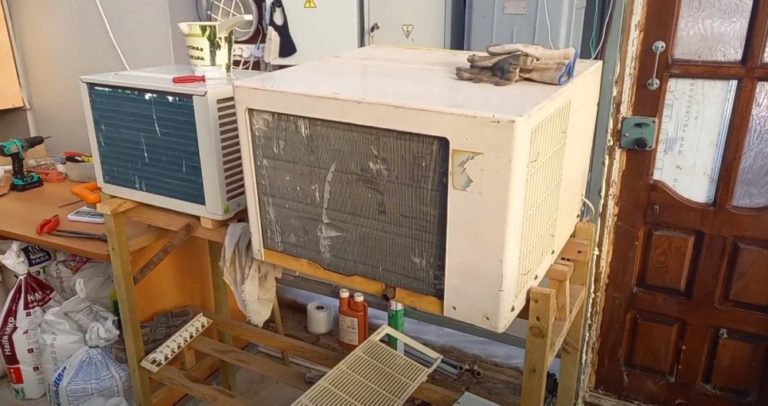
Greenhouse maintenance professionals have often encountered the problem of high humidity and the need for heating. Purchasing new dehumidification and heating equipment is expensive.
The solution is to convert an old window air conditioner into a dehumidifier. The only materials required are sheet plastic to cover the ducts and a window monoblock. The process involves redirecting the airflow within the air conditioner.
Let's start assembling it ourselves:
- Prepare your window air conditioner for renovation. Any model will do, even an old Soviet-era monoblock unit. The only requirement is that it needs to be in working order.
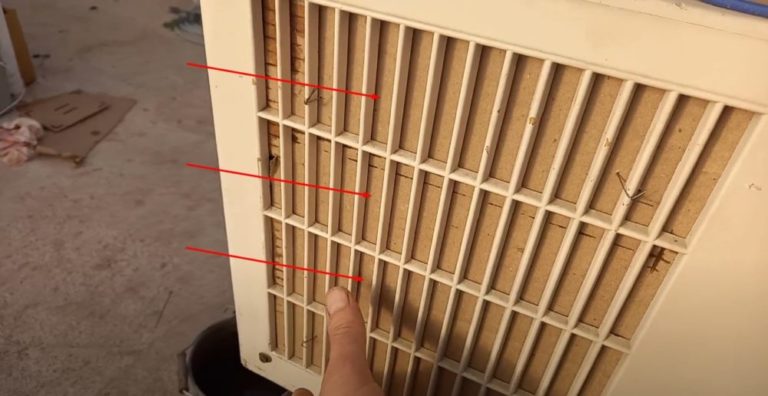
- Loosen the screws and remove the all-in-one unit's housing cover to access the internal components. The air conditioner has a baffle plate in the center that separates the airflow. Remove the plate if it's removable. If the baffle plate is an integral part of the housing, drill large holes across the entire surface.
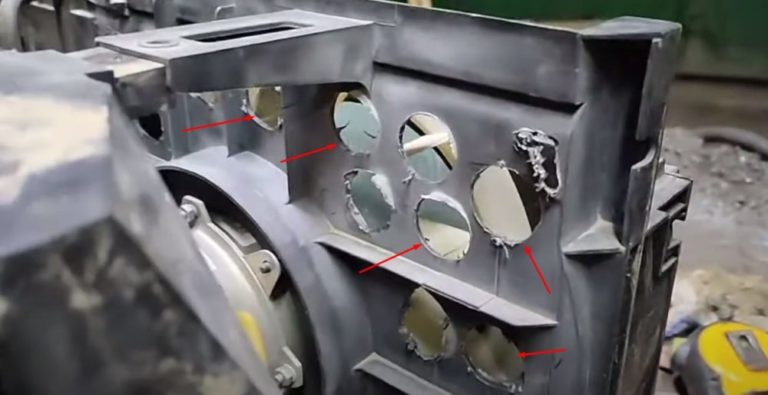
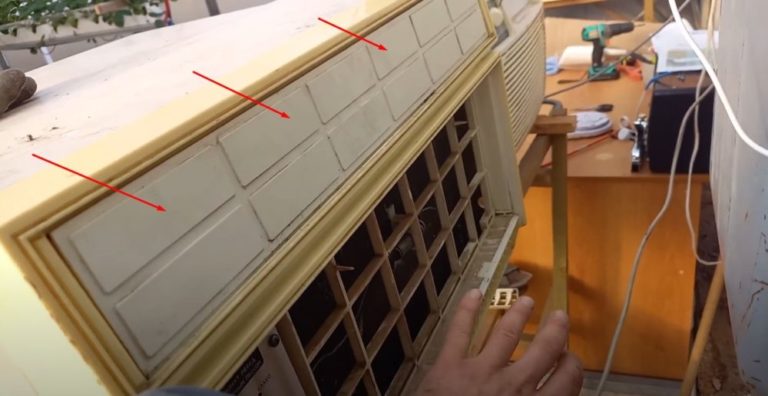
- On the front side of the monoblock, close the upper openings that supply cold air to the room.
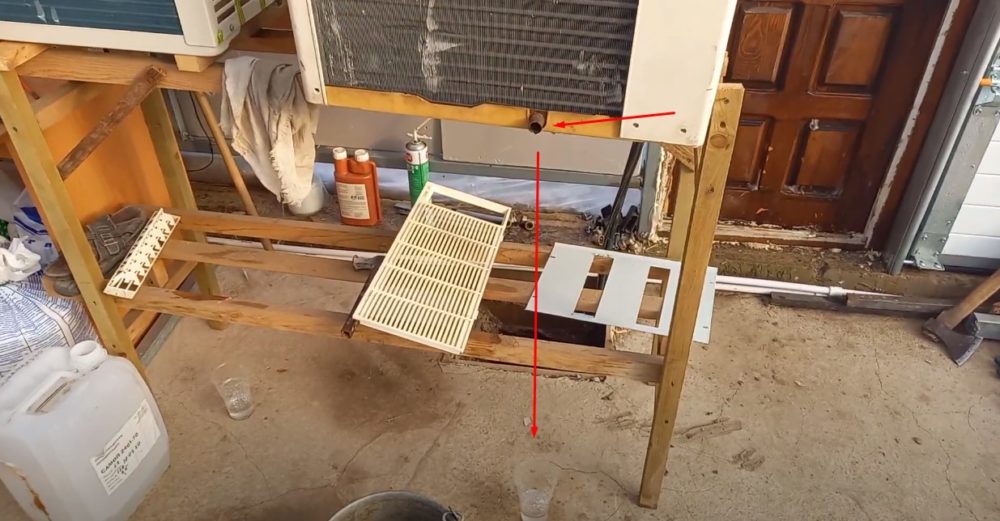
- After removing the partition, the fan directs warm air through the rear heating radiator, which previously vented to the outside of the air conditioner. It is the reverse side of the monoblock that, after the renovation, is directed into the greenhouse. Dry air, heated to approximately 30°C, exits the radiator.OWITH.
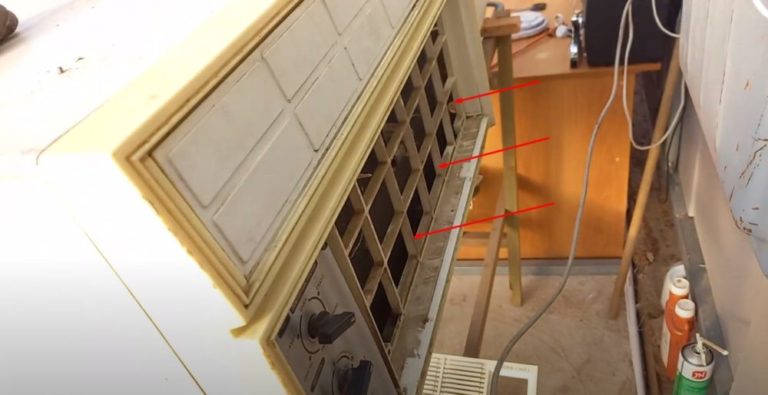
- The lower openings on the front of the monoblock still perform their function—they draw in air from the room. They cannot be covered with a strip.
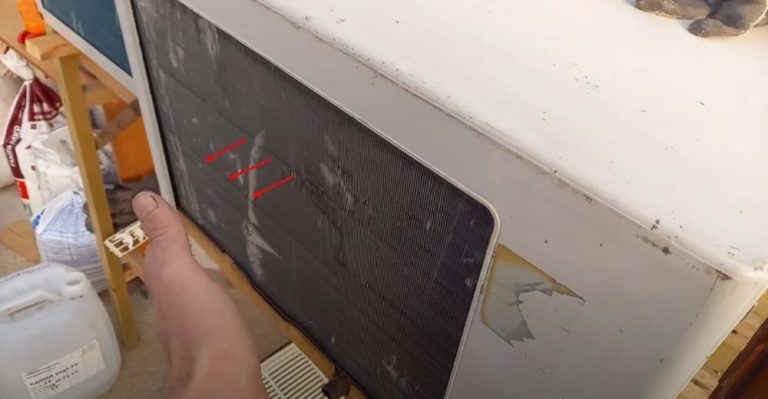
- The side of the monoblock is covered with a grille. Cover the air inlets provided by the manufacturer with a plastic strip or a piece of fiberboard cut to size.
After removing the internal baffle and closing the air vents, close the air conditioner housing cover. Turn on the unit. After the moist air has been purged, the separated condensate will begin to drain through the air conditioner's drain pipe. Place a container under the drain to collect the water.
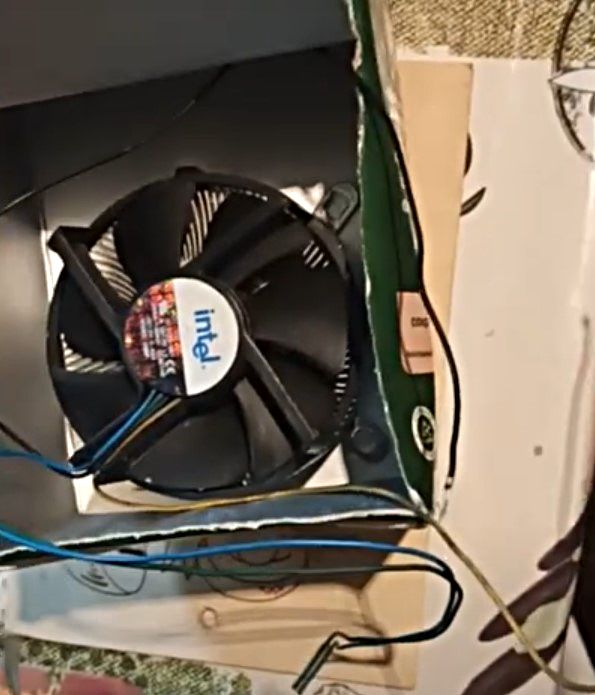
Peltier condensation dehumidifier
The dehumidifier's design is simple, but it's low-efficiency. You can build one yourself for experimentation or for use in a small room. You'll need an empty juice box, a computer cooler with two radiators, a Peltier element, and a power supply.
Let's start assembling it ourselves:
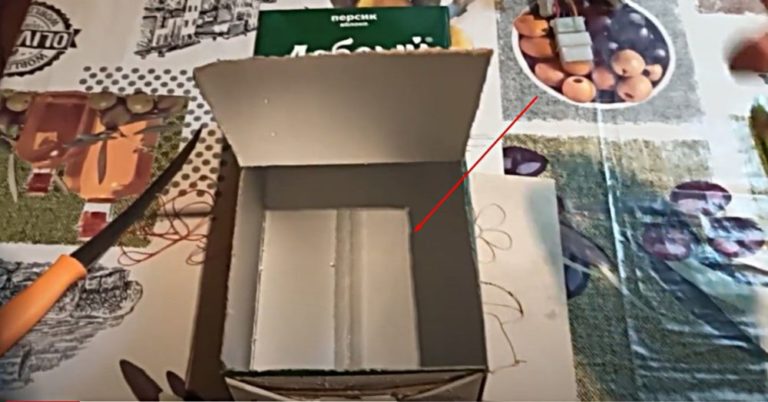
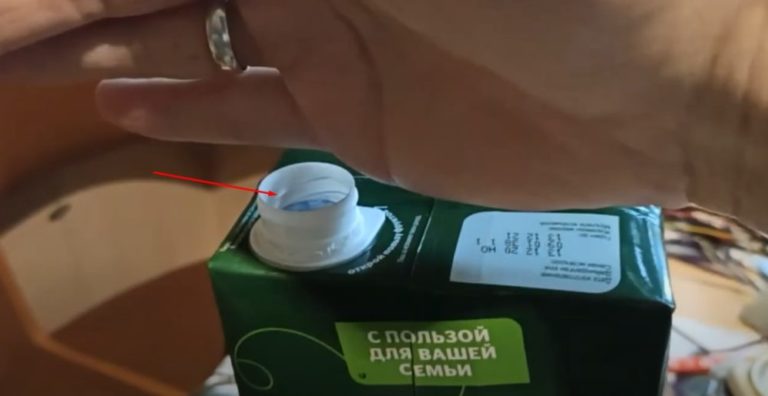
- Mark a hole on the wide side at the bottom of the juice box to accommodate the cooler and heat sink. Use a knife to cut along the side and bottom lines. Fold the cut-out petal upward.
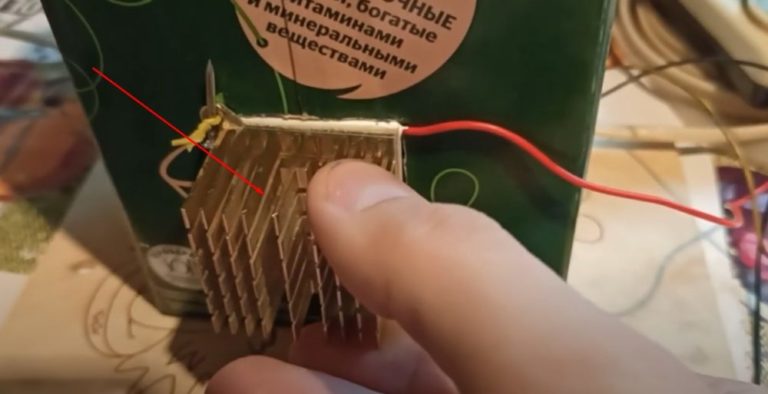
- On the opposite side, cut another hole for the Peltier element.

- Take a spare heatsink from a computer CPU cooler. Using thermal paste, glue the Peltier element to the cool side.
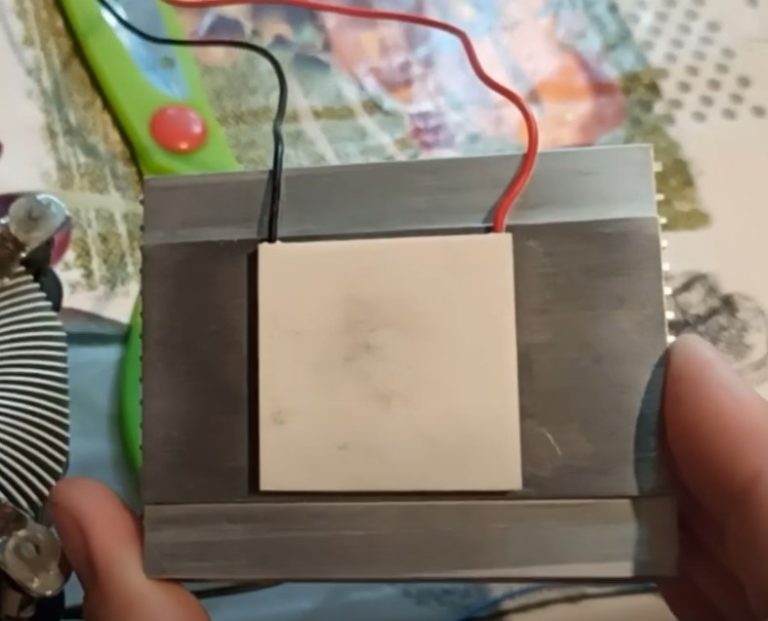
- Install the cooler and heatsink inside the package through the large opening. Attach the Peltier element to the small opening on the back. Position the cooler side facing outward, with the heated side facing inward. For better heat transfer, glue the heated side of the Peltier element to the cooler heatsink with thermal paste.

- Run the wires from the cooler and the Peltier element. Connect the equipment to the power supply using the adapter.

- Open the lid of the juice carton. Dry, heated air will escape through the opening. Bend the cut-out flap on the carton as well to allow air to escape.
While the assembled dehumidifier is running, the cooler on the outside of the package, glued to the cold side of the Peltier element, will collect condensation on the fins. Place a tray underneath to catch the water. The warm side of the Peltier element transfers heat to the cooler's radiator. The fan blades expel the dry, heated air into the room.
Adsorption dehumidifier from a bottle
When you urgently need to lower the humidity in a room, you can make a dehumidifier out of a plastic bottle. The larger the bottle, the more effective it is at collecting condensate. This option is perfect for dehumidifying a child's room.
Using more 5-liter bottles will help lower the humidity in your basement. To build your own dehumidifier, you'll need coarse table salt, plastic bottles, scissors, and a power drill.
Let's start assembling it ourselves:
- Unscrew the bottle caps. Using a power drill with a 2-3 mm drill bit, drill holes all over the caps.
- Screw the perforated corks onto the necks. Use scissors to cut off the tops of the bottles to create a watering can. Turn the pieces upside down and insert them into the other cut pieces of the bottles. Tape the pieces together with one layer of tape.
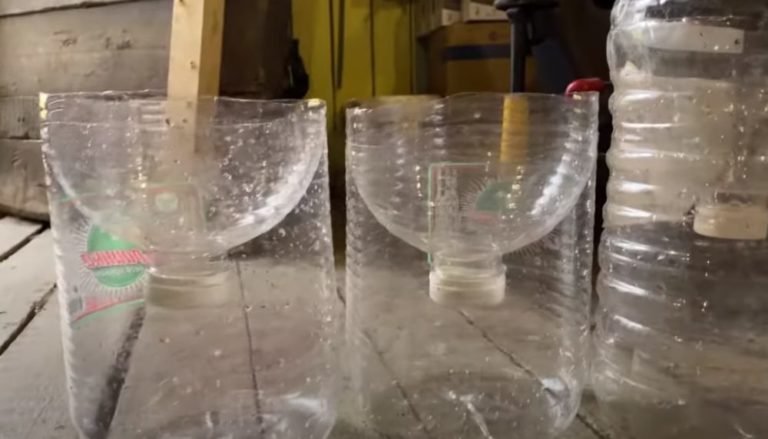
- Fill the resulting watering cans with coarse table salt. The fine perforations in the cork will prevent crystals from escaping. Place these homemade dehumidifiers in a damp basement, garage, or living room.
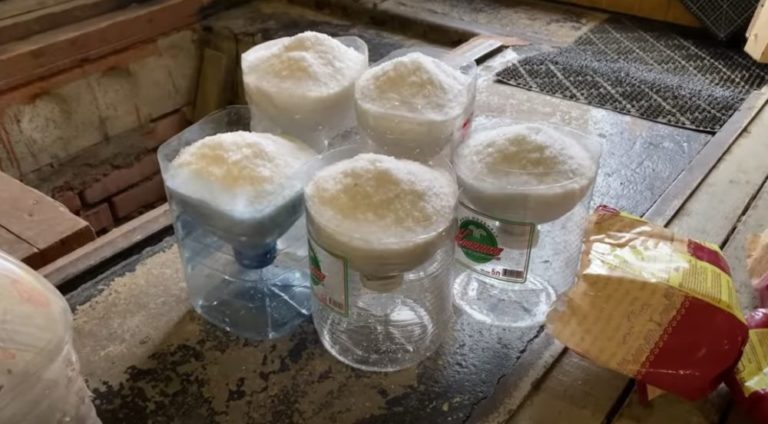
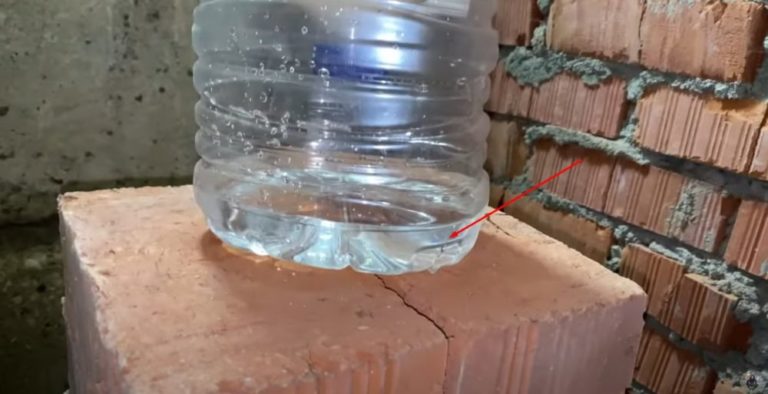
The homemade dehumidifier works by attracting moisture with salt. Condensation drains through perforations in the cork and into the bottle. Over time, the water needs to be drained.
Usually, when the bottom of the cut bottle is filled, the salt in the watering can will dissolve with condensation. After draining the water, refill the watering cans with fresh salt.
Tips for using a dehumidifier
The maintenance and proper operation of a self-assembled dehumidifier is determined by the type of dehumidifier.
Replace the dehumidifier media regularly with desiccant dehumidifiers. Dry the dehumidifier in the microwave or in the sun. Empty any accumulated water from the condensation dehumidifiers.
Clean and disinfect condensate collection tanks regularly. Bacteria and fungi can thrive in damp environments.
If one device isn't removing moisture, make another one yourself. You can build a different type of additional dehumidifier based on the same operating principle.
What other ways can you dehumidify the air?
Many homemade dehumidifiers have been invented. Some people use old refrigerators, water filter flasks, and other discarded items lying around the house.
Even a plastic bottle filled with frozen water can serve as a condensation dehumidifier. If you place the container on a tray in a room, the temperature difference will cause condensation to drip down the icy walls.

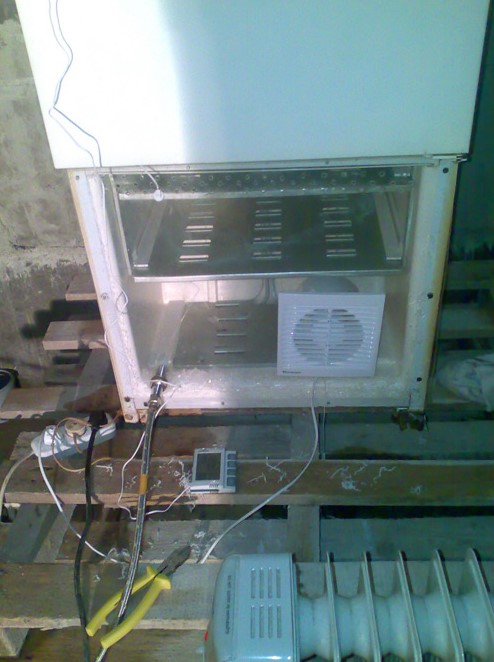
A refrigerator dehumidifier is popular among DIY enthusiasts. The idea is to replace the door of a working appliance with a sheet of plexiglass. Condensation that forms on the cooled surface will drain down the transparent sheet and onto the refrigerator's interior walls. Water drainage is provided through the appliance's built-in drain.
A supply fan is installed in the plexiglass to draw air into the refrigerator. After moisture is extracted, dry, cold air exits through holes in the top of the housing. A heater is installed to warm the air.
Silica gel and table salt aren't the only materials commonly used for adsorption dehumidification. Zeolite, anhydrous calcium chloride, and active alumina also have moisture-absorbing properties.
Sorbents come in natural, synthetic, solid, and liquid forms. Regardless of the substance's origin, each filler requires regeneration. The approximate service life of sorbents is limited to five years, after which they require replacement.
Answers to frequently asked questions
To remove moisture from the air, adsorption and condensation methods are used.
You can dry the air in a room using an air conditioner that has a drying function.
The average cost of a household appliance varies from 6 to 27 thousand rubles.
Silica gel, zeolite, anhydrous calcium chloride, and active aluminum oxide absorb moisture well.
Place the dehumidifier on a level, sturdy surface. Typically, the floor of the room where moisture concentration is highest is the ideal location. The dehumidifier's air ducts should not be blocked by walls or other furnishings.


