In residential and commercial spaces, a humidifier is essential for maintaining a healthy and comfortable microclimate. Learn more about the benefits of humidification and the causes of dry air in this article.
If you want to improve your indoor climate, you can build a humidifier yourself using antibacterial filters placed in a plastic box filled with water. To build a complex, functional sink, you'll need to make drums from discs and install a gear motor.
You can make a simple humidifier for a radiator from a plastic bottle and a bandage.Detailed instructions for each crafting method are provided below.
- Causes of "dry air" formation
- Benefits of a humidifier
- We assemble a powerful humidifier using factory-made filters
- Assembling a high-performance air washer with your own hands
- We assemble a humidifier for a heating radiator with our own hands.
- Ways to increase air humidity
- Answers to frequently asked questions
Causes of "dry air" formation
Conventionally, we can identify 2 main reasons for the formation of dry air in a room: lack of ventilation and high temperatureModern homes with insulated façades and plastic windows create a thermos effect.
Lack of ventilation leads to deterioration of air quality and over-drying by operating heating devices.
Dry air forms even inside ventilated buildings built in hot regions without a sea, river, or body of water. This is due to a climate characterized by high temperatures and low humidity.
There are two types of air humidity:
For the average person, the value of relative humidity is important, depending on the seasons and climate zones.
In winter, outside air has low absolute humidity (moisture content) and high relative humidity. When entering a heated space, the air masses warm up.
The moisture capacity increases and the relative humidity decreases below 15%The air becomes dry and difficult to breathe.
Benefits of a humidifier
Just like high and low humidity indoors, it's dangerous for the health of humans, pets, and houseplants. People experience difficulty breathing, and colds and allergies become more common.
Animals start acting irritated. Plants on the windowsills start wilting.
The humidifier brings the relative humidity level in the room to the recommended level. SNiP 2.04.05-91 norm: in winter – from 30 to 45%, in summer – from 30 to 60%. According to GOST 30494-2011, it is not recommended to lower the relative humidity in apartments and houses below 45%.

When a humidifier is running, children sleep more soundly because the mucous membranes in their noses don't dry out. Sick people experience relief from dry coughs, headaches, and nosebleeds.
Allergy symptoms and snoring volume are reduced. The moisture balance of dry skin and hair is restored.
The humidifier prevents wooden furniture from drying out, cracking, and loosening. It also increases the longevity of wallpaper and other finishing materials.

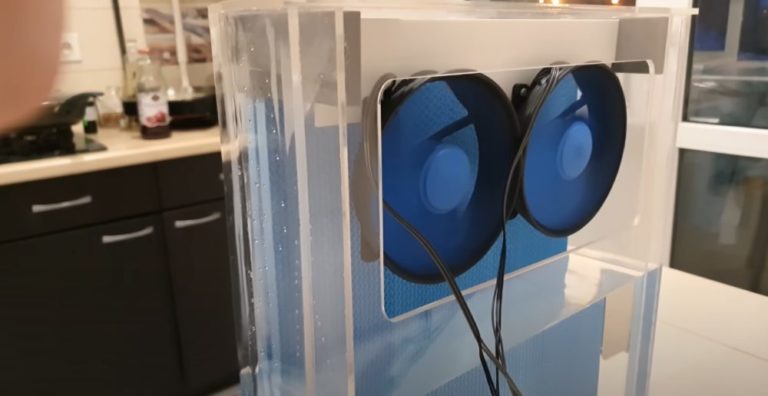
We assemble a powerful humidifier using factory-made filters
A high-quality humidifier that hangs on a heating battery is worth it about 11,000 rubles. If you thoroughly study the device's structure, you can assemble the design yourself at home. 3-4 times cheaper.
An additional advantage of this homemade device is the forced air supply provided by small fans. This option is ideal when the radiators in the apartment are covered by a decorative screen, which would prevent the installation of a commercial passive humidifier.
If you're interested in this homemade humidifier, let's get started building it yourself:
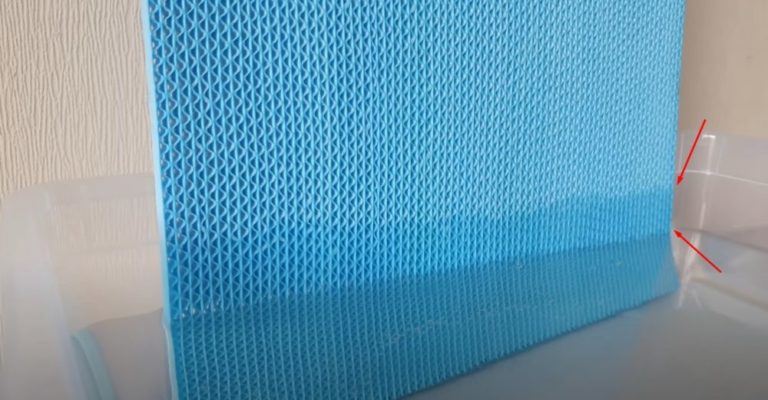
- Buy in store or order online 2 replaceable filters For a store-bought humidifier, the purchase will cost around 1,000–1,500 rubles.
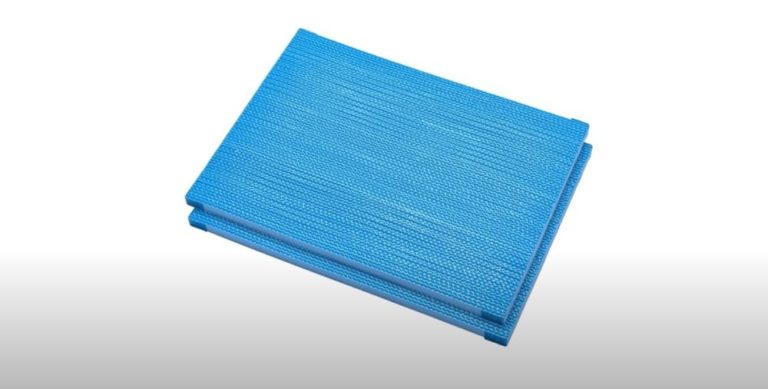
- For a homemade humidifier to humidify a room, the filters must have a high water absorption rate. You can test the purchased pads experimentally.
Submerge the bottom of the antibacterial filter in waterAbove the level of the poured liquid, you will see how the moisture gradually rises along the plate in a dark strip.
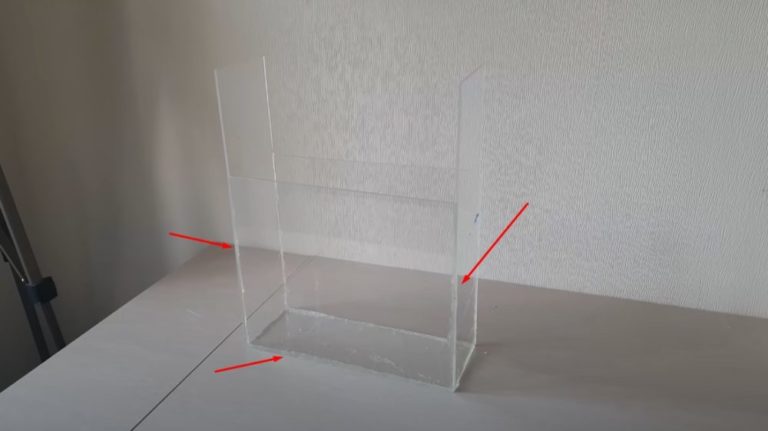
- Buy a sheet of plexiglass to assemble the plastic housing. You might already have some around the house, so you don't have to buy it yourself. Cut the plexiglass into pieces to assemble the box, taking into account the size of the filter plates.
They must fit into the case, leaving some space between the front and back walls to allow for ventilation by fans.
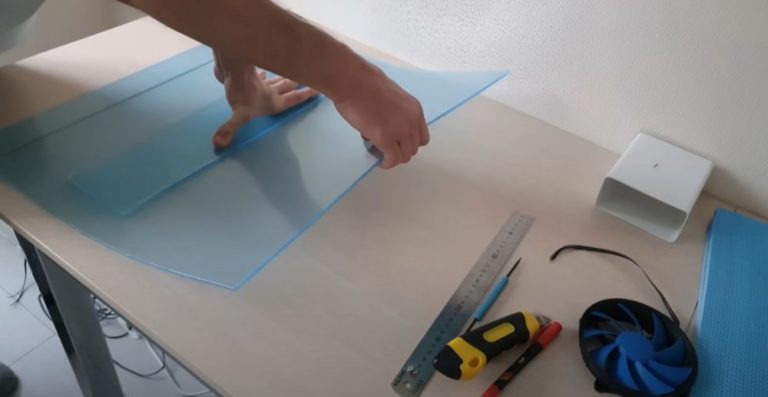
- Clamp the cut plexiglass pieces and glue them together with epoxy resin or a hot glue gun. The joints should be airtight to prevent water from leaking out of the housing.
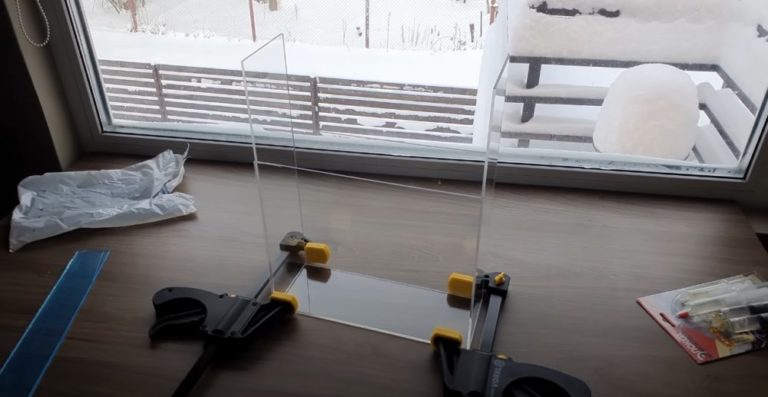
- When gluing plexiglass pieces together, try to make neat joints. Smeared glue will leave visible marks on the transparent walls. The resulting enclosure will be unsightly.
- If you're not satisfied with the gluing results or aren't confident in your abilities, contact a company that manufactures plexiglass structures. A custom-made enclosure using their material will cost between 2,500 and 3,500 rubles.
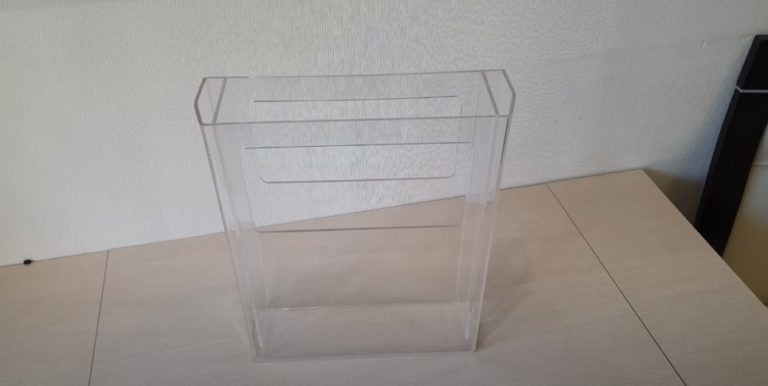
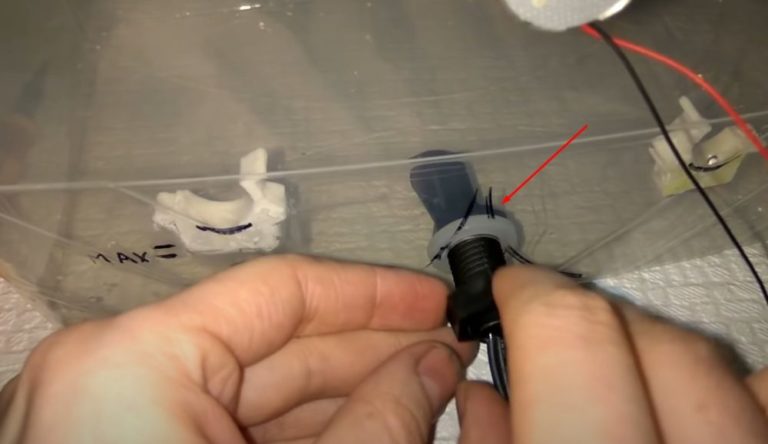
- Glue homemade plastic inserts to the top of the side panels from the inside of the case. First, cut vertical slots in the inserts to hold the filters and fans on the plate.
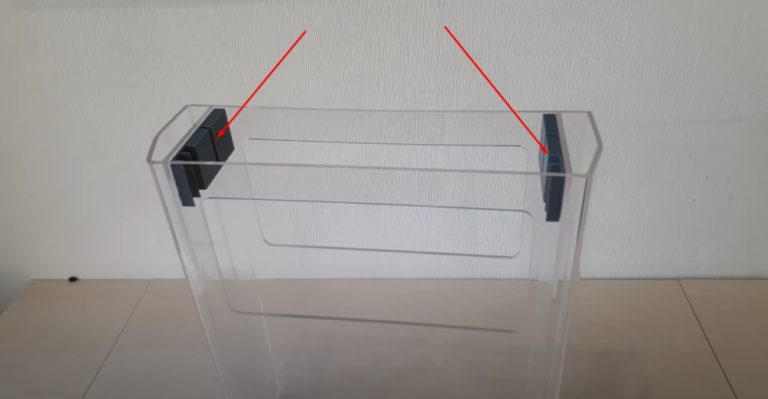
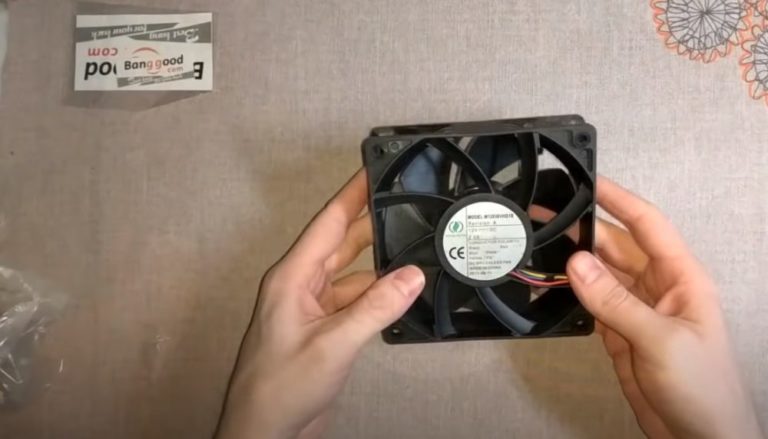
- To ensure that the humidified air circulates throughout the room and not around the appliance body, install 2 fansComputer coolers are suitable. Mount the fans on a plastic plate and install them into the slots in the holders inside the case.
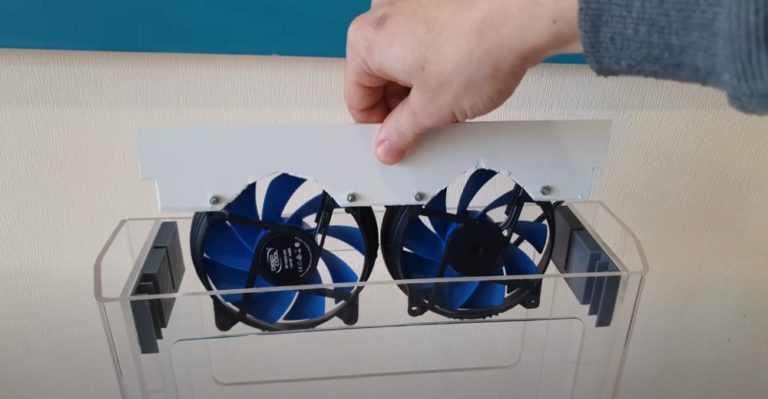
- Install antibacterial filters in the adjacent slots of the holders in front of the fans.
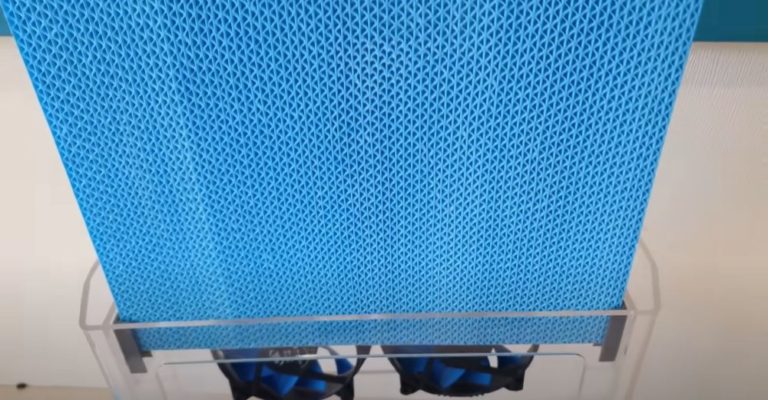
- Fill the housing with water. The volume depends on the size of the container, but 6 liters is typical. Set the top level 5-10 cm below the fans.
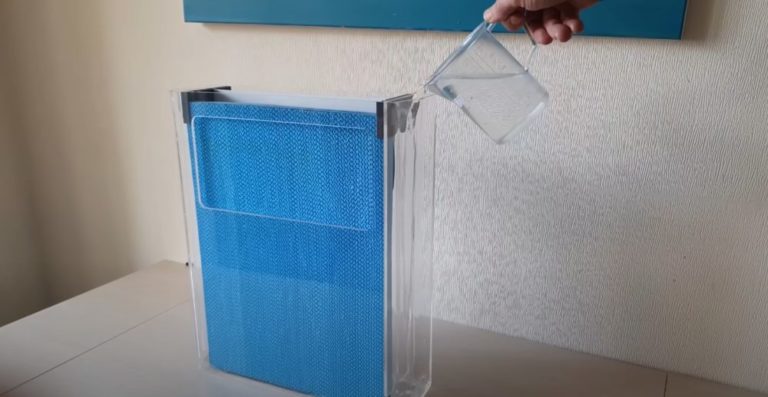
- Apply voltage to the fans. Computer coolers require 9-12 volts DC to operate.
- To check the quality of your humidifier, use airflow and humidity meters. If you don't have any, simply place your hand against the window. You should feel a moist air flow through the filter.
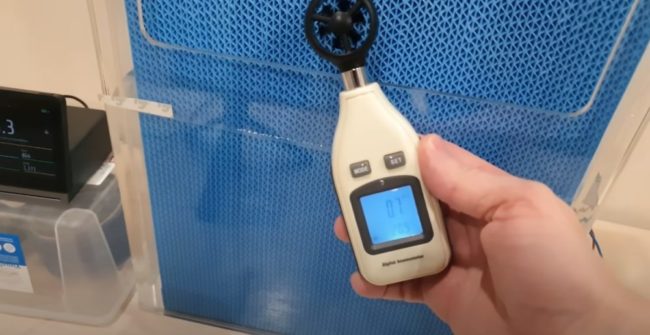
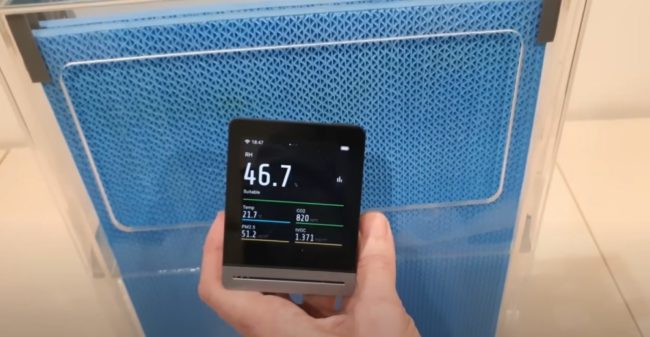
A homemade humidifier with computer coolers evaporates from the case in an hour up to 220 grams of waterThe humidity level in a dry room rises. from 30 to 45-48%.
Unlike expensive factory-made ultrasonic humidifiers, this inexpensive homemade device additionally purifies the air through antibacterial filters.
We invite you to watch the video instructions.
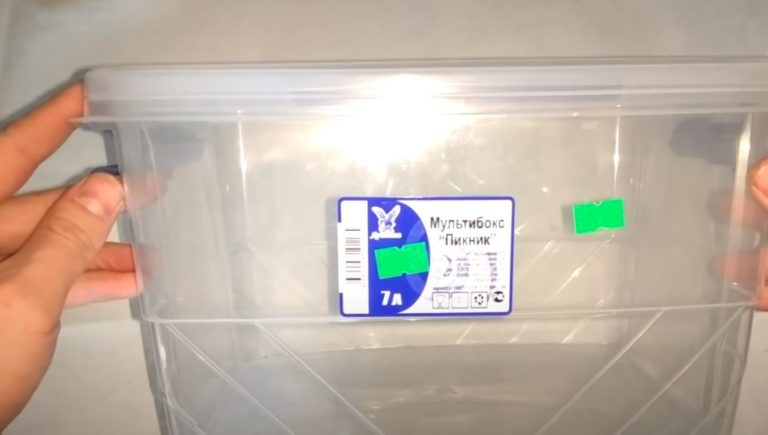
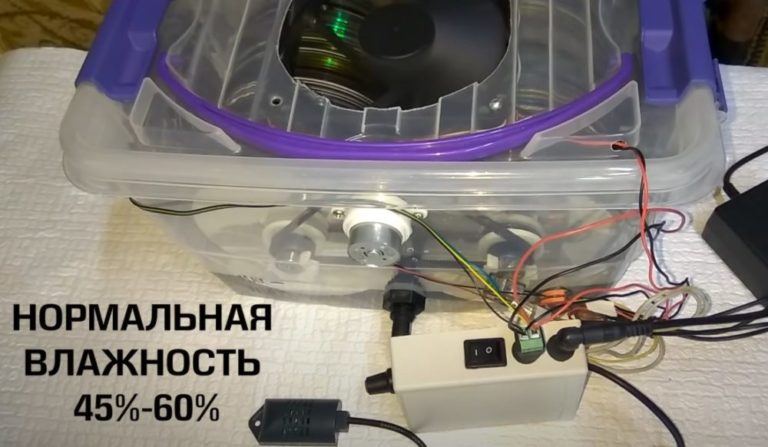
Assembling a high-performance air washer with your own hands
A humidifier with an air washer removes dust, allergens, bacteria, and unpleasant odors from your home. Factory-made units are expensive. A simple DIY project made from a plastic container can improve your home's comfort for next to nothing.
If you're interested in this DIY invention, let's dive into how to make a DIY humidifier with a cleaning function:
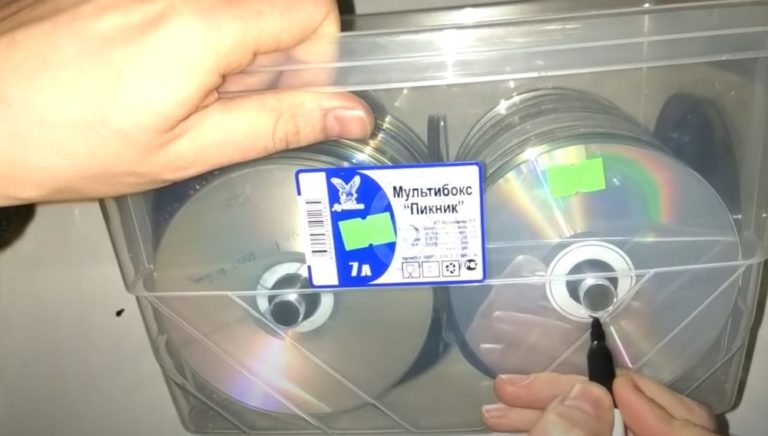
- Use a plastic multi-box to make your own sink enclosure. The optimal capacity is 7 liters.
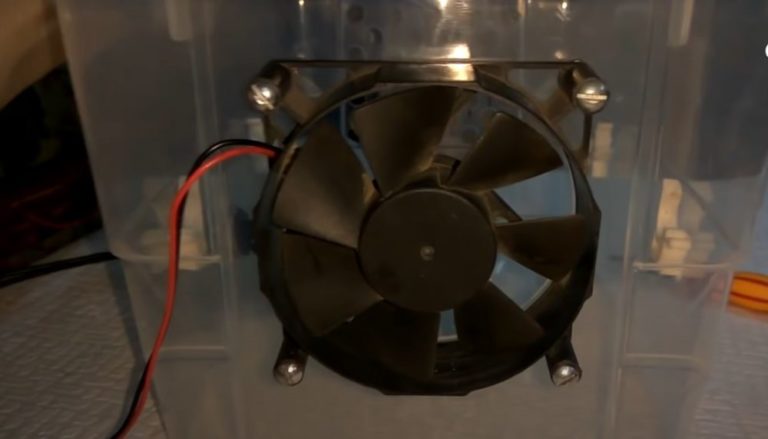
- Use a powerful computer cooler rated for 2 amps as your main fan.
- Use a marker to mark the cooler mounting location on the plastic case lid. Position the fan approximately in the center.
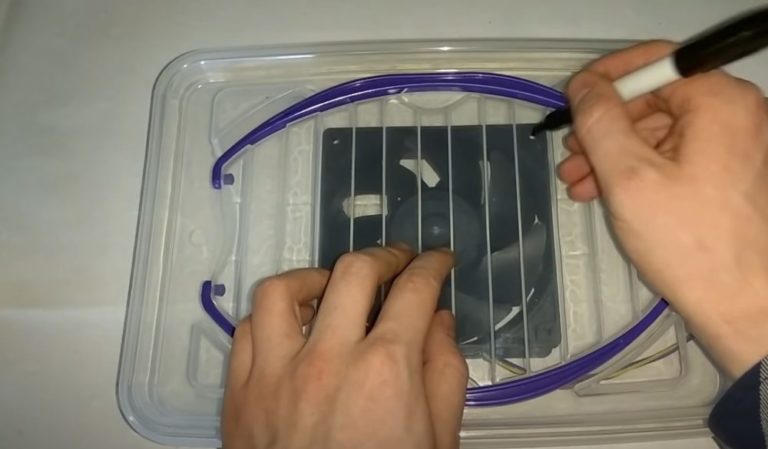
- Cut a hole in the cover for the cooler's air intake. Drill four holes to secure the fan and secure it with M4 bolts.
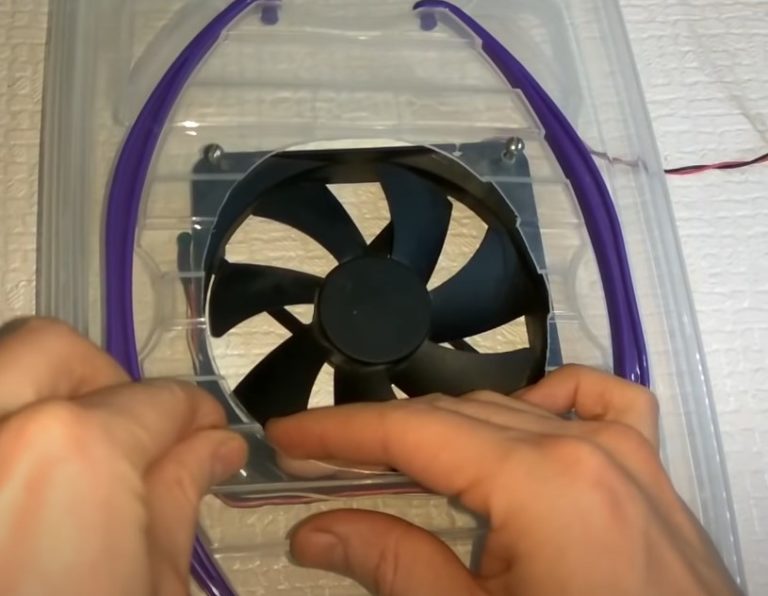
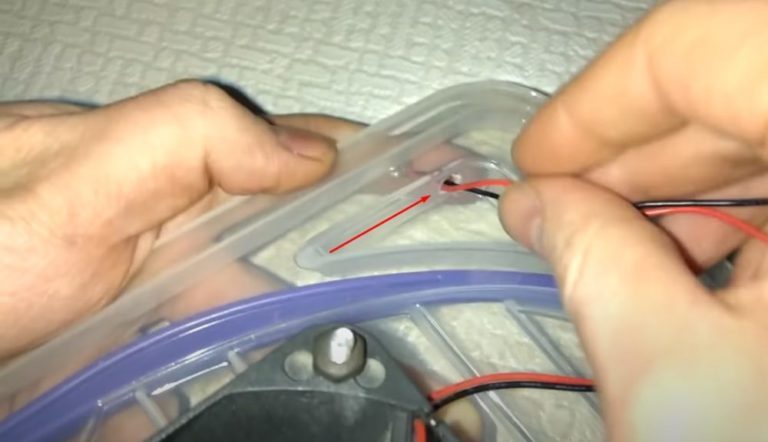
- The cooler will be located inside the box. To route the power supply wires, drill a hole in the lid.
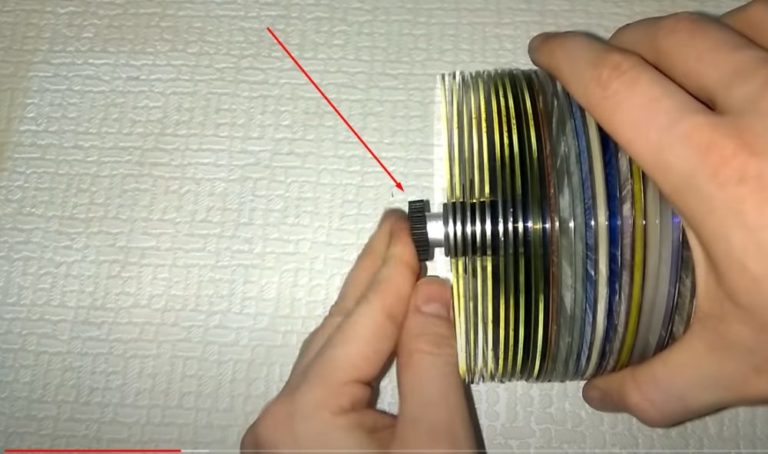
- To make two drums for the sink, use aluminum tubes with a diameter of 14 mm. The length of the tubes depends on the width of the container. Place the CDs on the tubes one by one.
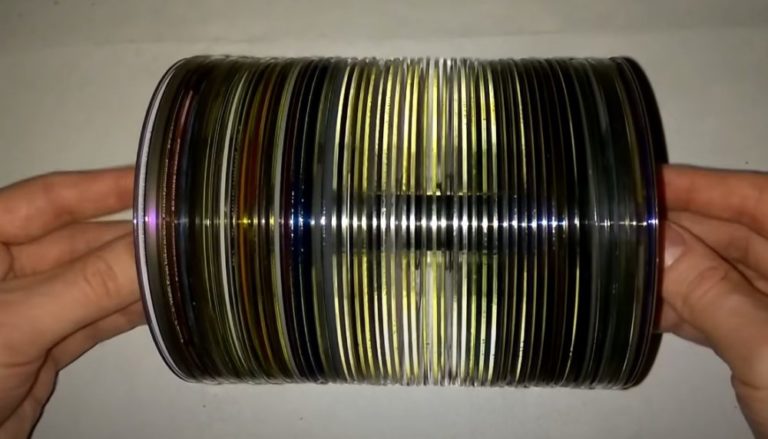
Use silicone or rubber rings to create a gap between them. The end result should be stacked drums with a 3-5 mm gap between each disc.
- Create supports for the drum shafts. Use a marker to mark the locations of the shafts on the sides of the housing. To ensure accurate markings, place the drums parallel to each other in the multi-box.
Maintain equal gaps between the blanks and the side walls of the plastic case. Make temporary spacers using the required number of CDs.
Make sure there is at least 2 cm of clearance between the cooler on the lid when closed and the top of the drums.
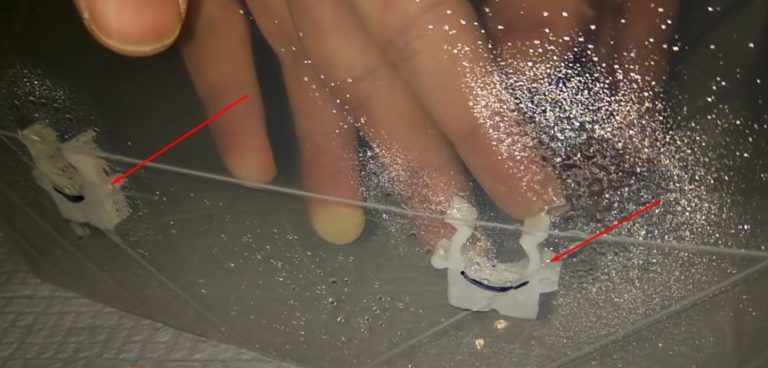
- Make the supports themselves from plastic holders for 16 mm diameter metal-plastic pipe. Cut the clips lengthwise into two equal pieces to reduce the thickness.
Use a hot glue gun to glue each half of the part to the side walls of the multi-box from the inside, following the markings.
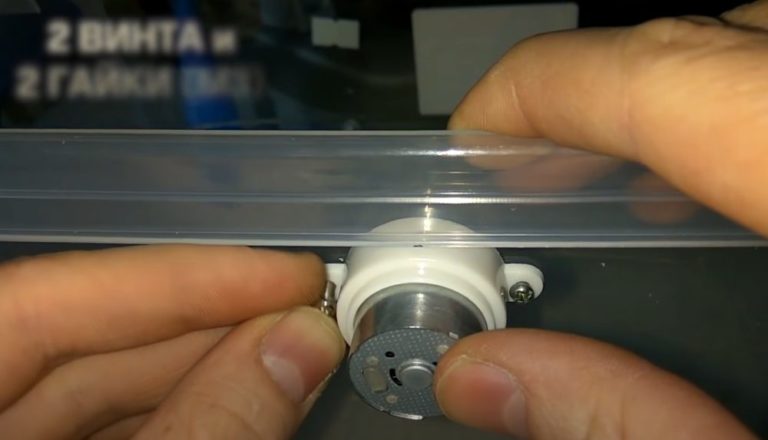
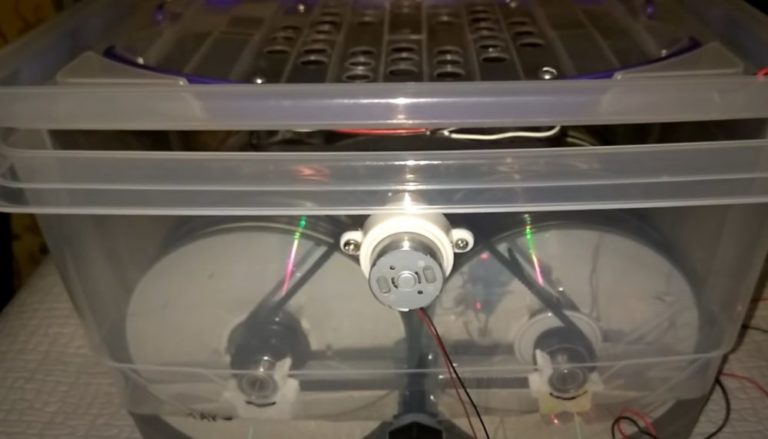
- Install the gearmotor directly in the center of the box's side panel at the topmost position. Position the motor itself outside the multi-box. Insert the shaft with the toothed pulley into the box through the drilled hole.
- For the drums, make your own toothed pulleys from silicone rings mounted on a 14 mm diameter aluminum tube. Press the rings tightly together and coat the surface with glue.
Glue a section of timing belt. The pitch of the drum pulleys and the gearmotor must match. Select the number of rings for each pulley based on the belt width.
Remove the resulting parts from the aluminum tube after the glue has set. Attach the homemade pulleys to the drum shafts on the gearmotor side.
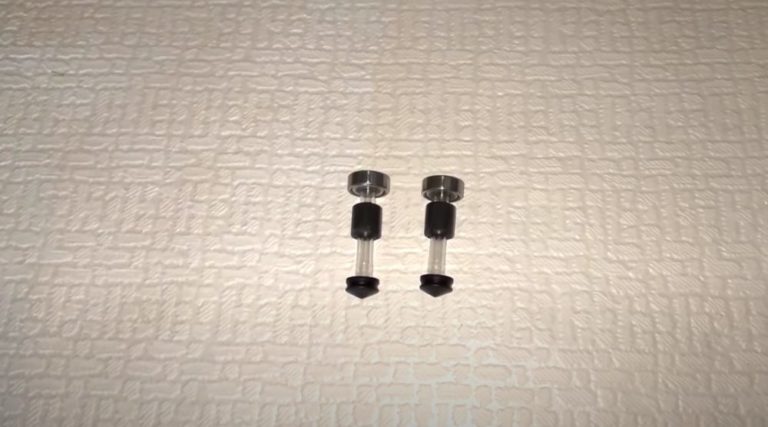
- To make the drums rotate more easily on the holders, fit them with bearings on both sides of the shaft. Make your own design from syringe caps. Fit a bearing with an outer ring tightly onto one side. diameter 16 mmto fit into the holder clip.
Use a knife to trim off one protruding thin edge of the cap. Wrap the other thick protruding end of the cap with just enough electrical tape so that the resulting circle fits snugly inside the drum shaft.
Make your own 4 parts with bearings for each side of 2 shafts.
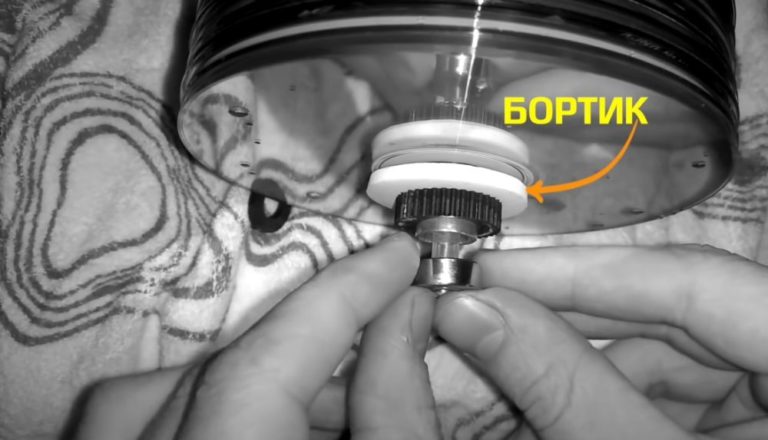
- Assemble the gear drive mechanism. Place the seal from the disc case onto the shaft to act as a flange preventing the belt from slipping. Install the homemade bearings with syringe caps.
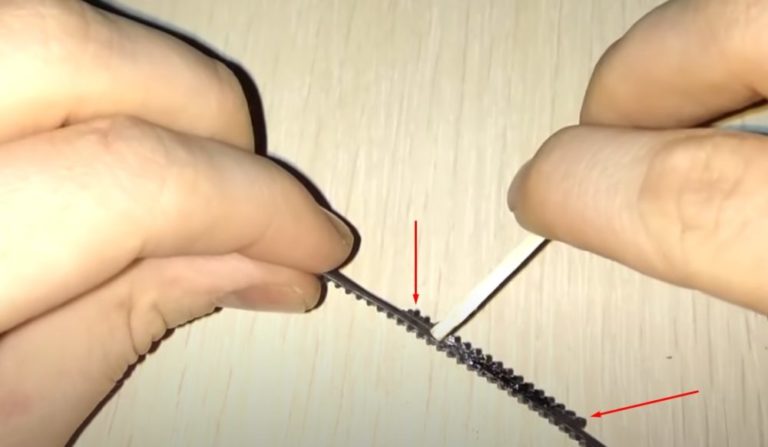
- Install the drums with bearings inside the multi-box in their permanent location. Make a toothed belt of the required diameter. Cut the rubber product to create a belt. Place it on the pulleys of the two drum shafts and the gear motor, connecting them into a ring.
Trim off any excess ends where the two edges intersect. Glue the ends of the belt together. To reinforce the joint, glue a piece of toothed tape to the back, flat, non-toothed side.
- Install the bonded belt onto the toothed drive. Check that the drums rotate correctly.

- Install the water level sensor on the side of the box. It should be located between the disc drums, as close as possible to their mating point.
Maintain a sufficient distance from the bottom of the box to allow the sensor float to operate. The reed switch mechanism will automatically shut off the washer when the required water level is reached.
- Drill holes in the lid of the multi-box for water evaporation. The number of holes is optional, but the diameter should be no less than 10 mm.
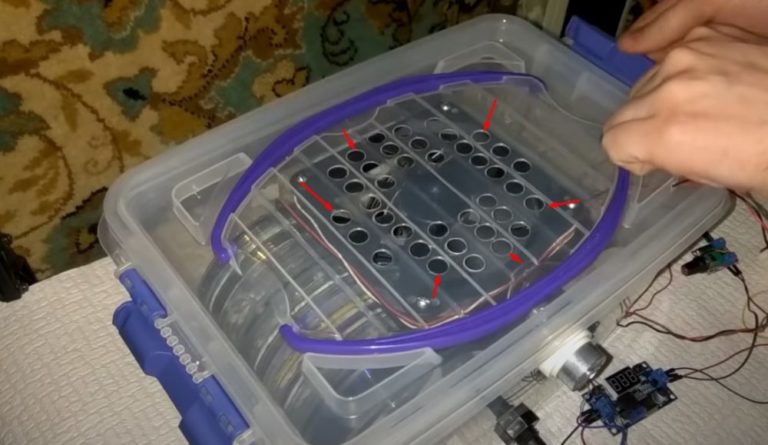
- The main fan installed on the box's lid may not be sufficient to evaporate the water. Installing additional fans on the sides of the box can increase the humidifier's performance.
Place fans where there are no fixed drum holders.
- Assemble all the sink components. Connect power to the coolers and fill them with water. Test the functionality of the assembled mechanism.
To automate the operation, you can connect your homemade sink to a humidity controller. The electronic unit will maintain the required humidity level for a residential area. premises 45-60%.
Connect a water level sensor with a reed switch to the automation system. Place the entire electronic unit, including the relay, controller, and power supply for the coolers, in a separate box.
Watch the video with instructions.
We assemble a humidifier for a heating radiator with our own hands.
With the start of the heating season, the air in your home is dry from overheating radiators. A simple humidifier, which you can build yourself for your apartment or home using materials you have on hand, will restore the microclimate.
Hang this homemade device on a radiator to allow the hot air entering the room to evaporate the moisture. We'll cover how to build a DIY radiator humidifier for your home or apartment in our detailed instructions.
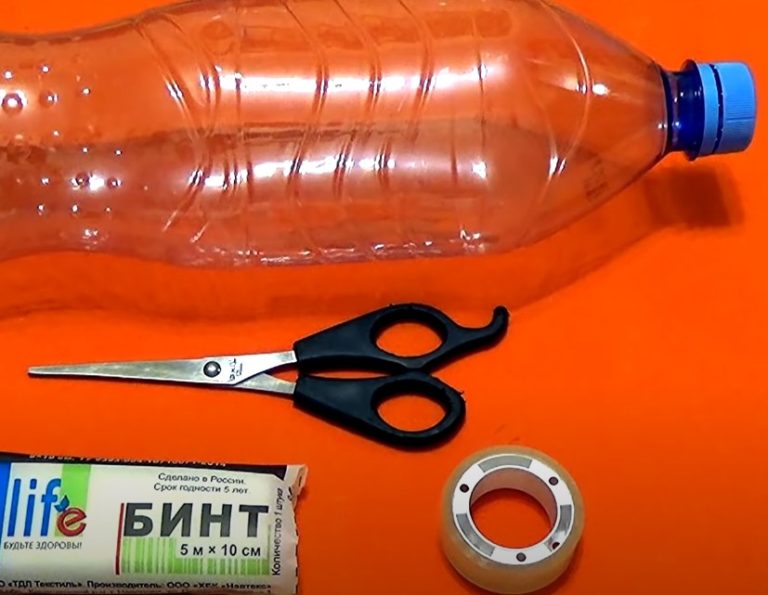
- Prepare the materials and tools for the job. You will need a 1.5-2 liter plastic bottle, medical gauze, tape, and scissors.
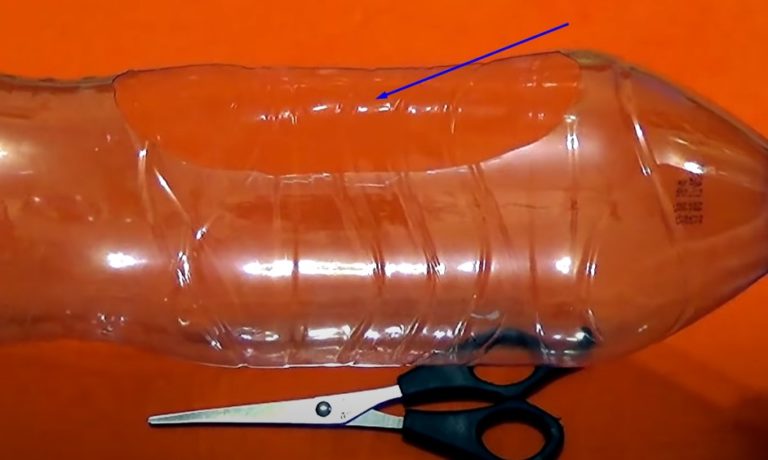
- Use scissors to cut a hole in the side of the bottle. Make it neat and oblong. Leave high, rounded edges to prevent water from spilling out.
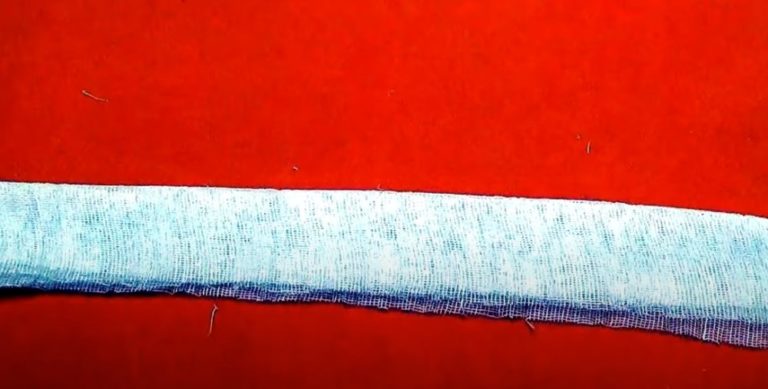
- Unroll a 5 m long medical bandage. Fold the strip lengthwise to create 4 layers of gauze.
- Using thin tape, attach a plastic bottle horizontally to the pipe leading to the radiator. Position the cut hole upward. If the pipes are connected from under the floor, try to secure the bottle to the radiator sections.
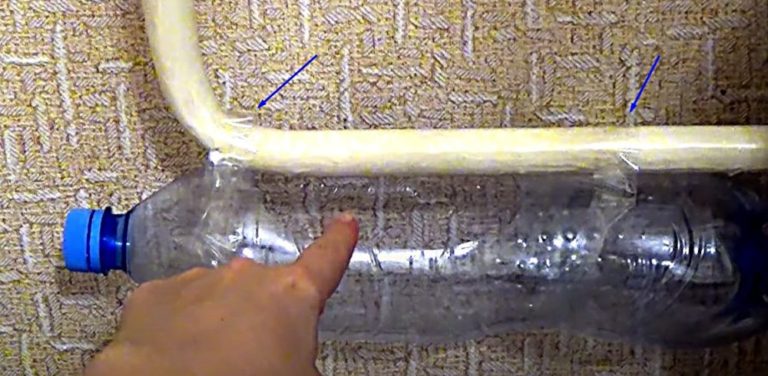
- Pour water into the bottle through the cut window. Take a strip of bandage and tuck the center inside the bottle to absorb moisture. Wrap the edges of the gauze on either side of the bottle around the pipe leading to the radiator.
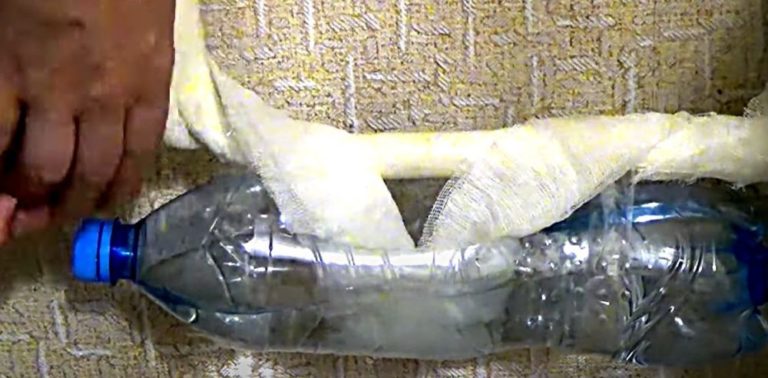
A simple humidifier works by natural evaporation. The bandage absorbs water from the bottle. Evaporation occurs where the bandages are wound around a hot pipe near the radiator.
Humidification stops when you forget to add water in time or turn off the heating.
Watch the video to learn how to make your own simple humidifier.
Ways to increase air humidity
A store-bought or homemade humidifier isn't the only way to improve your air quality. Before you get your hands on one, try these simple tricks:
- Fill the bathtub with hot water. Leave the door open to allow the moisture vapor to spread to other rooms.
- Place the dryer with wet laundry near a radiator or portable heater.
- Periodically spray water into the rooms using a household spray bottle for spraying plants.
- Wet clean your rooms more often.
- Boil water in a kettle or saucepan with the lid open.
- Place a fish tank in your home. Leave the lid on to increase evaporation.
- Add hydrogel beads to a beautiful vase to further enhance your interior decor.
- Bring a hibiscus, fern, dracaena, or other houseplant that intensively accumulates and evaporates moisture into your home.
You can quickly create a humidifier by placing a running fan in front of a wet towel. Periodically, as it dries, wet it with water or spray it with a spray bottle.
Answers to frequently asked questions
Place containers of water around the room. Plant plants that actively store and evaporate moisture. Mist the rooms with water from a spray bottle. Hang wet laundry in front of a fan or heater.
Ventilate the room frequently and perform wet cleaning. Place the aquarium with the lid open. To speed up humidification, boil water in containers with the lid open.
If humidity is high, increase ventilation. Turn on heating appliances. Running an air conditioner or kitchen hood will help reduce humidity.
Plain water can be used to humidify the air, but it leaves a hard scale residue in humidifiers. Manufacturers recommend using distilled water instead.
When using a commercial humidifier, add essential oils to a separate container, not water. Mixing the two will damage the humidifier. If you use a spray bottle to mist your rooms, you can add essential oils at your discretion. However, this may leave greasy stains on furniture and textiles.
Dry air is indicated by dried-out wooden furniture and wallpaper peeling in tightly packed pieces. People develop a dry cough, allergic and cold symptoms, and snoring at night. Children snore in their sleep due to dry nasal mucosa.


