Before using water-heated floors, it is necessary to first check for functionality and the presence of leaks, conducting a so-called pressure test.
In this article, we'll discuss the types and methods of pressure testing underfloor heating systems, and you'll also learn how to do it yourself. We'll also examine all types of compressors designed for this purpose, identifying their pros and cons.
- Why is it necessary to pressure test underfloor heating?
- Types of compressors: which one to choose?
- Hand pumps
- Electric
- Which one to choose?
- Methods for pressure testing water-heated floors
- Hot water pressure testing
- Cold water pressure testing
- Testing underfloor heating with air
- Which method should I choose?
- Features of hydraulic testing depending on the type of pipes
- We are making the first launch
Why is it necessary to pressure test underfloor heating?
Pressure testing of a heating system is a high-pressure test of its pipes and fittings for leaks. This test helps identify leaks and other defects. Each heating circuit must be tested separately.
Pressure testing of heated floors is carried out before pouring the concrete screed and laying the final coating, so that if any defects are discovered, they can be easily corrected.
If the hydrofloor is installed in a wooden house using the "dry" method, then it must also be tested before the pipes are covered with gypsum fiber sheets.
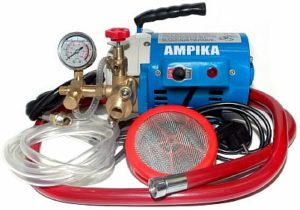
Types of compressors: which one to choose?
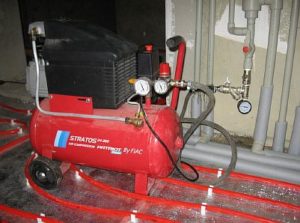
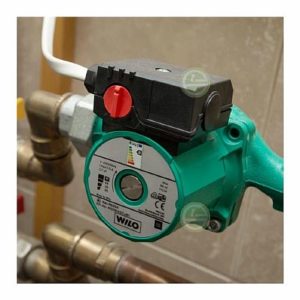
Compressors used for testing underfloor heating systems can be manual or electric.
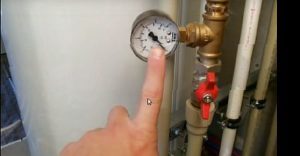
Their main function is to pump water or air into the pipeline. The unit's operation is monitored using a pressure gauge.
Hand pumps
Manual pressure testing tools are mechanical. Their advantages include low cost, low maintenance, and ease of use. They are portable and require no power source. Mechanical compressors include all necessary components, such as hoses, a pressure gauge, and a tank.
The downside is its low productivity. If you decide to perform pressure testing yourself with such a pump, it will require considerable effort to achieve a high-quality test.

Electric
Electric compressors are bulkier and more expensive, but they are fully automated. Using them requires no effort at all. A hydraulic pump easily achieves any pressure in the system. These devices are more often used by professionals who require frequent, large-volume pressure testing.
Despite the high cost of such pumps, a significant advantage is their increased productivity, as the device is equipped with a motor, which saves time and effort.
Which one to choose?
When choosing the type of pump for pressure testing, the following points must be taken into account:
- volume of the heating system;
- frequency of pressure testing.
If you need to pressure test a small system, a hand compressor is a perfectly suitable option, and buying an expensive electrical device does not make sense.
To test the heating system in a large room, the power of this equipment may not be sufficient, so it is better to purchase an electric compressor pump.
We recommend purchasing devices with a steel rather than plastic housing and equipped with special valves that prevent pressure from rising above normal.
Methods for pressure testing water-heated floors
Pressure testing of heated floors can be carried out in several ways:
- hot coolant;
- cold water;
- air.
Before carrying out pressure testing, it is recommended to flush the main line with ordinary water from the tap to remove any possible contaminants.
To do this, you need to fill and then drain the water from the pipeline several times. When the water runs completely clear, you can stop the procedure.
Hot water pressure testing
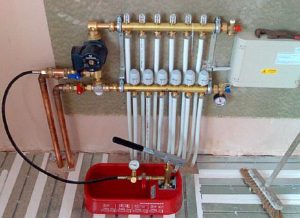
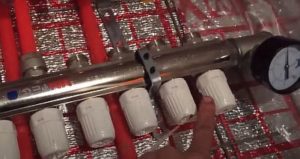
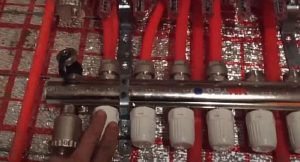
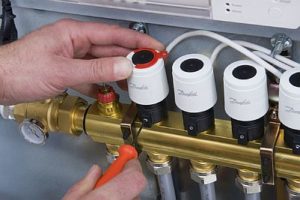
Before carrying out pressure testing of a warm water floor, it is necessary to roll out the pipeline and install a manifold to which the circuits are connected.
Let's look at the process step by step:
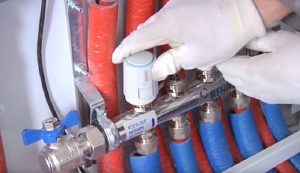
- The return valves are closed at the collector unit.
- The pressure is set at around 2.5 atmospheres.

- The main line fills with water through the supply pipes. A hissing sound is heard, indicating air is escaping from the Mayevsky valve or through the air vent.
- Open one return line valve to bleed air. When water starts flowing, all air pockets have been released, and the valve can be closed. This procedure must be repeated for all circuits.
The presence of air in the pipeline causes the formation of voids, which reduces the efficiency of the system, as this leads to a decrease in pressure.
- The valve in front of the supply comb is closed and opened in front of the return.
It's important to gradually increase the coolant temperature during the hydrotest, starting at 20°C and increasing by 5°C every few hours. During this time, check the underfloor heating for leaks. If any are detected, drain the water from the main line and repair the leak.
The pipeline is then filled with water again and left for 2-3 days for further testing and observation to identify any possible problems.
If no further defects are detected, the heating temperature of the coolant is gradually reduced. Pouring the screed begins only after the system has cooled.
Cold water pressure testing
Pressure testing of a warm hydronic floor with cold coolant should be performed under elevated pressure. The pipeline should be pumped with chilled water at a pressure twice the operating pressure. The system is tested for two days, which is sufficient to identify any defects.
As in the first case, the problems are corrected and the test is repeated.
Testing underfloor heating with air
Often, when there is no water, homeowners are faced with the question of how to pressurize a warm water floor with air.
We will tell you how to do this and at what pressure the system should be tested.
The step-by-step process of air pressure testing of a heated floor is as follows:
- All valves are closed, including the Mayevsky valve. If there are automatic air vents, they are unscrewed and plugged during the pressure testing.
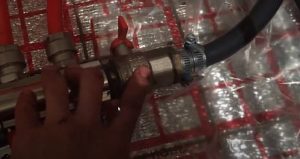
- The pressure is set to twice the operating pressure (4-5 atm). This is done using a compressor or a car pump. To pump air with these devices, a hose is required, which is connected with a fitting and a valve.
- Pressure is only built up in the underfloor heating circuits. There should be no pressure buildup between the manifold and the boiler, as most heating devices can withstand pressures up to 3 atm; otherwise, they may fail. Therefore, the section from the manifold to the boiler must be pressure tested separately.
- After the main line is filled with air, the supply is closed and the structure is left for a day. During this time, the pressure in the system should be monitored. A slight drop in pressure is acceptable.
- If the pressure drops, identify the leaky areas. To do this, cover the areas where the leak is likely with a soapy solution. Glass cleaner or soapy water will work well. The solution will foam where air is escaping from the pipeline.
- The problems are eliminated and the pressure testing is repeated.
Only after making sure that the heating system is free of defects, can you pour the screed.
It's worth noting that when testing hydrofloors under high pressure, there's a risk that the pipeline will pop out of its seat. This can happen if the system was secured with mounting tape.
To avoid this, install mortar beacons before pressure testing. Once hardened, these will form a framework, thereby securing the pipeline. If the pipes are secured to a metal mesh, this procedure is not necessary.
Which method should I choose?
Many people wonder which testing method is best for underfloor heating systems. The air method is more convenient, as it's not always possible to start the system up in time when cold weather sets in, which poses the risk of freezing the entire pipeline.
Air pressure testing will prevent such problems. This is important for underfloor heating systems, as the coolant can be easily drained from radiators, whereas this is quite difficult to do with floor-mounted circuits.
But with the air method, it's difficult to visually identify a leaky connection or a section of pipe through which air will escape. With water, such problems don't arise, and you'll immediately identify the right spot.
In addition, when choosing a method for testing a heating system, one should take into account the type of pipes from which the water heating system is made.
Features of hydraulic testing depending on the type of pipes
Hydronic underfloor heating can be installed using different types of pipes:
- Metal-plastic pipes. When constructing heated hydrofloor systems using metal-plastic pipes, it is recommended to perform pressure testing by pumping cold water. The maximum permissible pressure should be 6 bar. Testing is performed within 24 hours.
If the pressure remains constant, everything is normal and you can proceed with the screed. However, it's important to remember that pouring is done under pressure in the system. Furthermore, if the test is performed at a pressure above 4 bar, the air vents should be tightened to prevent water from leaking through.
- Cross-linked polyethylene piping is manufactured using modern technology that allows for cross-linking of molecules. When testing such piping, increased pressure (at least 6 bar) is created. If the pressure drops after 30 minutes, it should be restored, and the system should be tested for another 30 minutes. The procedure should then be repeated, and the underfloor heating system should operate in this mode for another 24 hours. If, after this period, the pressure has dropped by a maximum of 1.5 bar, the test is considered successful.
Sometimes, after testing with cold water, it's recommended to test with hot coolant. This requires checking all joints and connections for several days. If the pressure is normal, the screed can be poured after the system has cooled.
We are making the first launch
Before pouring the screed into the circuit, a test run must be performed. This is necessary to check the quality of the underfloor heating contacts. To do this, it is necessary to ensure proper circulation of the coolant and remove any air pockets.
If tap water is used as a coolant, A special valve is installed to supply the antifreeze. When adding antifreeze, you'll need to use the nozzle with the shutoff valve on the manifold.
The first launch should be performed in the following sequence:
- The valves upstream of the distribution manifold are closed, thereby ensuring fluid circulation between the boiler and manifold. The pump and boiler are turned on, but not at full power. All connection contacts are checked.
- The circuit valves are opened. Start with the loop located farthest from the boiler. When the circuit heats up to a temperature difference of 5-10 degrees between the inlet and outlet, the second branch is started, and then the other branches.
- If the heated floor is the only source of heat, the heating temperature rises to the maximum level (60 degrees).
With combined heating, the operating temperature is set. In this mode, the heated floor should operate for 6 hours.
As you can see, pressure testing is a crucial step in installing a hydronic underfloor heating system. It's mandatory, and it should be done before laying the final floor layers. Otherwise, if the hydronic floor fails to work or a leak is detected, the final finish and screed will have to be removed.
If you doubt that you can carry out pressure testing of underfloor heating pipes on your own, it is better to invite specialists.


