Having decided to install warm water floors in an apartment or a private house, special attention should be paid to the choice of pipes, especially the material from which they are made, as well as their quantity that will be required to heat a given room.
In addition, it is worth paying attention to the fact that the flow rate of the pipeline directly depends on the distance between the loops.
- Parameters affecting the distance between pipes
- Type of pipes and diameter
- Visually, the relationship between the step when laying the water floor circuit and the cross-section of the pipes looks like this:
- Area of the premises
- Thermal conductivity coefficient
- Coolant - type and temperature
- Heat loss and location
- Optimal room temperature
- Optimal distance between pipe turns in different laying patterns and calculation rules
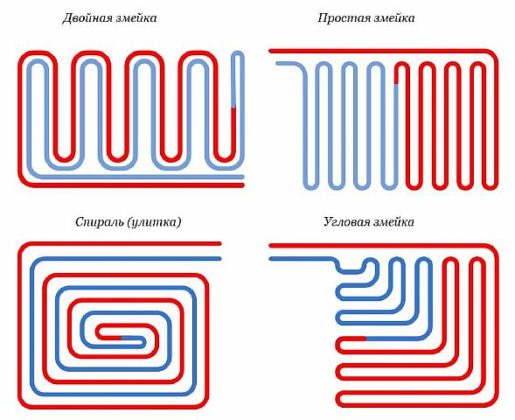
- Snake
- Corner snake
- Double snake
- Snail
- Combined method
- Choosing the optimal installation method
- Let's calculate the length of the contour
- Can the contour be of different lengths?
- Is it possible to connect pipes to each other?
- Video materials
Parameters affecting the distance between pipes
There are several key points to consider when determining the distance between water-heated floor pipes; let's look at them in more detail.
Watch the video
Type of pipes and diameter
The pipe material and diameter are key factors that directly influence the installation spacing of a water-heated floor. Specifically:
- The distance between pipes in a warm water floor depends on the material from which the pipe is made, or rather not on it, but on its thermal conductivity.
In terms of decreasing thermal conductivity, copper pipes and corrugated stainless steel products rank first, followed by metal-plastic, polyethylene, and polypropylene pipes.
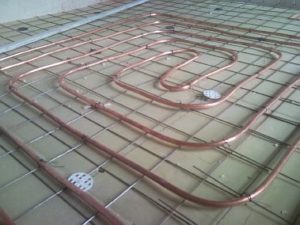
- Copper - have excellent thermal conductivity, service life of more than 10 years, but they are expensive and installation is quite complicated;
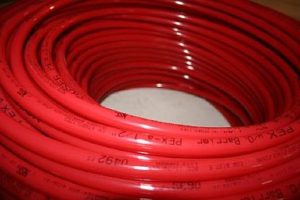
- metal-plastic - have good heat transfer and performance characteristics, are easy to install, and are inexpensive;
- Polyethylene - they conduct heat well, are wear-resistant, and are inexpensive, but they lack flexibility, requiring rigid fixation;
- Polypropylene - have the lowest heat transfer rate, and are the ones least often installed in water-heated floors.
That is, the higher the thermal conductivity of the material, the larger the gaps between the loops, and vice versa, if this indicator is not high, then the step decreases.
- The pipe diameter determines this: the larger the pipe diameter, the wider the installation pitch, and the smaller the pipe diameter, the smaller the spacing between the coils of the underfloor heating system. Since a large cross-sectional area occupies a larger area, it's natural for such a coil to emit more heat. A thin pipe, on the other hand, has increased hydraulic resistance.
Visually, the relationship between the step when laying the water floor circuit and the cross-section of the pipes looks like this:
- step 10 - 15 cm, with a diameter from 20 to 36 mm - the amount of pipe material that will be needed per 1 m2 is 7 - 10 linear meters, respectively;
- 20–25 cm, diameter 20–36 mm – required pipe size 4–5 meters;
- 30 cm, diameter 20 - 36 mm - quantity from 3.5 to 4 linear meters.
Area of the premises
To calculate the pipe spacing, you first need to calculate the area of the room being heated. This can be done using a simple geometric formula:
S = A * B
Where:
- S — area;
- A — length of the room;
- B — width.
Please note! Exclude areas where you plan to install large furniture from the resulting figure.
There is no point in installing a water-based floor underneath it; this will only lead to additional costs for purchasing the material.
Based on the obtained results, the optimal distance between the flooring coils is determined. For larger rooms, it is recommended to install the coils closer together, while for smaller rooms, the distance should be increased.
Thermal conductivity coefficient
The thermal conductivity of the structure is affected not only by the thermal conductivity of the pipeline but also by that of all the materials in the "pie." Most often, the circuit is placed in a screed, and if the mortar layer is greater than 70 mm, this must be taken into account when developing the installation scheme.
Different types of flooring also conduct heat differently. The best options for hydronic underfloor heating are tile, linoleum, or laminate.
When installing heating in a building with wooden floors and using aluminum plates, the level of heat transfer is almost the same as with a screed.
Coolant - type and temperature

The distance between the turns is affected by the coolant - its type and degree of heating.
A liquid, usually water or antifreeze, circulates in the floor water line. Water heats up well and retains heat, but antifreeze warms up faster and cools down slower, so its heat transfer coefficient is higher. Therefore, when using antifreeze, the coils can be spaced further apart.
If the coolant temperature reaches 31–32 degrees Celsius, the recommended installation spacing is 10 cm. At 33–35 degrees Celsius, the acceptable spacing is 15 cm; 20–25 cm is recommended for temperatures between 36 and 40 degrees Celsius. If the temperature rises above 40 degrees Celsius, the loop should be installed at 30 cm intervals.
To determine the average temperature of the coolant for a warm water floor, you need to add the temperatures of the supply and return circuits and divide in half.
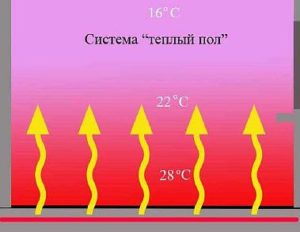
Please note: When making calculations, it is necessary to use the ideal and most suitable temperature for a person: 27 degrees Celsius.
Heat loss and location
Heat loss from windows, doors, and external walls also influences the spacing between pipes in underfloor heating systems. The house's location is also taken into account.
For example, in northern regions, where temperatures outside are below freezing but the building is warm, this difference in temperature leads to increased heat loss through windows, doors, and walls.
To compensate for these losses, it is necessary to increase the length of the pipeline and reduce the distance between pipes.
For each loop connected to the manifold unit, the heat flow calculation must be done separately.
Optimal room temperature
The optimal temperature for a room depends on its intended use. In auxiliary rooms, it's lower, while in residential rooms, it's higher. Approximate temperature recommendations:
- living rooms - from 18 to 25 degrees;
- kitchen, toilet and bathroom - from 18 to 26;
- corridor - from 16 to 22;
- pantry - from 12 to 22.
It's worth noting that each person has their own comfortable temperature, so you should choose the temperature level that suits you.
Optimal distance between pipe turns in different laying patterns and calculation rules
After selecting the type of pipes and their installation method, you should calculate what distance between the underfloor heating circuits will be optimal for your design.
As mentioned above, if a large-section circuit is placed close together, the floor surface will overheat. Conversely, if small underfloor heating pipes are placed too far apart, thermal voids will form.
There are several factors to consider when determining the correct loop spacing for underfloor heating systems, as this will impact even heat distribution:
- The distance between loops varies from 50 to 450 mm, depending on the pipe diameter. To simplify the calculation process, multiples of 50 are most often used. For private buildings, however, the distance may be 100, 150, 200, etc.
- The pitch is affected by the thermal load level. For an average load of 50-80 W/m2, the recommended interval is 100-200 mm.
- The distance from the walls to the first turn should be at least 20 cm.
Experienced plumbers often use a variable pipe spacing technique. In areas under a window or near a door, the pipe is laid more closely together.
It is important to determine the optimal spacing between branches, as the liquid in the pipes affects the floor covering, and choosing the correct spacing will ensure efficient distribution of water flows.
Let's take a closer look at each scheme..
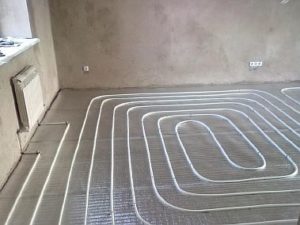
Snake
The "snake" method is simple to calculate and install, making it quite common. The heating element should first be installed in the coldest areas of the room—near the exterior walls, balconies, and windows. Then, loops are run parallel to the wall throughout the entire area, and the circuit returns to the heating element.
However, a serpentine pattern does not provide uniform heating of the surface. This pattern is often used when there is an additional heating source or for small spaces. When laying tiles in a serpentine pattern, the spacing between the tiles should be as small as possible—100 mm.
Corner snake
The loop is laid along the outer corner, and the next loop is placed parallel to it. This method is ideal for heating corners. If there are three exterior walls, the "double corner snake" option is recommended.
Double snake
The installation principle is the same as the "snake" method. The difference is that the return pipe runs parallel to the straight pipe. With this method, the gap between the loops can be increased from 150 to 250 mm.
Snail
The pipes are placed around the perimeter of the room and then spiral toward the center. The return lines run between the hot water loops. This is the most optimal layout, as the floor is heated evenly, but it is a more labor-intensive method.
The "snail" method allows for pipes to be placed at maximum spacing, as heat loss is minimal. Furthermore, this design reduces pipeline consumption.
Laying the TP in a snail pattern, features of the scheme, pros and cons, calculation of the step and length of contours, standards and SNiPs.
Combined method
For a large room, a combination of the two loops can be used. The recommended configuration is two "snail" loops and three to four "serpentine" loops. Hydronic underfloor heating will be more efficient if the piping is laid in a "serpentine" pattern at the edges and in a "snail" pattern in the center.
Please note! With any layout, pipes can be placed with equal or different spacing.
Choosing the optimal installation method
In large spaces (hallways, living rooms), a "snail" piping layout is ideal, as it can evenly heat an area of any size. A "serpentine" layout is possible, but the floor in one area will be hotter than in another.
A "snake" design is ideal for small rooms, as the temperature difference will be erased over a small surface and won't be noticeable. This method is also ideal for rooms with complex layouts. Furthermore, placing the "snake" design along the exterior walls will help block out cold draughts from the street.
This option is ideal for spaces with different zones. Each zone can be configured with the most appropriate layout to create an optimal microclimate.
The "corner snake" does not heat the room well; it is recommended to use it with a combined method; it will heat corners perfectly.
Let's calculate the length of the contour
When carrying out calculations to determine the number of pipes for laying a structure - a water-heated floor, the following points should be taken into account:
- the total area of all premises;
- number of collectors;
- room layout;
- the size of window openings and doors through which heat can escape;
- thickness of the walls;
- furniture placement;
- air humidity;
- purpose of the rooms;
- presence of other heating systems.
Based on the average value, 1 m2 will require 5 linear meters of pipe, with a laying step of 20 cm.
For the most accurate calculation of the pipeline size, the following formula is suitable:
L = S / N x 1.1
Where:
- S is the area of the room;
- N — laying step;
- 1.1 - reserve for making turns.
The number of meters from the floor to the manifold cabinet and back should be added to the obtained data.
For clarity, let's look at the calculation process using an example:
- room area - 15 meters;
- the maximum distance to the manifold cabinet from the floor is 4 meters;
- distance between pipes - 0.15 mm;
15: 0.15 x 1.1 + (4 x 2) = 118 meters
Another way to calculate the required amount of pipe is to plot the layout on graph paper. Be sure to follow the scale and take into account the room size.
After reflecting the entire system on paper, you need to measure the length of all the coils on the drawing using a ruler, and multiply this result by the appropriate scale.
Can the contour be of different lengths?
The underfloor heating line should not exceed 120 meters. Otherwise, several separate loops should be installed. Ideally, they should all be approximately the same length. This will eliminate the need for additional balancing and adjustments to the system.
If we consider a three-room apartment, one of which is a bathroom, it's natural that the length of the piping in this room is much shorter than in the others. The question arises: should the coil in the other rooms be divided into sections so that it matches the size of the pipes in the bathroom?
This isn't necessary; there's an acceptable variance in pipe length of up to 30 to 40% in rooms of different sizes. Furthermore, by using different pipe diameters and varying the installation spacing, you can reduce the area of a large room.
Please note! Remember to exclude from the area of the largest room the areas where large furniture will be installed.
Regardless of the chosen scheme, it is necessary to first prepare a drawing of the pipeline layout, taking into account the size of the contours and the intervals between the branches of the warm water floor.
Is it possible to connect pipes to each other?
If you're installing a copper-pipe underfloor heating system in a screed, you'll need to connect the pipes together. This will make the structure more reliable and durable. When installing polypropylene products, the connection is made by soldering, and when using a polyethylene circuit, the connection is made by welding a heat-resistant coupling.
Connecting PE-X and PE-RT pipes with fittings is more difficult. Installing press fittings is acceptable, but not recommended due to the risk of leakage. However, connecting the pipeline to the manifold unit requires press fittings.
Important! Connecting circuits using push-in or compression fittings is prohibited. This also applies to push-in connectors for HDPE.
It's better to use flexible piping for underfloor heating in one piece. This is more reliable and practical, as repairs to the lower floor will be more expensive if a leak occurs.
Underfloor heating is a modern heating system that, with the right choice of material and accurate calculations of the distances for laying the loops, can create an ideal microclimate in the home.


