Heated floors are no longer considered a luxury, but if you have small children, this appliance is a must-have. Heated floors have a long lifespan, but despite this, such systems still fail.
Most often, the breakdowns are minor, so you can fix problems in the water system or repair the electric underfloor heating yourself.
In this article, we'll look at the main problems that arise with heated floors and how to repair them yourself.
- Electric heated floors
- Cable
- Infrared
- Rod
- Reasons for failure of electric underfloor heating
- Thermostat - Causes of its failure and repair
- Replacing the thermostat display
- Floor sensor
- Cable fault - break
- Coupling defect
- Incorrect installation
- Water-heated floor
- Reasons for failure of water floors
- Pipeline damage and repair
- Uneven heating
- Electrical faults
- How to test underfloor heating
- Repair kit for heated floors
- Is it possible to repair floor elements without removing tiles and screeds?
- Prevention of breakdowns
- Video instructions
Electric heated floors
Electric heated floors operate on a 220-volt electrical network, with energy transmitted via a special power supply. Electric current passes through wires or carbon plates, heating them. These, in turn, transfer heat to the surface. Thus, electrical energy is converted into thermal energy.
Electric floors are easier to install than water floors, but many people have questions about their safety for human health. Electrical structures emit electromagnetic waves, but their volume is insignificant (especially for infrared film and rod mats), and according to experts, does not cause harm to humans.
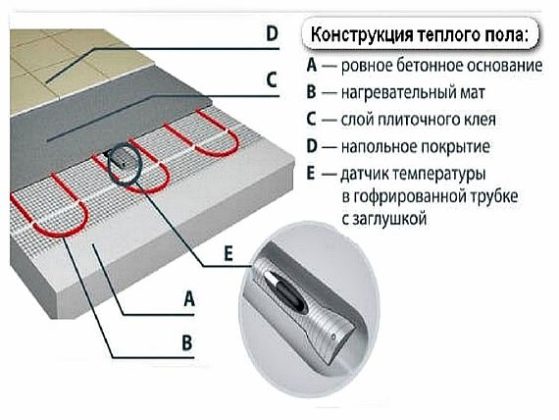
The structure of the "pie" looks like this:
- base;
- hydro and thermal insulation;
- foil backing;
- heating cable, infrared film or rod mats;
- concrete screed or flooring;
- finishing coating.
To install these heating systems, you will also need a temperature controller and a sensor.
There are several types of electric heated floors.
Cable
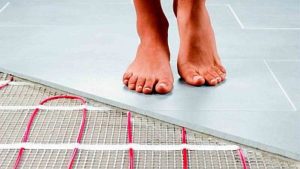
Cable - a structure consisting of wires that are laid out on the surface of the subfloor according to a specific pattern.
There are cable mats—the wires are already secured to the mat at a specific pitch. These floors are often filled with concrete screed.
Infrared
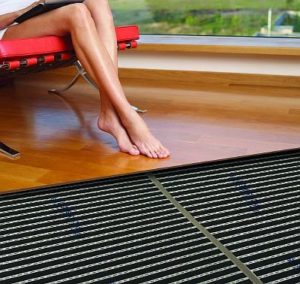
Infrared - two-layer film with carbon strips inside.
The difference between this system and cable floors is that this device heats not the air in the room, but the objects in it.
It is economical, fast and the most suitable option for dry styling.
Rod
Rod-type heating is a type of infrared heating floor, the heating element being carbon rods placed on a mat.

Reasons for failure of electric underfloor heating
Despite the apparent strength of electric heating (cable, infrared and rod), there are several elements in the design that can fail.
Major faults - when The floor isn't warm at all (find out the reasons why this might be happening) or there's no way to control the heating. Finding the cause and fixing it can sometimes require a complete disassembly, but sometimes repairing the regulator is sufficient.
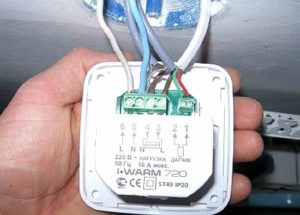
Thermostat - Causes of its failure and repair
If you detect any problems with your floor heating, after checking the power supply, we recommend starting with troubleshooting the thermostat. If the thermostat is faulty, the floor will not heat up, or the system will overheat.
The controller's primary function is to transmit electrical current to the heated floor. It controls the intensity and quality of the heating. It regulates the temperature—when the set level is reached, the unit automatically turns off and turns back on when the temperature in the apartment decreases.
Thermostats come in electromechanical and electronic types. Mechanical devices are simple—a dial, a temperature scale, and an off button—and are easily repaired.
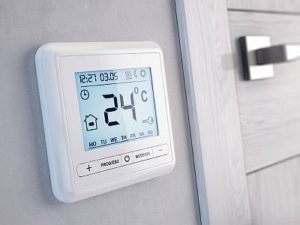
Electronic devices are more intelligent, equipped with an LCD screen and a microprocessor as the control element. They can be used to adjust the temperature based on the time of day. These devices are more reliable, but they cannot be repaired; if they break, they are simply replaced.

The first thing you should do when checking your device is to make sure it's receiving power, as indicated by the indicators on the screen. If they're not lit, you need to find out the cause.
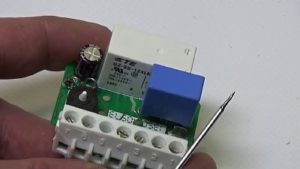
To do this, check the device with a multimeter—a special digital device. If the problem is with the regulator, it's most often due to loose contacts on the terminal block inside. Often, a transistor, voltage regulator, relay, or capacitor fails.
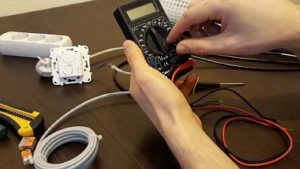
If there is voltage at the input, then you need to check whether it reaches the cable or film (infrared or rod).
The process of repairing the control unit is as follows:
- the power supply is cut off;
- the regulator is dismantled;
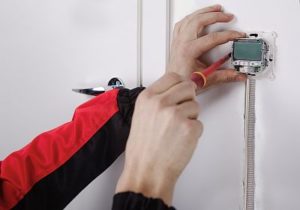
- The cover is removed and the screw connections are tightened with a Phillips screwdriver.
If these manipulations do not have a positive effect, then it is easier to replace the device completely.
Please note: If the microprocessor in an electronic device fails, it's more cost-effective to replace the entire unit.
If the fault lies in the mechanical regulator switch, then to restore its functions, it is recommended to wash it in an alcohol solution.
Replacing the thermostat display
There are cases when the floor is functioning, but the readings on the thermostat screen are not displayed; in this case, the display needs to be replaced.
This is quite simple to do, as long as you follow the instructions. To do this, disconnect the controller from the cables, then unscrew the box, remove the faulty screen, and install a new one.

Floor sensor
The main problem with the floor sensor is that it operates continuously or switches off when the heating level hasn't reached the desired level. This occurs if the device is placed too close to the heating element.
The heat from it affects the sensor, and it switches off before the entire system is heated. Then the temperature sensor begins to operate continuously to heat the floor to the set temperature.
This type of operation of the device increases electricity costs and leads to rapid failure of the floor due to continuous operation.
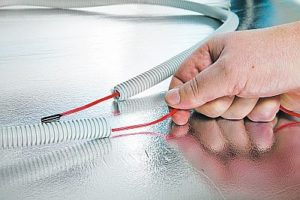
To repair the sensor, there's no need to dismantle the structure, as it's housed in a special protective tube. The key is to find the outlet and pull the device out using the wires. The sensor is not repairable, so you'll need to purchase a new one and connect it.
Please note: If the sensor cannot be removed, to avoid dismantling the entire unit, we recommend replacing the thermostat with a different model that has an independent timer.
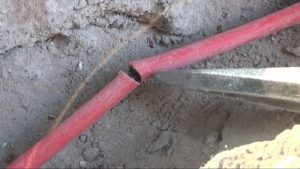
Cable fault - break
One of the reasons electric floors fail is a broken cable. Electrical wiring is often damaged during installation. Furthermore, walking on the cable during operation can cause the break to become larger.
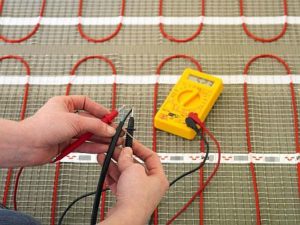
To confirm that the floor is not functioning due to a broken cable, measure the resistance. The resulting values should not exceed the nominal values specified in the product's technical data sheet. A 5% excess is acceptable; any greater indicates damage to the cable.
There are two ways to locate a break, using different equipment, such as:
- high-voltage generator - it will show the area of the fault by creating an electric arc effect;
- An audio detector or voltage tester - at the site of damage, the device will emit a distinctive sound, reminiscent of a metal detector.
The process of repairing a cable or underfloor heating mat under a screed is quite complex. Therefore, using a cable locator to pinpoint the exact location of the break significantly simplifies the work and eliminates the need to dismantle the entire concrete surface.
Before starting repair work, you should stock up on a thermal imager, a generator, sleeves for connections, heat shrink and pressing pliers.
The repair procedure for a broken underfloor heating system consists of the following steps:
- You should start by turning off the power and disconnecting the wires from the thermostat;
- then high voltage is supplied to the cable through a generator;
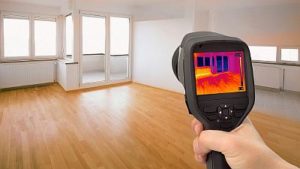
- the thermal imager determines the location with the highest voltage level;
- in this area, the screed is dismantled down to the heating elements;

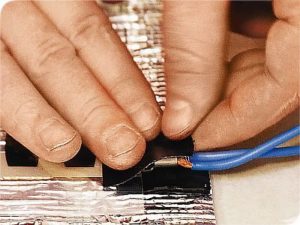
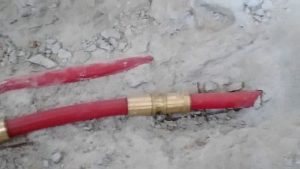
- the ends of the broken wire are protected and connected to each other with a copper sleeve, after which the joint is crimped;
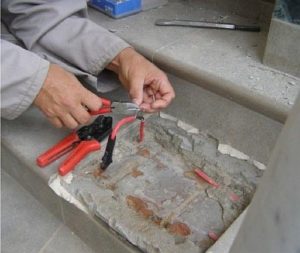
- The connecting section is insulated with special insulating tape or heat shrink tubing.
Important! Before restoring the screed, turn on the floor and check its functionality.
For your information! If you are using an infrared or rod floor, it is recommended to measure the resistance of each individual strip, as problems with these devices are often caused by poor electrical connections.
The film is connected to the power supply via wires, which are secured to the copper busbar with clamps. It is this poor contact that prevents the floor from heating, causing the metal to oxidize, which ultimately leads to a break in the circuit. To restore operation, the contact must be replaced.
Coupling defect
Another heating element problem that affects the operation of the underfloor heating system is a lack of contact in the coupling. This occurs if the heating element is suddenly turned near the coupling during installation. The turn causes significant tension, and the cable is pulled out of the sleeve during operation.
The repair process for underfloor heating with an end sleeve consists of:
- by heating it with a building hair dryer;
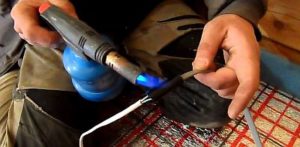
- cut the coupling with a stationery knife to free the problem area.

Next, the steps are similar to those described above. The wires at the ends of the wire where the problem is detected are protected, connected with a sleeve, and compressed with pliers.
A heat-shrinkable adhesive sleeve is placed on this section and heated with a heat gun until the adhesive begins to release. This creates a tight seal.
Incorrect installation
Having checked all connections and components and found no faults, we can conclude that the cause of the device's malfunction lies in the installation:
- in errors in calculating the heating power;
- in heat losses caused by poor room insulation;
- in non-compliance of the laying step with the technological parameters during cable installation;
- in the thickness of the screed or the location for the thermostat was chosen incorrectly.
If the problem is not with the temperature controller installation, then the problem can only be corrected by dismantling the structure and reinstalling it in compliance with technological standards.
It is important to take into account the most common mistakes made when installing electric floors (cable, infrared and rod type):
- Heating elements are located under heavy furniture and plumbing.
- Materials with low thermal conductivity are used for thermal insulation.
- Careless handling of cables or film during installation can damage the heating elements, so check their integrity before pouring the screed.
Please note! When embedding the heating element in the adhesive, it can be easily damaged by the spatula when applying the tiles, as the layer is thin. Therefore, work carefully.
Water-heated floor
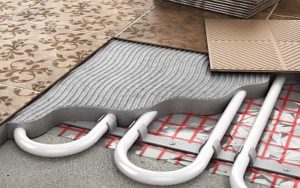
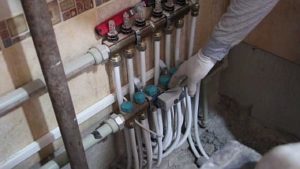
A hydronic floor is a structure made of pipes laid in a specific pattern (snake or snail). This system has a long service life—over 50 years—provided high-quality materials are used and proper maintenance procedures are followed.
In addition to the pipeline through which the heated liquid moves, the hydrofloor is equipped with:
- bypass;
- circulation pump;
- collector and electric drive - they are necessary for regulating water flows;
- balancing valve - it is designed to mix cold and hot coolant;
- thermostat and temperature controller - they are responsible for the heating level.
Reasons for failure of water floors
Water floors, like electric ones, operate with low heat output if they are poorly insulated, which means the entire "pie" will have to be re-laid.
Furthermore, errors in power calculations or the installation of improper components also impact the system's performance. If a boiler with a low power rating is installed, the amount of energy generated may be insufficient to heat the required volume of water.
Pipeline damage and repair
Pipes are the main component of a water-heated floor system, and they can also become unusable. The most common cause is a rupture or leak, which can occur when the pressure in the pipeline drops sharply. A leak reduces the volume of coolant in the main line, and the leaking water can damage the screed.
To locate the leak, first visually inspect the floor for any wet spots. If this method fails to locate the leak, a thermal imager will be needed, which will easily pinpoint the location of the damage.
Step by step, repairing a hydrofloor pipe looks like this:
- the decorative finishing and screed are being dismantled in this area;
- the coolant is drained from the main line;
- the product is cut with a hacksaw at the location where the tear is found;
- the pipeline is cleaned from debris inside;
- the edges are aligned on both sides with a scan tool;
- the coupling is put on both ends;
- The coupling is crimped using pliers.
Before pouring concrete, the system should be checked for leaks. It is filled with water and pressure tested to remove air from the pipeline.
Uneven heating
Another reason why the floor doesn't heat up properly is because the water isn't distributed evenly through the pipes. This happens when the lengths of the pipes are different.
In long loops, the coolant cools down faster. To correct this, It is necessary to adjust all circuits on the manifold separately.
Please note: It may take some time for the heating to show results, depending on the number and type of layers in the structure.
It also depends on the water temperature and the speed at which it enters the main line, the power of the equipment, and the material of the finished product.
Electrical faults

If there's no leak, the problem may lie in the electrical system. The circulation pump or thermostat, located in the manifold assembly, could be faulty.
First, you need to make sure there's voltage in them. For this, use a multimeter or a test screwdriver. You can also tell if the pump isn't working if there's no characteristic noise when it's turned on.
In addition, it is necessary to check the voltage at each terminal and temperature sensor.
How to test underfloor heating
To test the underfloor heating system, use a multimeter. The beep indicator is located next to the ohmmeter scale. When the probes touch each other, the device emits a sound, indicating a closed circuit.
If you touch the floor wire with the probes, a buzzer sounds. If it doesn't, it means the wire is broken. The temperature sensor is checked in the same way.
Repair kit for heated floors

The standard repair kit for electric underfloor heating (cable, infrared and rod) includes:
- electrician's kit - pliers, nippers, tester;
- Crimping pliers - for crimping connecting sleeves;
- a hair dryer - to heat the heat shrink sleeve;
- hammer drill - to punch and remove screed.
To repair the water system you will need:
- hammer, pliers, screwdriver, chisel;
- set of wrenches;
- hammer drill;
- connecting fittings.
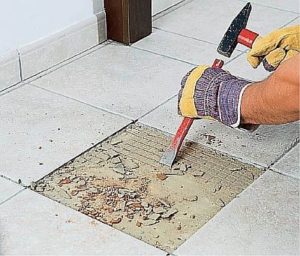
Is it possible to repair floor elements without removing tiles and screeds?
Repairs without opening up a heated floor laid under tiles or another finishing coating and filled with concrete mortar are only possible if the thermostat, which is located on the wall, is broken.
If there is a problem with the heating element, it is impossible to do without removing the coating, at least partially.
Prevention of breakdowns
To extend the life of your heated floors and avoid premature damage, we recommend:
- takes power measurements and calculations seriously;
- produce high-quality thermal insulation;
- place the temperature sensor in a corrugated pipe;
- do not turn on the system until the screed has completely hardened;
- select the cable cross-section according to the room dimensions;
- cut the infrared film or rod floor along special lines.
After installing underfloor heating, be sure to save the heating element layout diagram. This will make repairs easier in the event of a breakdown.
If your underfloor heating system is broken and you're not sure you can repair it yourself, it's easier and more reliable to call a specialist, although this is certainly a more expensive option.


We decided to do the repairs ourselves. We have a problem with the heating element, we will have to open everything up. We will try to fix it ourselves for the first time according to your article.