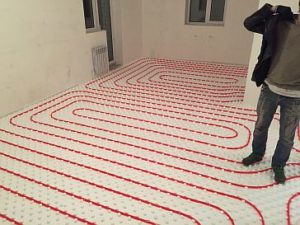
Today, when solving the problem of heating their homes, most owners turn to the following type of heating: heated floors.
At the same time, the most popular type, both in a private house and in an apartment, are water-heated floors powered by a battery, and in the bathroom it is not uncommon Hydro floors are made from heated towel rails.
- The advantage of underfloor heating over radiators
- Is it possible to install underfloor heating from a radiator? Is the connection legal or not?
- Connection diagrams
- Connecting underfloor heating to a radiator
- Connection to bypass via RTL balancing valves (mixing unit)
- Connection via thermostatic mounting kit
- Scheme with heat exchanger
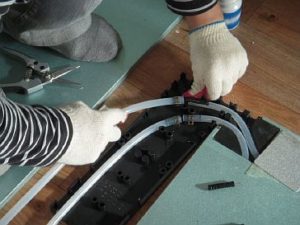
- Installing the collector
- Difficulties that may arise during installation
- First launch
- Operating tips
- Video instructions
The advantage of underfloor heating over radiators
Unlike radiators, underfloor heating is This ensures uniform heating of the room. Furthermore, this device provides more comfortable conditions for the user, since with underfloor heating, the temperature is higher at the bottom than at the top.
Therefore, your feet will be warm and your head will be in a cooler space, which is good for your health.
Another advantage of this type of heating is its energy savings, as heat loss is reduced by up to 20%. Without a doubt, a major advantage is the aesthetic appeal of the design. The underfloor heating system is hidden beneath the flooring, thus not spoiling the apartment's décor, unlike wall-mounted radiators.
Of no small importance is the fact that the air does not become over-dried and hot currents do not drive dust particles around the room, as with radiator heating.
The disadvantages of this type of installation include the rather labor-intensive and time-consuming process, which requires significant financial investment. Furthermore, when connecting underfloor heating to a radiator, it will only function if the radiators are heated.
Is it possible to install underfloor heating from a radiator? Is the connection legal or not?
Installing underfloor heating from a radiator in a multi-story building is possible, but several issues need to be addressed. The main one is obtaining permission to connect the heating system to the building's central heating system, as this could affect the operation of neighboring radiators. Furthermore, improper installation could lead to an emergency situation and flooding of the apartment below.
Please note! Without this permit, installing underfloor heating will be illegal, and if such a connection is discovered, you will be subject to fines.
To maintain thermal balance in a home, there are three legal options for installing underfloor heating to a radiator:
- If the apartment has a two-pipe battery connection system;
- If the heating main is located in the basement of the building, it is easier for residents of the first floor to obtain consent to connect a separate input for the supply and return circuits;
- If there is an upper wiring in the attic, it is easy to obtain such permission for the residents of the top floor.
Only in such cases, installing underfloor heating in one apartment does not affect the heating system in the entire building. Tapping into a single-pipe system will inevitably lead to an imbalance in the hydraulic balance, which will affect the performance of the entire system.
Please note! If it is not possible to directly connect the heated floor to the mains, it is impossible to legally obtain permission to install a water-based floor.
Connection diagrams
There are several schemes for connecting heated floors that experts recommend using.
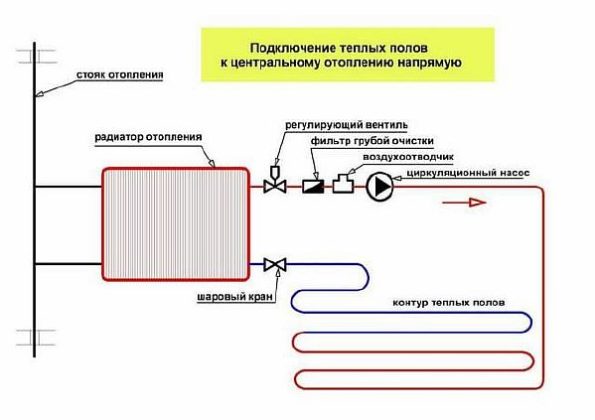
Connecting underfloor heating to a radiator
Connecting a hydronic underfloor heating system to a radiator is the simplest and easiest installation method. Furthermore, this design is inexpensive. However, it is not possible to regulate the temperature in a system installed this way.
For your information! When connecting underfloor heating using this method, the amount of coolant in the riser decreases. Therefore, permits for such connections in high-rise apartments are rarely issued.
To design a TP, a low-power pump is required; it is necessary to move the coolant along the main line.
The principle of action is as follows:
- A special circuit for underfloor heating is installed above the radiator. A filter, an air tube, and a circulation pump are installed on it.
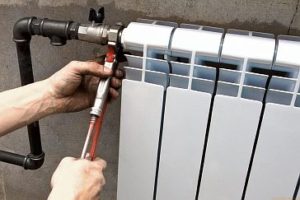
- The other end of the pipe connects to the radiator at the bottom. The cooled coolant will flow through the radiator's return line to the heating point.
- A thermostatic valve or actuator is installed on the circulation pump to regulate the temperature. When the water temperature in the floor heating system exceeds the permissible level, the pump switches off and the heating is suspended.
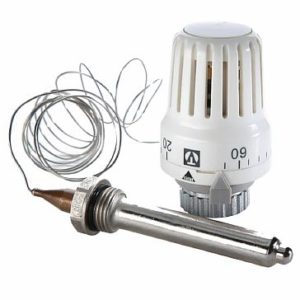
Please note! Powering underfloor heating directly from a radiator without regulating valves is impossible, as the water in the radiator is twice as hot as the underfloor heating system requires.
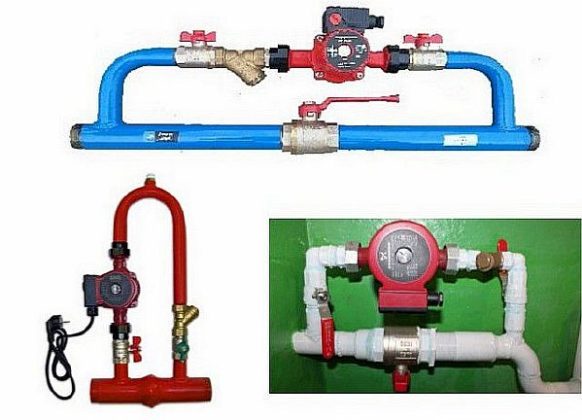
Connection to bypass via RTL balancing valves (mixing unit)
This diagram involves connecting the floor pipes to the radiator return line. To do this:
- A branch is brought out from the return pipe.
- A mixing unit with a three-way valve equipped with a thermal head and a circulation pump are installed on it.
- Pipes are extended from the pump.
- The other end of the loop is connected to the heating return line via a bypass, through which the cooled coolant is directed to the heating point. The distance from the supply to the return hose must be at least 30 cm.
- A two-way valve with a head is installed on the bypass. Its function is to regulate the water temperature in the floor heating system. When the temperature exceeds the set limit, the valve closes the outlet of the cooled liquid from the pipeline. The cooled coolant is directed through the bypass to the three-way valve, where it dilutes the hot water supplied to the floor heating loops.
After the temperature level of the coolant in the floor has been normalized, the two-way valve again releases the cooled liquid.
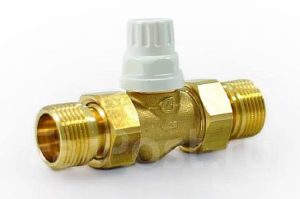
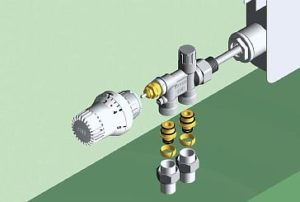
Connection via thermostatic mounting kit
Another option for installing underfloor heating in an apartment is to use a mounting kit. It's designed to connect only one circuit, which is capable of heating a small area. This setup eliminates the need for a mixing unit.

The thermal mounting device includes:
- temperature limiter for coolant;
- valve for regulating the air temperature in the apartment;
- air vents.
With this combined system, water enters the floor loops directly, rather than through a manifold. However, the coolant is supplied to the pipeline at a temperature of 80 degrees Celsius, and it cools directly in the floor loop.
In other words, a large amount of hot water enters the coil, then the thermostatic head shuts off the flow of coolant. After it cools in the circuit, a new portion is supplied.
This design is easy to construct; the mounting kit connects to the radiator. And since there's only one loop, there's no need to install a pump to force the fluid to circulate.
This diagram is suitable for a two-pipe layout; for a one-pipe layout, it will be necessary to additionally install a bypass and a balancing valve.
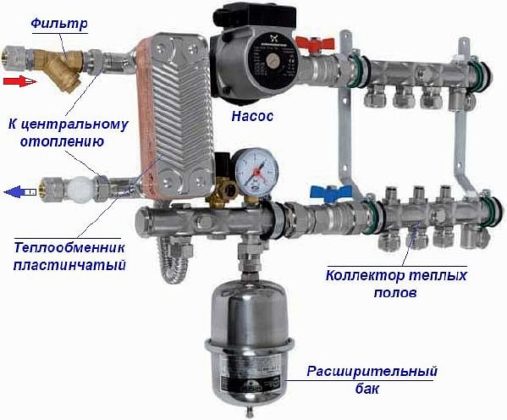
Scheme with heat exchanger
A heat exchanger is a device made of copper plates that transfer thermal energy from a coolant at a high temperature to a cooler liquid.
The performance of this design is superior, as it eliminates the shortcomings of previous designs. This device boasts a long service life, as the coolant circulation is completely autonomous.
Heat is transferred through an equipped heat exchanger, where isolated movement of water occurs in the floor coil and radiator.
Installing a heated floor with a heat exchanger has a number of positive aspects:
- automatic regulation of floor temperature is carried out;
- the heat exchanger is made of steel, so it has a long service life;
- no risk of water hammer;
- the hydraulic resistance in the central heating system does not change.
The connection process is carried out in the following sequence:
- The heat exchanger is connected to the return and inlet heating pipes.
- Then the circulation pump is installed.
- After this, the return and heat exchanger inlet pipes are connected to the corresponding hoses of the floor circuit, or manifold group, if there are several loops.
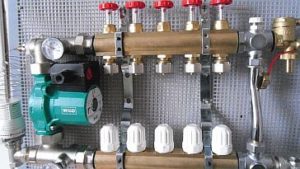
Installing the collector
The manifold is a device responsible for regulating the flow of coolant and its temperature. It can be used to balance the floor circuits and bleed air from the system.
When installing a warm water floor in a country house, the manifold is connected to a separate boiler, while in an apartment it is connected to the heating system, to the supply and return pipes of the radiator.
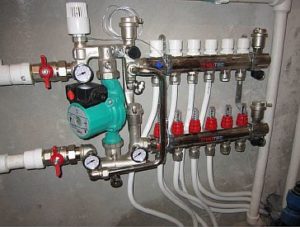
Shut-off valves are installed on the supply and return pipes before the manifold. These can be used to shut off the underfloor heating system for repairs.
To remove air from the piping, an air vent is installed on the manifold. To ensure proper water flow into the floor coil, a pump is installed on the radiator's supply pipe, upstream of the manifold assembly.
After this, one end of the floor hose is connected to the supply outlet of the manifold group, and the other to the return.
Difficulties that may arise during installation
When installing a hydronic floor in an apartment, you may encounter a number of problems:
- The water in radiators is very hot (90°C), which is not suitable for underfloor heating. For heated floors, the maximum permissible temperature is 50°C. Exceeding this temperature will damage the system and the finish.
- Installing underfloor heating without a special permit is prohibited in apartment buildings. Failure to do so will result in a fine.
- The heating system is connected via an elevator, while underfloor heating requires copper pipes, which are expensive. Furthermore, working with them requires specialized equipment and the assistance of professional technicians, which is also quite expensive.
- Installing underfloor heating in older buildings is problematic, as apartments were previously equipped with single-pipe heating systems. If you connect the heating system to this type of system, your neighbors' radiators will be cold, making it impossible to obtain permission to install hydronic floors.
Therefore, if you decide to install water-heated floors in your apartment, you need to carefully calculate everything, prepare design documentation, and obtain permission.
First launch
Upon completion of the underfloor heating installation, we carry out the first launchTo do this, the pipeline should be thoroughly flushed with water, with the system pressure set to maximum. Afterwards, the water should be drained and the system should be blown out with a compressor.
The circuit is then filled with the working coolant; if there are multiple loops, they are filled one at a time. During this process, all air must be completely purged from the pipeline through the air vent.
To create pressure in the system, the pump is turned on briefly. This promotes the movement of the coolant, which displaces any remaining air pockets. The process should be repeated (adding water and turning on the pump) until the system is completely filled.
To start the underfloor heating system, start with a minimum temperature of 20 degrees Celsius. Increase the temperature by 5 degrees Celsius each day until you reach the operating temperature of 40 degrees Celsius. Then, set the thermostat to its design setting.
Operating tips
It's worth noting that underfloor heating is an inert heating system. Therefore, you'll only notice temperature changes in the room after several hours of adjustment.
Experts recommend the following during operation:
- Maintain floor temperatures in living rooms between 25 and 30 degrees Celsius. In the hallway, bathroom, and along exterior walls, temperatures up to 35 degrees Celsius are permitted.
- Adding fiberglass or another filler to the solution will reduce the shrinkage of the concrete screed. The dosage instructions are on the packaging.
- Replenish the system with liquid in a timely manner and monitor the heating temperature.
- Select pipes for underfloor heating of the same diameter as the heating system (in the supply and return).
- When using a two-pipe system, make the length of the floor loop no more than 50 meters.
Please note: Underfloor heating requires virtually no additional maintenance.
The heating circuit's temperature is usually regulated manually. However, it is possible to install an automatic control unit equipped with a controller and software that controls the servo drive and pump. Such a device is capable of independently creating a comfortable microclimate based on preset parameters.
When deciding to connect underfloor heating to a radiator yourself, experts recommend careful calculations. Furthermore, when choosing a system, consider its features, as well as all the recommendations outlined in this article, so you can properly install underfloor heating in your apartment using a radiator.


