If you decide to install a heated water floor with a gas boiler in your home, be sure to thoroughly study the safety regulations and all the intricacies of choosing materials and installation, which affect not only the quality of heating but also the peace of mind of your entire family.
Why gas? The answer is simple – it's the most cost-effective option.
We also suggest you find out How to connect a water-heated floor to a boiler.
- How does a gas boiler operate underfloor heating?
- Preparatory activities
- Requirements for the premises
- Carrying out calculations and creating a project
- Tools and materials
- Coordination with the gas service
- Installation
- Waterproofing
- Damper tape
- Insulation
- Reinforcing mesh
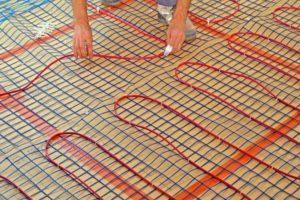
- Laying and fixing the pipe
- Connecting circuits
- Pressure testing
- coupler
- Installation of additional automation
- Helpful tips
- Security measures
How does a gas boiler operate underfloor heating?
Hydronic underfloor heating is a system of pipes that continuously circulates hot water, heated by an energy source—in this case, a gas boiler. Installing such systems in multi-story apartments is impractical, as it is prohibited by law, but in a private home, it is the ideal option.
We suggest you find out which one Choosing a boiler for underfloor heating, how to calculate power, diagrams and installation instructions.
It's much easier to install a central heating system, but it's inconvenient—you have to wait until the heating season. A gas system can be used year-round.
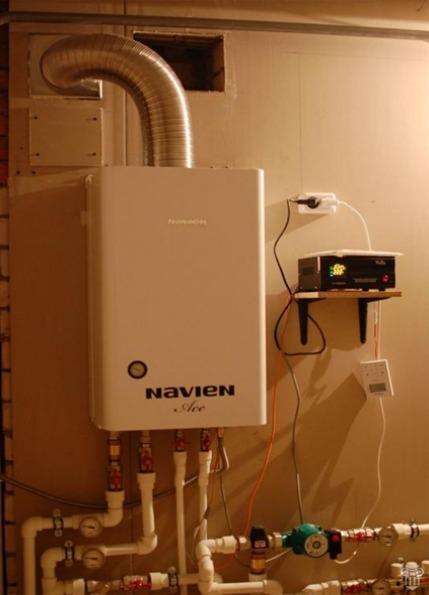
A gas boiler is a specialized unit that heats and cools water using natural gas. The system is equipped with a coolant mixing unit, which includes a manifold, thermostatic mixer, and pump, maintaining the desired temperature. Hot water flows through the circuits.
Preparatory activities
Before you begin installing a water-heated floor, prepare the tools, materials, and room, make certain calculations, create a schematic plan of the system, and also draw up a project and obtain all necessary permits from the gas service.
Requirements for the premises
Gas boilers are considered explosive equipment, so you must adhere to basic building regulations that ensure safe operation:
- minimum ceiling height – 2.5 m;
- The boiler must not be installed so that it touches other pieces of furniture – keep a distance of 50-70 cm on all sides;
- the walls in the room with the gas boiler must be fire-resistant (finish with non-combustible materials);
- a ventilation system must be installed;
- minimum room area – 4 sq. m;
- a grounding circuit is installed in the room;
- The chimney cross-section is selected depending on the boiler capacity;
- the door to the room should be 80-100 cm wide;
- the room must have access to the central gas pipeline and water supply;
- The presence of a cold water pipeline is required.
With a central water supply, there's no need for a pump. This significantly reduces the family budget. A manifold distribution unit is required to connect the underfloor heating system.
Carrying out calculations and creating a project
Design is an important step. First, a house plan is created, showing the rooms where the pipes will be located (over time, people tend to forget the exact layout of the system, but a plan will help you see it). Be sure to consider where the furniture will be placed, as pipes are not installed in these areas.
There are also other nuances that need to be adhered to:
- one circuit should not exceed 100 m in length, as this will reduce the heating efficiency;
- the length of all contours should be approximately the same (a discrepancy of 10-15 m is allowed);
- retreat from the walls by 28-35 cm;
- the distance between pipes is 10-20 cm (in severe climatic conditions there should be a minimum figure).
One of the most important aspects is completing all the calculations. This is a difficult task to handle on your own, so it's best to entrust this process to professionals.
The number of pipes can be calculated as follows: L = S / N * 1.1, where L is the length of the pipes, S is the area of the room, N is the step length, 1.1 is 10% reserve for pipe turns.
For example:
- S = 50 sq. m.
- N = 0.2 m.
- 50/0.2*1.1 = 275 m.
In this figure, don't forget to add the distance to the manifold, multiplied by 2, since there are two pipes running (to the supply and return manifolds). Heat loss, wall width, flooring material, etc. must be taken into account.
Example of a water floor layout:
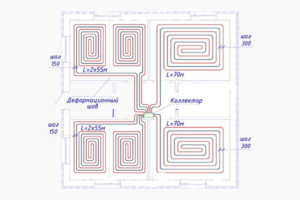
It's important to consider the method of installing the pipes. Three methods are commonly used:
- Snake It's a loop-shaped system that covers the entire area. The loops run from wall to wall, but hot water flows only along one side.
- Double snake It differs from the usual one in that the hot pipes are located throughout the room.
- Snail or spiral – the optimal option for a private home, as the entire area is heated.

Tools and materials
The first thing you need to choose is the pipes. They are made of different materials and vary in diameter. What is used:
- Copper pipes They are considered the best because they are durable, reliable, and have a high heat transfer rate. However, they are also the most expensive.

- Metal-plastic – a modern material that has earned a well-deserved place among the most popular. It's cheaper than copper, and the quality is virtually identical (though it will last a few years shorter).
- REH Made of polyethylene, it's a budget option. One significant drawback is that it's impossible to achieve a perfect shape, as the pipes straighten when water is supplied.

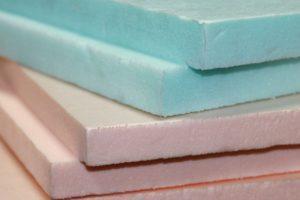
The second important material is insulation, as it ensures heat retention. For underfloor heating powered by a gas boiler, the following are most often used:
- EPS – extruded polystyrene foam. It is characterized by high strength, low thermal conductivity, resistance to high humidity, and affordability. The material is produced in slabs with thicknesses of 0.2, 0.3, 0.5, 0.8, and 10 cm (sizes: 50x100 cm, 60x125 cm). The tongue-and-groove joint method makes EPSS quick and easy to install.
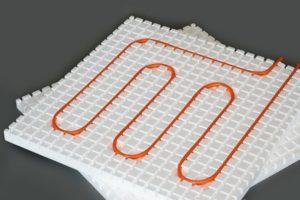
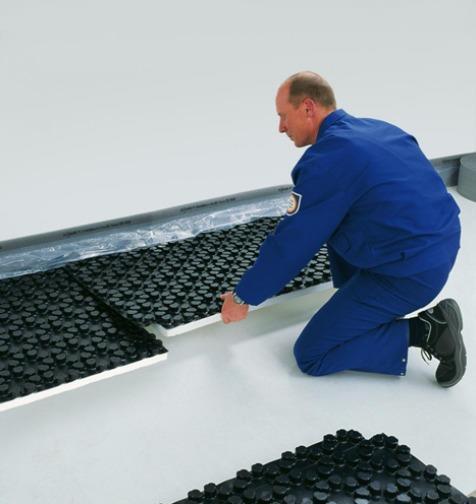
- Thermal insulation profile mats They are made of high-density polystyrene foam. They are a convenient material for underfloor heating, as the surface is equipped with round or rectangular "spikes," making it easy to position pipes. Mat thicknesses range from 1 cm to 3 cm, and sizes range from 50 x 100 cm to 60 x 120 cm. The downside is the high cost.
Other, more affordable materials can be used, but those described above are considered the most optimal. EPSPS can be purchased with a foil layer with markings applied, but this type of material is more expensive. Furthermore, foil is pointless for a cement floor (it lacks reflectivity, and concrete corrodes aluminum).
Consider the thickness of the insulation based on the following requirements:
- It is better to lay the material on the soil base with a thickness of 10 cm in 2 layers;
- when paving on a concrete screed, 5 cm is sufficient;
- when laying on the 2nd floor – 3 cm.
Additionally, you will need to purchase fastening material – plate-type dowels, which are attached in the center and at the joints to prevent the slabs from floating up when the screed is poured on top.
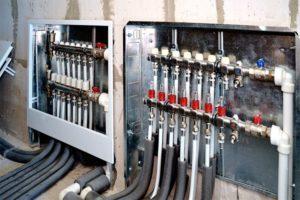
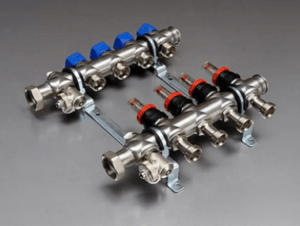
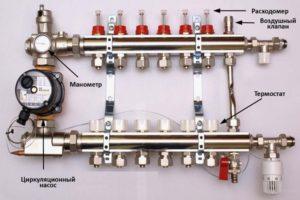
The third piece of equipment is the manifold-mixing unit. Its purpose is to receive the coolant, distribute heat throughout the system, regulate temperature and flow, balance the circuit loops, and bleed air. Manifolds come in different types, but for hydronic underfloor heating systems powered by a gas boiler, a unit with special components is purchased.
What to look out for:
- The manifold block must be equipped with various fittings, including balancing valves for flow adjustment with a flow meter, which are installed in the supply section, as well as shut-off valves or thermostatic valves for return flow. An automatic air vent and drain valve are required.

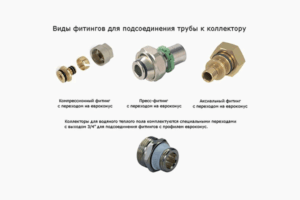
- To connect pipes to the manifold, fittings (compression, axial or press fittings) are used.
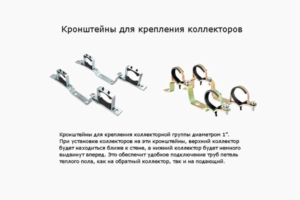
- To mount the manifold-mixing unit, a bracket is purchased that provides the required center-to-center distance.
- Collector cabinet of open or closed type.
The collector unit is installed so that the length of the loops in all rooms is approximately the same.
Other materials and tools:
- damper tape;
- reinforcing mesh;
- sand;
- cement;
- crushed stone;
- plasticizers;
- metal profiles;
- fittings;
- taps.
Coordination with the gas service
The installation, connection, and operation of a gas boiler are regulated by special standards (SNiP 42-01-2002, SNiP 41-01-2003, SNiP 21-01-97, MDS 41.2-2000) and are considered high-risk equipment. Therefore, all activities involving the equipment are supervised by the gas service. Therefore, only the gas service has the right to perform adjustments and connect to the gas main.
Also, before installing and commissioning gas equipment, it is necessary to obtain permission for this, as well as prepare and approve a project, and conclude a contract for system maintenance.
Installation
Before installing a hydronic underfloor heating system, preparatory work is always carried out to clear the area. The floor surface is cleared of any debris and leveled (check with a spirit level). If there are any uneven areas, it is recommended to apply a thin layer of screed or add sand. If the surface is hard, vacuum the floor to remove dust.
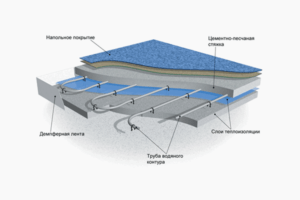
Waterproofing
After the preparatory work, install a waterproofing material to prevent excess moisture in the overall structure. It's best to install the waterproofing on the very bottom, but it can also be installed over the insulation. The process:
- spread the material over the surface, overlapping each other (overlap 10 cm);
- be sure to fold the edges towards the wall;
- glue the joints with construction tape if the material does not have an adhesive strip.
If the heated floor is installed on the second floor of the house, you can do without insulation and lay the pipes on top of the waterproofing.
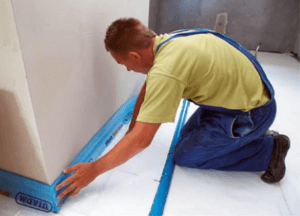
Damper tape
The damper tape compensates for thermal expansion that occurs during screeding. In simple terms, it limits and regulates contraction and expansion. The tape should be 15 cm high and is glued between the floor surface and the walls around the perimeter of the room.
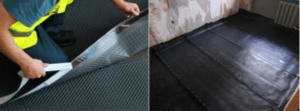
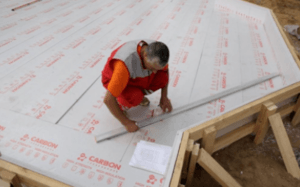
Insulation
Thermal insulation is installed on a waterproofing layer, soil, or concrete surface, depending on the owner's preferences and requirements. It is important to put on shoes on a completely flat surface, especially when installing EPS boards, as heels can deform the insulation.
Installation process sequence and rules:
- Using a building level, water level, or laser, mark the finished floor surface on the walls to eliminate any unevenness. If there are any differences, fill the subfloor with sand to level it.
- The first sheet of insulation is placed in the farthest corner of the room, flush against the walls. There should be no gaps between the sheets—the joint is perfectly tight.
- At each stage, check the horizontal level of the plane using a level.
- If obstacles are encountered in the form of communication elements or protrusions, the slabs are cut with a knife (holes of the required size are made).
- When installing 2 layers of EPS boards, work is carried out in a mutually perpendicular direction relative to the first layer.
- After the slabs are laid, they are secured. To do this, drill holes of the required diameter with a hammer drill, insert plate anchors, and hammer them in. Fasteners are installed along the joints and in the center. Be sure to apply construction tape at the joints.
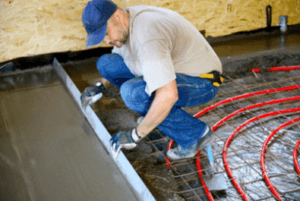
Reinforcing mesh
Reinforcing hydronic underfloor heating is optional, but experts strongly recommend installing a reinforcing mesh, as it strengthens the overall structure. The material is installed after the pipes are laid, which is the correct approach, unlike laying the mesh directly on the insulation, as reinforcement requires embedding the mesh into the concrete screed.
A metal or plastic mesh with a wire diameter of 3 mm and a cell size of 10 x 10 cm is used. The use of reinforcement with a ribbed surface is strictly prohibited, as it will damage the pipe surface.
Installation features:
- the mesh is overlapped by 1 cell;
- the elements are connected to each other using plastic clamps or wire (knitting);
- There should be no sharp or protruding ends left - they are cut off;
- In some places, the reinforcing mesh is attached to the pipes with clamps.
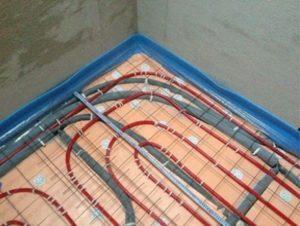
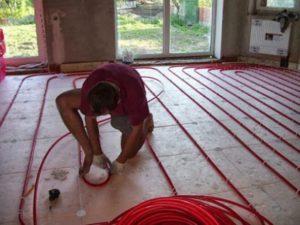
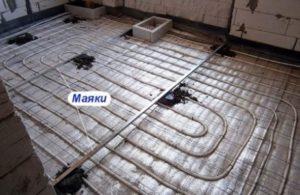
Laying and fixing the pipe
The method for laying pipes depends on the subfloor. If it's insulation, a top screed may not be required, as other materials, such as chipboard, are laid on top.
If the base is concrete, then screeding is a must. However, experts recommend pouring the top layer of concrete in both cases (this will make the structure more reliable). On the other hand, if pipes break or burst, the concrete mixture must be broken up, and the sheets can simply be removed after the flooring is removed.
If you're using polystyrene foam insulation mats, you can simply lay flexible pipes between the studs. You can then apply a screed or lay gypsum fiber sheets on top.
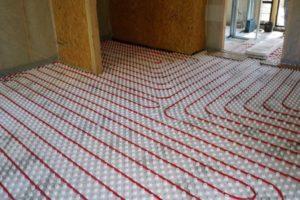
Things are quite different if you're using a more budget-friendly option—EPS. Based on the chosen pattern (snake, snail, etc.), a pipe layout plan is drawn up, after which markings are made on the laid sheets with a marker.
Don't forget to leave space for the return pipes when double laying - if the laying step is 15 cm, then you need to initially leave 30 cm.
What to do next:
- Unwind approximately 15 m of pipe from the coil and attach the end to the water supply manifold.
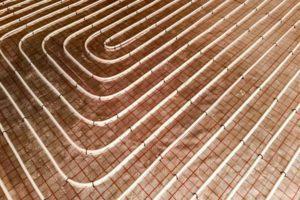
- Lay the pipes along the marked “route”, gradually unwinding the length from the coil.
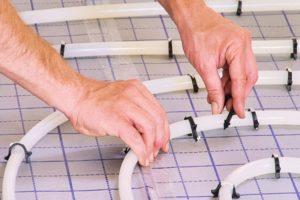
- Secure the elements with harpoon staples, carefully bending the tube to avoid kinks. Staples are placed every 30-50 cm on straight sections and every 15 cm on curves.
- If you don't want to use staples, place a reinforcing mesh under the pipes and attach the elements to it with wire or plastic clamps.
- Install the return pipe in the same direction, stepping back the required step size.
- Align all pipes.
Connecting circuits
The manifold has a supply and return pipe. Each pipe has openings on the sides that connect to the circuits via valves.
Therefore, both circuits must be attached to two side openings—the inlet and outlet—to form a closed loop. The ends of the manifold also have connecting elements. These are designed to release air and drain liquid. A mixing valve, shut-off valves, and a circulation pump are required.
The number of holes for the circuits depends on the number of pipes, which are connected at one end to the supply inlet and at the other to the return outlet.
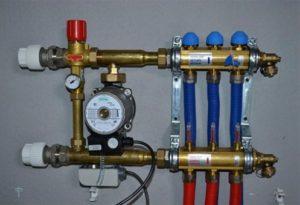
Attachment is made with fittings or nuts. The pump is always mounted to the return end of the manifold, where the water return pipes are attached.
Pressure testing
After connecting the circuits, a pressure test is carried out, that is, a check of the operability of the underfloor heating system connected to the gas boiler.
A compressor with a pressure of 4 bar is used for this. A pressure gauge is used to regulate and monitor the pressure. If the pressure drops, check the pipes for damage. During normal system operation, the pressure does not drop.
The manifold has a drain pipe that drains water through a hose into the sewer. It needs to be connected, as fluid will spill out when testing the circuits.
What you need to do:
- a hose from the water supply is connected to the supply inlet of the manifold with a ball shut-off valve;
- a pressure testing pump is connected to the input (supply) intended for the circuit;
- the remaining inputs and outputs to the collectors are blocked;
- air vents remain open;
- Water is connected for a few minutes to clean the pipes from internal grease and remove air.
Similar manipulations are performed with each input/output on the collector.
coupler
There are two types of concrete screed: for the subfloor and for the top layer. For the subfloor, follow these steps:
- After preparing the base (cleaning it of dirt and dust), mark the height of the first layer on the walls. Then add a layer of sand no more than 10 cm thick to level the floor, then moisten and compact it.
- Next, add 5 cm of crushed stone, add more water, and compact. To simplify the process, you can mix the gravel with river sand and create a 15 cm layer. We suggest you find out more. What is the optimal screed thickness for a water-heated floor?.
- Place beacons from profiles for ease of use.
- Now prepare the concrete mixture - for 1 part cement (grade M400), you need 6-7 parts crushed stone and 4-5 parts sand.
- Fill the floor with concrete mixture to a depth of 5 cm, carefully leveling the surface.
- It remains to wait a week until the rough base is completely dry.
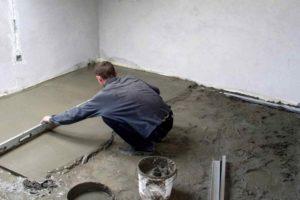
How to make the top tie:
- After installing the pipes and reinforcing mesh, prepare the concrete mix for pouring. The optimal proportions are: cement (grade M400) – 10 kg, river sand – 18-19 kg, crushed stone – 35-37 kg. If necessary, add a plasticizer in the proportions specified in the instructions.
- Since the procedure is carried out after pressure testing and connecting the entire system, leave water in the pipes, which will prevent them from floating up during further work.
- Install beacons—perforated metal strips—over the contours. To do this, apply a small amount of concrete mix to the sides and center of the beacons to secure the profile.
- Starting from the far corner, pour the cement mortar onto the heated water floor, using a leveling float to spread it along the marks. If any depressions in the liquid form, add a little dry mix to prevent the mixture from becoming too runny.
The curing rate of concrete depends on the room temperature and time. You can view these figures using the table (the figures are given as percentages):
| Air temperature (°C) | 24 hours (day) | 48 hours (2 days) | 72 hours (3 days) | 120 hours (5 days) | 168 hours (week) | 336 hours (2 weeks) | 672 hours (28 days) |
| 0 | 5 | 12 | 18 | 28 | 35 | 50 | 65 |
| +5 | 9 | 19 | 27 | 38 | 48 | 62 | 77 |
| +10 | 12 | 25 | 37 | 50 | 58 | 72 | 85 |
| +20 | 23 | 40 | 50 | 65 | 75 | 90 | 97 |
| +30 | 35 | 55 | 65 | 80 | 90 | 97 | 98 |
Based on the rules, further work can be carried out when the cement mixture has gained 50% strength, the underfloor heating can be started, but at a minimum heating temperature of 75%, and the underfloor heating system can be fully turned on at 100%.
Installation of additional automation
Auxiliary automation is required when circuits are laid in several rooms, and the coolant in each system must be heated to a specific temperature. For example, in the bedroom – to 20°C, in the living room – to 25°C, in the bathroom – to 30°C. This is achieved by using a control unit consisting of a three-way valve, a circulation pump, and a thermostatic head.
Additional automation is connected to the distribution manifold, thermostatic heads are mounted on the return outlets, and a bypass is installed between the inlet and outlet. Additionally, a flowmeter must be installed on the supply outlet.
Operating principle:
- When the coolant overheats, the three-way valve automatically closes the supply circuit and opens the return circuit further.
- At the same time, cold water is mixed with hot water in the mixing chamber.
- When the water cools down, the valve also automatically closes the return outlet.
You can see the steps for installing underfloor heating from a gas boiler in the following video instructions:
Helpful tips
To ensure your gas boiler's underfloor heating system operates properly, follow a few rules. Experts recommend the following:
- When installing a gas boiler, be sure to install a chimney and an additional emergency circuit purging system. This is necessary in case of a breakdown.
- Install compressed air cylinders. They allow for uninterrupted operation even in the lowest temperatures.
- Purchase boilers, manifolds, and other components only from trusted manufacturers.
- The maximum pressure for a warm water floor is 10 bar.
- When purchasing a gas boiler, pay attention to the set of functions, as some models cannot be used with hydronic underfloor heating.
- Try to install the boiler in a living space, not in a basement, etc., since if there is a malfunction in the winter, the system will freeze.
- Do not make the top tie until you have checked the system’s functionality (pressure testing).
Security measures
Be sure to follow safety rules when using a heated water floor from a gas boiler:
- Install a gas analyzer - it's expensive, but you'll be sure of safety (if the burner suddenly goes out, the protection system will be activated);
- avoid placing flammable objects near the boiler;
- Do not repair the gas system yourself – be sure to call a gas service representative;
- the boiler must be installed on a fire-resistant base;
- If a gas leak occurs (a specific smell appears), immediately shut off the supply and call the gas workers.
A DIY hydronic underfloor heating system powered by a gas boiler will significantly save your family money. To ensure safety, strictly follow all installation requirements. If you're unsure of your abilities, consult with specialists or entrust this complex task to professionals.


I usually do this in practice, when I don't want to bother with welding or when it's not possible. I can only say that the flange connection method is effective, but more expensive. When you factor in a relatively large number of connections, welding is cheaper.
Is it necessary to coordinate the project with the gas service?
Hello. The installation and operation of a gas boiler is regulated by standards and overseen by the gas service, so you need to obtain permission from them, and have a project developed and approved.
Could you please tell me what to do if the floats in the manifold are floating above zero, but they should be in the middle? What should I do? I haven't checked the level all winter, I confess.
The installers got lost
Hello