Household appliances of this type have long been an essential part of most households. Purchasing and connecting washing machines to the sewer and water supply has long been commonplace, and most of us know how to do it.
However, in this article, we'll delve into the issue in detail and examine all the nuances of connecting to the water supply and sewerage systems, the various methods available, the tools and materials needed, and how to avoid common mistakes.
But first, let's briefly review how to connect a washing machine: one end of the cold water supply hose is screwed to the water pipe, and the other to the machine's inlet fitting. The end of the drain hose is connected to the sewer system at a certain height. We'll cover all the steps in more detail below.
- Materials and tools for connecting to water supply and sewerage systems
- Preparing washing appliances for installation
- Removing the transport screws
- Options for placing washing appliances
- Connecting washing machines to the water supply - several connection methods
- Connecting washing machines to the sewer system - we will consider two methods
- Connecting washing machines to the electrical network
- What you need to connect
- Electrical installation
- How to level a washing machine
- First launch
- Tips, recommendations, and mistakes that can occur during the process of installing a drain to the sewer and connecting it to the water supply
Materials and tools for connecting to water supply and sewerage systems
The need for specific materials when installing and connecting washing machines to the sewer and water supply is determined primarily by the location of the unit and the accessibility of these facilities. In some cases, significantly higher costs are required to ensure the appliance remains convenient to use for many years to come.
If you plan to install additional water supply lines in the groove, you'll need a powerful angle grinder with a concrete saw blade. A hammer and chisel can be used to chip out the concrete.
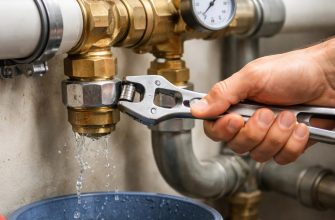
 The pipe is laid seamlessly into the groove to ensure long-term, leak-free operation. Otherwise, if a leak occurs, restoring the pipe's functionality will require extensive troubleshooting and repair work.
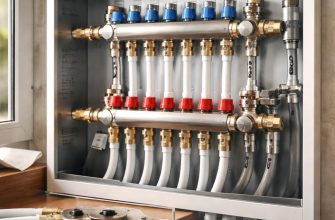
A tee with a shut-off valve is typically used to connect to the water supply, and a set of wrenches or a universal adjustable wrench are used to install it. All threaded connections are sealed with tow or FUM tape.
Installing an external branch pipe involves securing the pipe to the wall. This requires an electric drill and concrete drill bits. Plastic anchors are installed in the drilled holes and secured with appropriately sized screws.
When installing washing machines, the main requirement is horizontal position of the top cover in relation to the floorA building level is used for precise installation of the washing machine; adjustment is made using screw-mounted support feet.
To install a drain for washing machines into the sewer, you will need a drain adapter with a 45-degree outlet.

To connect washing machines to the power supply, you will need a three-core cable with a cross-section of 2.5 square meters in double insulation and a 16-amp circuit breaker with a leakage current of no more than 30 milliamps.
Additionally, it's possible to use control equipment such as a voltmeter. We'll discuss how to properly connect a washing machine to the power supply in more detail below.
Preparing washing appliances for installation
First, once the unit is delivered to the installation site, it needs to be unpacked. Typically, the machine is packed in a cardboard box and secured with plastic tape. This plastic tape needs to be cut and removed.
After this, carefully remove the cardboard box and the foam pads from the top and sides. Next, lift the car and pull out the lower foam platform.
It's important to pay attention to its design: if there's no special lug in the middle that supports the drum during transport, it's manufactured and installed separately. Tilt the drum and remove this insert.
Please note that the cardboard packaging and foam padding must be retained for the duration of the warranty. If a machine needs to be replaced due to a defect, it will not be replaced without the packaging. These are the warranty terms.
Inside the cardboard packaging is an envelope or folder with technical documentation. It contains:
- A passport for the purchased washing machine, indicating the unit's identification number and other identification information. All entries must be certified by the store's seal.
- A warranty card, which is certified by the store's seal and indicates the date of sale, since the warranty period begins from that date.
- Operating instructions, starting from the moment of unpacking, and instructions on the installation procedure.
All manufacturer's requirements must be strictly followed, as failure to comply with any of them will void the warranty.
- Flexible filling hose equipped with union plastic nuts for connection to the machine and water supply;
- drain hose for removing used water after washing and spinning clothes;
- reduction – an intermediate part for connecting a drain hose to a sewer pipe;
- bracket for fixing the drain hose to the wall;
- a wrench for removing transport screws and adjusting the position of household appliances in space before switching them on;
- plugs installed on the holes for the transport screws after they have been removed.
These are the main items included in the sales kit, which may differ between models.
If your washing machine breaks down, you can connect the motor from it to the 220 V network with your own hands.
Removing the transport screws
 This is a mandatory procedure before connecting washing machines to the water supply and sewer system. Their purpose is to secure the drum during transport to prevent damage.
As noted above, a bolt removal tool is included in the sales package.
The removed screws should never be thrown away; they will be useful if you need to transport the washing machine to a warranty workshop.The holes where the transport screws were must be covered with the covers included in the sales kit.
Options for placing washing appliances
Household appliances of this kind are not purchased spontaneously; they require careful analysis and preparation. This primarily concerns the installation location.
The need to drain used water dictates that washing machines should be located as close as possible to the sewer system.
These points are located either in the bathroom or kitchen, where the water supply is also located.
As for the electrical connection, washing machines may require a separate power supply line from the input panel to the socket location.
Connecting washing machines to the water supply - several connection methods
Watch the video - the first method of establishing a connection to the water supply
A cold water connection hose is always included with this unit. It's 1.2-1.5 meters long and has two plastic union nuts at each end.

One end is installed on the hose at a right angle. It should be positioned on the unit's inlet. The angle prevents the hose from kinking or being pinched. Connection is made as follows:
- Turn off the water supply to the water supply by turning off the tap on the riser.
- Unscrew the flexible cold water supply line on the sink or washbasin.
- Install the tee on the supply pipe in the water supply system so that the side outlet is conveniently located for connecting the washing machine hose.
- Screw the filler hose onto the tee. When tightening the plastic nut, do not use a tool; tighten the nut by hand only. Using a tool to tighten the nut often results in breakage of the fragile plastic nut.
- Install the flexible mixer hose.
A test run of water into the washing machine system should be performed with the tap on the crosspiece closed. Only after ensuring there are no leaks can it be opened to check the reliability of the hose connection.

This connection option is used when the installation location of the unit coincides with the location of the sink or washbasin.
Otherwise, it is necessary to bring the water closer to it. To do this, a tee is inserted into the nearest water supply pipe..

An additional pipe from the water supply system is extended to the location where the washing machine is installed, where it is connected in the manner described above.
Often, the filling of a household with household appliances occurs gradually, and eventually the entire space under the sink or basin is filled with tees and a tangle of various hoses.

Connecting washing machines to the sewer system - we will consider two methods
Watch the video - the first method of installing a drain into the sewer
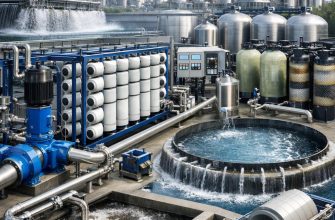
Discharging used water into the sewer system is a mandatory process for this type of unit, as the treatment of contaminated wastewater is becoming increasingly important.
If we are talking simply about organizing the drainage of water from washing machines into the sewer, it is possible to do without directly connecting these two systems.
Simply use the U-shaped bracket included with the unit to secure the drain pipe to the edge of the bathtub. This eliminates the issue of the drain height, creating a water seal that prevents backflow.
Many modern units are equipped with a check valve to prevent this process.

Given the specific location of the sewer system in a house or apartment, there are no problems with connection, but it does have its own specifics.
Direct connection to the sewer system is quite common and is the simplest method. However, this method has its drawbacks.
To do this, it is necessary to install a spacer to the sewer pipe in the form of a tee, and the branch must be at an angle of 45 degrees.
The drain hose connects to a 50-millimeter diameter sewer pipe, while its actual diameter is 22 mm. Therefore, the connection is made using a special spacer called a "reducer."
The washing machine drain hose is standardized across all models and has a diameter of 22 millimeters. There are no special adapters for draining from this size; this simple rubber piece is used as the adapter.
When the machine is located in close proximity to the outlet of the sewer pipe, it is naturally connected to it using a tee.
In this case, the slope of this pipe must be 2-3 millimeters per meter of length. Reduction fittings with these dimensions are available commercially.
 In some cases, if the machine is automatic, there is no need to use an intermediate pipe, since the used water is pumped out by a pump.
In this case, the connection is made using a rubber reduction. It is a rubber sleeve. Ribs are made on the outer surface, like a cuff, to seal the connection. The inner hole is designed in the same way, with a diameter of the corresponding size.
In the technical documentation, if there is no check valve in the installed machine model, the height of the drain from the floor at which a water seal is formed must be indicated.
If this parameter is not maintained, very unpleasant odors will penetrate from the drain hole into the room.
 The second connection method Washing machines are connected to the drain via a siphon. Many of these machines are manufactured with a special drain outlet at the top.
When sold, it comes with a special plug that seals the outlet. Before connecting the car's drain hose, this part must be removed and discarded—it's purely for protection.
The washing machine drain hose is simply placed on this branch pipe and, if necessary, additionally secured with a clamp.
This product can be equipped with multiple outlets, allowing connection of several units simultaneously.
If possible, washing machines should be connected in a manner that is sufficiently reliable and resolves all issues of tightness and safety.

Connecting washing machines to the electrical network
When renovating a bathroom or kitchen, it's essential to provide wiring for a washing machine or other similar appliance. It's important to understand that combining water and electricity in a single unit makes it a highly dangerous appliance. Therefore, separate wires are installed for these connections.
What you need to connect
The list of materials for creating an autonomous network for connecting household appliances is not extensive and includes:
- Conductor products are selected from copper samples. Given the location of use, they must be double-insulated.

- An emergency shutdown control device that will protect household appliances from failure due to power surges and the building from potential fire. The appliances will not be damaged by moisture entering the electrical system.

- An automatic switch with the same parameters is installed in case of a short circuit and protects the network from damage.

- High-security socket with moisture protection.
- Additional materials include common electrical installation parts – clamps, terminals, distribution boxes, cable channels, etc.
Electrical installation
We draw your attention to the need to comply with all rules to ensure your own safety and the security of your property and home:
- During installation, only professionally executed connection diagrams should be used.

- It is not possible to connect aluminum and copper wires by twisting.
- To perform the wiring, you must use only wires of the appropriate cross-sectional area for the power rating.
- It is not possible to arrange grounding by connecting a wire to a water pipe or hot water supply.
- The sockets used must be made on a ceramic base in a waterproof housing.
- It is strongly recommended not to use an extension cord or an adapter from a standard outlet to a European plug to connect washing machines.
- It is prohibited to connect the ground wire to the neutral wire.
- The connection wire must be laid as a separate line.
After completing the electrical installation, it is recommended to carefully check the entire circuit with a tester to exclude the possibility of a short circuit.
How to level a washing machine
This is the final step and is performed after connecting the machine to all utilities. Failure to do so will result in the machine overloading during operation, resulting in severe drum vibrations that will reduce its service life.
The top cover of the unit must be positioned horizontally. To do this, follow these steps:
- Install the washing machine in its permanent location. The distance from the rear panel to the wall should be no more than 5 centimeters, otherwise the hoses may become deformed or kinked.
- Loosen the lock nuts on the machine legs.
- Use a spirit level to determine the direction of raising or lowering.
- Adjust the unit's position by loosening or tightening the screws. The lid's parallelism to the floor is allowed to be no more than 2 degrees.
- Having achieved the correct position of the machine body, it is necessary to tighten the lock nuts to the body.

- It's important to prevent the unit from vibrating, which can occur if there's a gap between the feet and the floor. To do this, try rocking the unit in different directions. If necessary, tighten the feet until they are tightened evenly.
First launch
To check the functionality of the installed washing machine, you need to perform a test wash. This is done in the following order:
- Plug the machine into the power supply.
- Select the desired washing mode and set it on the display.
- Turn on the operating mode. When filling the tank with water, monitor the filling time against the specifications. If the machine fills slowly, check the water pressure and, if necessary, increase it according to the specifications.
- Check the water heating time for the selected mode.
- When filling the tank with water, check for leaks; if there are any, eliminate the cause and repeat the tests.
The test run program and procedures are detailed in the relevant technical documentation. Recommendations for different models may vary, but these are the only guidelines you should follow.
Tips, recommendations, and mistakes that can occur during the process of installing a drain to the sewer and connecting it to the water supply
The most important recommendation when installing any household appliance is to carefully read the instructions in the technical documentation. Even an experienced washing machine installer may encounter new features and installation technologies they haven't encountered before.
Next, the following circumstances need to be clarified:
- Check the water supply pressure to ensure it meets the requirements and specifications of the equipment being installed.
- Similarly, the power line load must be calculated to ensure that the remaining capacity is sufficient to power all available equipment. If this is insufficient, the equipment can be used sequentially, although this is very inconvenient.
- When unpacking the washing machine, you must additionally ensure that the spacer under the drum and the transport screws have been removed.
- If the unit's drainage system doesn't have a check valve, a sewer odor may develop in the room and the washing quality may be unacceptably poor. A built-in valve can be purchased and installed. These devices are available on the home improvement market.
- All threaded connections must be sealed. Use hemp with caution when connecting the stock hoses. It tends to swell and can tear the plastic nuts.
Watch the video: Water and sewer connection errors
Household appliances on the market today are very ready to use. By carefully studying the instructions, anyone can handle the installation.