The most reliable way to provide water to a country house is to connect the internal water supply to the existing system. However, shutting off the main water supply isn't always possible, so the question arises of making a pressurized connection to the water supply.
This operation can be performed with or without welding. However, in any case, such work must be performed by qualified specialists with special certification and a valid connection permit.
- Obtaining permission to perform work
- Device for cutting into water pipes under pressure
- Installing the saddle
- Methods of cutting into a pipeline
- Let's consider the simplest method
- Built-in cutters
- Using drill clamps
- Other methods of insertion
- The main stages of the insertion procedure
- Rules for determining the insertion location
- How to select materials for cutting
- General rules for performing a challenge
- Testing and adjusting water pressure in the water supply system
- How to increase water pressure in a water supply system
- Lowering blood pressure
Obtaining permission to perform work
Given the importance of the water main as a vital supply, permission to make a tapping connection must be obtained from the local water utility. The method of execution, whether welding or not, is irrelevant.
Connection made without permission is considered illegal and is subject to administrative measures with financial penalties.
An approved copy of the site plan is issued by the Federal Land Registry, and the Vodokanal branch issues the technical specifications for connection. These specifications must include the following information:
- location of the insertion;
- size of the main water pipe;
- data that may be needed when producing the insert.
Such a document can be executed by a specialized design organization, but this does not cancel its approval by the water utility.
The document authorizing the connection will be registered with the local sanitary and epidemiological station. The set of documents submitted to the sanitary and epidemiological station is accompanied by a statement of the need to connect to the central water supply network.
Given all the various restrictions, it's clear that cost savings through in-house efforts are only possible when performing excavation work. Any other work can only be performed by specialists with special permits.
Connection to a pressurized water supply is prohibited under the following conditions:
- the pipeline is made of large diameter pipe;
- in the absence of connection to the central sewerage system;
- if the installation of water meters is not provided for during the installation.
Device for cutting into water pipes under pressure
Cutting into a pipeline system and stopping pumping is associated with significant material losses. To perform this operation, it is necessary:
- Relieve pressure in the water main and drain the water. This will significantly disrupt water supply to all facilities connected to the pipe.
- Make a hole in the pipe wall using any available method.
- Install a drain pipe and mount a tap or valve on it.
- Install a connection unit from the branch to the internal wiring in the house and on the site.
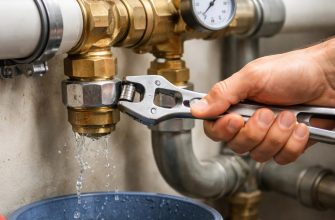
- Check all connections for leaks.
- Fill the pipeline with water, release air locks, and increase the pressure in the system to the required level.
It is obvious that the time and energy costs associated with this connection technology are quite significant.
Therefore, a technology has been developed and is being used for installing bends on pipes that are under pressure without stopping the operation of the water supply system.
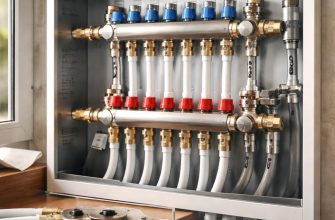
Before making a tap into a pressurized water supply, a special saddle clamp, also known as a "saddle," should be installed on the pipe. It is a split coupling that is tightened with screws.
Used for compaction rubber gasketA flange or pipe stub is fabricated on the half coupling to accommodate the drill bit. A rubber seal is used when making a tapping connection into a plastic pipe.


When drilling pipes made of cast iron or steel, a saddle is used in the form of a covering layer of plastic material applied to the inner surface of the coupling.
Universal tie-downs made from strip metal are now widely used. Their design resembles a car tie-down strap.
Considering the constant improvement of the tool, we pay attention to the device in which the cutter is installed and the tap installed on the side is used to drain water when passing through the wall.
When cutting into a plastic water pipe under pressure, built-in heating elements are used, which allow the wall to be melted without cutting.
For use with large diameter pipes, three-piece saddles are used.
Installing the saddle
 This structural element is secured with screws. Tightening should be done by tightening the screws alternately, ensuring the coupling halves meet evenly and without distortion.
On steel pipes, careful surface preparation is required, including treatment with a wire brush or sandpaper.
When drilling into a cast iron water pipe under pressure, the axial force on the tool should be applied with less pressure to avoid breaking the wall, since cast iron is brittle.
Methods of cutting into a pipeline
There are various ways to connect to the pipeline. The simplest is as follows.
Watch the video
Let's consider the simplest method
It involves installing a transition shutoff element before drilling into the pipe wall. A ball valve, mounted on a saddle, is used for this purpose. When open, it allows the drill bit to pass through the bore.
To prevent water from splashing onto it, the top of a plastic bottle is inserted through the hole in the lid. After passing through the pipe wall, the drill is removed from the hole and the ball valve is closed.
If the water main connection is made through a steel pipe, an even simpler solution is available: simply weld a threaded elbow to the pipe and install the same ball valve on it. The rest of the process follows the diagram.
Built-in cutters
This tool is equipped with a core drill to make the hole and a safety valve to prevent backflow of water.
 The tool is rotated manually by pressing the handles. A professional tool operates using a power drill. The end of the nozzle is equipped with a locking device through which the tool is inserted.
When not in use, the pipe is sealed by a valve that opens when pressed. A rubber ring-shaped seal is installed around the pipe.
Devices of this design are most often used for cutting into polyethylene pipelines.
Once drilling is complete, a small amount of water may leak through the bit. The drill bit is withdrawn until it contacts the valve, which closes and seals the leak.
The side outlet must be in the closed position and is opened only after the installation of the water supply system in the house and on the site is completed.
Using drill clamps
Pre-drill clamps are often used for tapping into pipelines under pressure. These clamps are typically sold with attachments and swivel connectors.

These products come in several design variations and are used to connect pipes with a diameter of 80 mm or more. When drilling, deep center punching is essential to prevent the drill bit from slipping on an inclined surface.
Other methods of insertion
It's worth paying attention to the standard tapping device popular with water utility workers. It looks like a pipe with multi-layer seals. It's placed on the main pipe and secured with long studs.
Watch the video
[sociallocker]
The device is so tightly sealed that no leakage occurs as the drill penetrates the wall. This device is equipped with a pressure gauge, whose change in reading indicates the completion of drilling.
The main stages of the insertion procedure
To summarize, the main stages of work production can be identified:
- Installation of a clamp for cutting into a main pipeline.
- Installation of the locking device.
- Drilling a hole in the pipe wall
- Connecting the in-house water pipe to the insert.
Installing an additional water supply connection on a property or in a house does not require any additional approval and can be done independently.
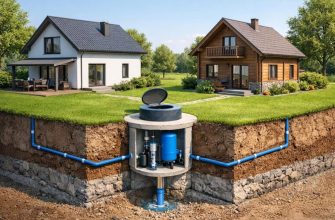
Rules for determining the insertion location
 Typically, the connection to the water supply is made at the nearest inspection well on a straight section. The basic rule is that the drain pipe should be installed below the frost line.
For mid-latitudes, it's 1.2-1.5 meters. However, the trench should be approximately half a meter deeper, as a drainage layer of sand and gravel will need to be installed.
In some cases, the pipeline is additionally insulated with foam materials, and a heating cable with automatic switching on at a temperature of 0- +2 degrees is installed.
The water supply branch is equipped with a drain valve, installed directly behind the connection.
Before you start digging a trench, you need to make sure that it does not intersect with other communication systems - communication cables, power supply or sewerage.
How to select materials for cutting
Connection to the main water supply is made using pipes made of various materials – polyethylene, cast iron, steel, including those with protective coatings.
When using cast iron materials, its properties should be considered, particularly its increased fracture toughness. Pipes made of spheroidal graphite cast iron, which is more ductile, should be selected, and significant tool forces should be avoided during machining.
The pipe used for the tapping must be smaller in diameter than the main pipe.
Watch the video
The connection is made using pipes with a size of 50 millimetres.
When connecting to a plastic pipeline, products with built-in heating elements are used, which are capable of thermally creating a hole, while a calibrating cutter is simultaneously installed to achieve a precise joint.
At pressures up to 1.6 MPa, saddle clamps are used in plastic pipelines, creating uniform pressure across the entire contact area, which prevents deformation of the plastic product.
The use of saddles with a built-in cutter and a check valve allows welding in the connection, after which the service life of such a tapping increases to 50 years.
General rules for performing a challenge
The cut-in is made using one of the methods described. The front end of the pipe is connected directly to the cut-in element, and the other end, via a water meter, is connected to the internal plumbing system.
 Therefore, the meter should be installed between the tap/valve of the connection and the valve connecting to the internal water supply network. When installing the meter, it is also necessary to use a non-return valve to prevent reverse flow of liquid.
For cases where the introduction of a water supply into a house involves crossing a wall or foundation, the hole in them should be larger than the diameter of the pipe itself, approximately 200 millimeters.
Once installation and necessary testing are complete, it must be sealed using resin strands or a waterproof seal. The surface is finished with cement mortar.
Testing and adjusting water pressure in the water supply system
Pressurized tapping of plumbing equipment is the final stage of its installation. The purpose of this procedure is to check the quality of the connections made during assembly.
To do this, you need to complete the following steps:
- Fill the water supply completely. To do this, open all the faucets in the house to bleed air from the system. A properly designed water supply system should also have an automatic air bleed valve.
- Measure the water pressure at the branch pipe connection. For water supply systems in low-rise areas, it is maintained between 1.5 and 2.8 atmospheres.
- It's important to remember that some household appliances and plumbing fixtures can only operate at a minimum pressure of 4 atmospheres; otherwise, they either won't turn on or will quickly fail. Clearly, the home's plumbing system must be able to reliably withstand a pressure of at least 4.5 atmospheres.
- After the water supply network is filled with water, the pump is turned on, increasing the pressure in the system to 6 atmospheres. Simultaneously, all connections are inspected for leaks. The pressure is maintained for at least an hour.
System pressure is crucial for the successful operation of a plumbing system. Insufficient pressure can cause appliance failure, while excess pressure can destroy the entire system. Threaded connections are particularly vulnerable.
One atmospheric pressure unit can lift a column of water to a height of 10 meters. For a massage shower or jacuzzi to function properly, the minimum pressure is 4 atmospheres. A dishwasher or washing machine requires 2.5-3.0 atmospheres. In this article, you'll learn how to connect a washing machine to the water supply and sewer system..
We invite you to familiarize yourself with An article on how to connect a dishwasher to the water supply and sewer system yourself.
Watch the video
[sociallocker]
The pressure in the water supply system is an unstable indicatorIt depends not only on the system settings but also on the current level of fluid withdrawal from the system. At maximum flow, it can drop to zero and then rise sharply.
At the same time, it's important to remember that excessively high pressure (4-10 atmospheres) can lead to rapid failure of ceramic valve inserts and damage to the control equipment of household appliances. Critically high pressure is 6.5 atmospheres.
A drop in pressure to 1-4 atmospheres results in the shutdown of most household appliances and low water pressure in taps.
Pressure testing is performed using a standard instrument—a water pressure gauge. This should be installed during the plumbing system's installation.
The pipeline owner has the right to make any decision regarding the pressure in their network. However, professionals recommend approaching this process with great care, taking into account the number of draw-off points and the characteristics of the pressure booster pump, especially its operating limits.
How to increase water pressure in a water supply system
 This is the most pressing issue for owners, and one that everyone faces from time to time.
The problem can be solved in several ways:
- install a pressure boosting unit;
- introduce reserve storage capacity into the system.
The first method is preferable for apartment water supply systems, as it's difficult to find space for a reserve tank in a standard room. However, they are also widely used in summer cottages and country houses.
An additional pump can be installed at the building entrance. When operating, this device additionally oxygenates the water.
A traditional method for increasing pressure in any conditions is using a pumping station with a hydraulic accumulator. The additional tank has a capacity of 24 or 50 liters, and the pressure can be stabilized within 1-5 atmospheres.
A reserve tank installed in the attic, in addition to stabilizing the pressure in the system, allows you to always have a supply of water for drinking and cooking, even during interruptions in the water supply.
Lowering blood pressure
 In some cases, it is necessary to reduce the pressure in the system. For example, if the drilled well is a gushing well. The pressure in such water intakes can reach up to 10 atmospheres, which is destructive to the water supply.
In such cases, manual system adjustment is used by changing the settings. A pressure gauge built into the system is used to monitor the results.
The adjustment is made as follows:
- Disconnect the power supply to the pumping and storage station.
- Open the cover of the automated pressure control unit.
- Turn the upper regulator nut (larger size) clockwise, which will decrease the upper pressure limit.
- Turn the smaller nut counterclockwise, increasing the lower cut-off limit.
Watch the video
Connect the pump to the power supply, start the station, and check the effectiveness of the adjustments using the pressure gauge. If necessary, repeat the operation until the desired results are achieved.
Different brands of pumping and storage stations are regulated differently, and this is fully reflected in the accompanying documentation for these devices, which should be used as a guide for adjustment.