Sooner or later, the time comes when replacing bathroom pipes becomes necessary due to objective necessity. Unfortunately, no one can avoid this situation; you can only be prepared when the time comes. That's what we suggest you do.
In this article we will go into detail let's look at the reasons, as a result of which the issue of replacement becomes relevant. We will also analyze all the stages of replacing pipes in the bathroom, starting from dismantling old communications, selecting materials and laying new ones.
This article includes videos and detailed instructions that will help you easily do everything yourself.
- Find out when a replacement is required
- Dismantling of obsolete communications
- Which pipes should I choose for replacement in the bathroom?
- Sewage system: what to look for when choosing
- Selecting materials for hot water pressure pipelines
- Cold water pressure pipes made of plastic
- Tools and materials that we will need during work
- Selecting a piping system and stages of replacing the main line
- Tee-shaped utility layout diagram. Algorithm for replacing old piping materials with new ones.
- Algorithm for replacing pipe materials in a manifold layout
- Pressure testing of the water supply system
- Replacement of riser, sewer and drain pipes
- How to change a faucet
- What you need to know about replacing a heated towel rail
Find out when a replacement is required
This may be due to the following circumstances:
- physical wear and tear resulting in leaks;
- clogging of old metal pipelines with corrosion products and lime deposits on the walls, which can lead to complete blockage of the lumen in them;
- vibration of the pipeline system due to pressure changes, which can lead to the complete destruction of the water supply system.

Let's determine what pipes are installed in the bathroom. To do this, we'll pay attention to the water temperature in them. It could be:
- hot – for household needs;
- cold - for general water supply for various household needs and mixing with hot water to the required temperature;
- hot heating system;
- Since, on average, more than a cubic meter of water can be used per person for household needs alone, the task of removing used liquid through a gravity sewer system is relevant (in private homes, this amount increases to 3 cubic meters during the summer season).
 Not long ago, steel water and gas pipes manufactured according to GOST 3262-80 with sizes from a quarter of an inch and above were used for installing pipelines in the bathroom.
For bathrooms, the optimal size was typically up to an inch and a quarter. Before replacing bathroom pipes yourself, it's important to carefully review the process steps. We'll cover them below.
Dismantling of obsolete communications
Dismantling occurs in the following sequence:
- First, you need to turn off the water on the hot and cold water supply risers.
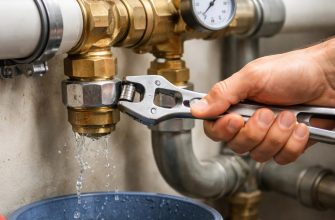
- Before replacing the pipes yourself, you must remove the old pipes. To do this, disconnect the inlet pipe from the riser and ensure the inlet shutoff valve is properly sealed. If necessary, install a plug. Even a small leak will inevitably flood the neighbors below, and this should be avoided.
- Dismantled materials need to be cut into sections. This is done to make them easier to remove from the apartment or house.
- Remove the plumbing fixtures from the walls of the room, first removing any tiles (if any). It's important to note that reusing them is not recommended, as modern installation methods and fixture designs differ significantly from those used previously. It's important to remove not only the clamps or brackets, but also the anchors used to secure them. Holes in the walls should be carefully sealed with cement-sand mortar or an equivalent.
- Dismantling the drainage system is accomplished by disassembling the connections. The fasteners are first removed. Concrete supports, determining the slope of the plumbing system is not These are subject to replacement and should be left in place. They can be used during the installation of a new sewer system to maintain the standard slope.
The reason for replacing them is the age of the old drainage system. Previously, cast iron drains were used, which have a rough inner surface, which contributes to increased clogging and, therefore, requires frequent cleaning when clogged.
Therefore, replacing the bathroom drain pipe is a must. The drain riser is usually located in the toilet room; only in combined bathrooms can it be found in the bathroom. However, this is not the responsibility of the tenant or the property owner. the management company should be responsible for replacing it.

Replacement of the riser pipe in the bathtub must be carried out by the utility company at the request of the homeowner.
Which pipes should I choose for replacement in the bathroom?
Modern materials offer many advantages over those used previously (cast iron, ferrous metal, etc.). Plastic materials are now widely used.
Watch the video
[sociallocker]
These include polypropylene, cross-linked polyethylene, metal-plastic, etc. We strongly recommend using these materials, and we will substantiate our assertion later in the article.
Before replacing your bathroom pipes with plastic ones, you need to determine the type of material. The construction market is flooded with products from various brands, so let's consider their advantages and disadvantages to determine which ones to use.
Watch the video
Sewage system: what to look for when choosing
The choice here is limited – you can use traditional cast iron or new generation plastic products.
Plastic ones perform better because their interior surface is of higher quality and prevents clogging. They're also lightweight, making them easier to transport to the site.
They are also easy to install. Connections are made using sockets, where rubber cuffs serve as a seal. All sizes are fully equipped with fittings for creating drainage systems of any complexity.
The materials used to produce sewer pipes are:
- Polyethylene (PE) is a product of the polymerization of ethylene gas at elevated temperatures and pressures. Depending on the production technology, a distinction is made between low-density polyethylene (LDPE) and high-density polyethylene (HDPE). It's important to remember that the former has superior strength and temperature characteristics.
- Polyvinyl chloride (PVC).
- Polypropylene (PP).
Other polymer plastics are also used in sewer pipe production, but much less frequently. They will not be discussed in this review.
 To replace a drain pipe in a bathroom, it is best to use polypropylene products, which can withstand temperatures up to +75 degrees Celsius and short-term increases up to +95.
It's doubtful that the drain in this part of the system will reach these values. Low-density polyethylene (LDPE) can be used for the external drainage system, as the liquid in it has a lower temperature and is significantly less expensive.
To replace drainage systems in bathrooms, pipes measuring 30-40 millimeters, less often 50, are used.
Before replacing your bathroom pipes with plastic ones, you need to study all their characteristics and choose the right option.
Selecting materials for hot water pressure pipelines
The advantage of using plastic products is their inability to form scale on the interior walls. Chemically, the material is completely passive and resistant to most household harsh substances, and limescale simply does not form on them.
The most dangerous impact is caused by atmospheric oxygen, which penetrates into the water from the outside through the pores and microcracks in the product.
While it doesn't directly affect the material, it does contribute to accelerated chemical wear of the metal parts of the piping system, which in the bathroom includes the heated towel rail and shutoff valves. As a result, they often need to be replaced.

To address this drawback, oxygen shielding was developed. It uses aluminum tape with a thickness of at least 0.1 millimeters. It is wound onto a base, which is a tubular blank, in a helical pattern.
The joint is continuously welded during production using a laser. Then, another layer of plastic is applied over the metal jacket. This creates a three-layer product, the interior of which is hermetically sealed against oxygen penetration.
On its end face, the metal jacket is visible as a thin, shiny strip. In addition to the standard markings, a longitudinal red stripe is applied along the outer surface.
For hot water piping, it is preferable to replace the pipes in the bathroom with polypropylene ones with oxygen protection.
Cold water pressure pipes made of plastic
 Products made from various materials are suitable for such purposes. Their pressure-resistant properties are enhanced by the use of a fiberglass reinforcing belt.
The manufacturing process is similar to installing an aluminum protective jacket, but fiberglass threads are wound in place of aluminum. On the end face, this reinforcing layer is distinguished by a dark concentric band. The outer surface is marked with a blue longitudinal stripe.
For internal wiring when replacing in a bathroom, products with a diameter of 20-25 millimeters are used, and for branches to specific consoles - 16.
Tools and materials that we will need during work
Replacing plastic pipes in a bathroom requires the use of a specific set of tools and equipment for plumbing installation. The composition of these tools and equipment is determined by the characteristics of the materials used.
Tools for working with PVC products include scissors. The key requirement for this operation is a strictly perpendicular cut, as the main joining methods are cold welding or socket jointing. Sometimes, in addition to a rubber cuff, a sealant is used.
If you choose polypropylene products for your bathroom's internal wiring, you'll need a specially designed soldering iron and a cutting device for joining.
The physical characteristics of polypropylene products do not allow them to be produced in rolls, so connections play an important role during installation.
A variety of fittings are used during installation, allowing for the creation of water supply networks of any complexity. If necessary, the use of combined components is provided. for the transition from metal to plastic.
 When installing polyethylene pipes, two different methods are used for joining during installation: for products with a diameter of 20–63 millimeters, fittings are used, and for other sizes, end welding is used.
Cross-linked polyethylene products are used to create both cold and hot water supply systems in bathrooms. Connections are made using specially designed compression fittings. Crimping tools are used for their installation.
When working with metal-plastic products, the ends of the parts to be joined are cleaned. This is done with a special tool— end facer, which must also be available.
Obviously, other general-purpose tools may be needed during the work process:
- Electric drill for drilling holes in walls for installing brackets - holders.
- Drills or concrete drills of the required sizes.
- A hammer drill for punching holes in the walls through which replacement pipes will pass.
- A cement-sand mixture will be needed to seal the holes in the walls after laying, along with a trowel and other tools.
- To cut through the old water supply system when replacing it, you will need an angle grinder equipped with a metal cutting disc.

- Fasteners for installing pipes, including brackets, dowels (plastic inserts in holes), screws.
- A screwdriver or a set of screwdrivers.
The quantity of basic materials depends on the chosen plumbing installation scheme.

Selecting a piping system and stages of replacing the main line
The traditional method for installing plumbing in a bathroom is the tee method. This involves running the main pipe from the riser to the final point of consumption. It is routed along the wall and secured with brackets.
Watch the video
[sociallocker]
As each water intake point is reached, a tee is installed, from which a flexible hose is connected to the faucet or mixer tap. A second pipe, for hot water supply, is installed in parallel and connected to the corresponding faucet in the same manner.
It's worth noting that replacing old pipes in a bathroom isn't a separate process. It's done simultaneously for the entire plumbing system.
Tee-shaped utility layout diagram. Algorithm for replacing old piping materials with new ones.
The sequence of individual connections in the bathroom from the beginning of the system to the end may look like this:
- Install coarse and fine water filters after the riser valve. Hot and cold water meters are also connected at this location.
- Extend a branch pipe from the riser to the first water intake point. To connect it, you may need a metal-to-plastic adapter, which is a standard product. The main pipe can be 20 or 25 millimeters in size.
- Install a tee to connect to the first point of use, usually the toilet or bidet, since the standpipe is traditionally located in the toilet. Then the second point will also be located here for connecting the toilet. Only cold water is connected to it.
- Next, the system is carried through the wall into the bathroom, where tees for the bathtub, washing machine and sink must be installed in sequence.
- From the bathroom, the wiring is carried to the kitchen, where the water intake points are the outlets for the sink, kitchen machine, and other equipment that consumes water.
- At the last section of the water intake, an elbow or plug is installed in the tee.
This method is used to install new cold and hot water lines when replacing old ones. The number of required fittings, including flexible 16-millimeter diameter elbows, is determined by the number of water intake points. An exception is made for the toilet, which does not have a hot water supply.
Watch the video
IMPORTANT! The advantage of this connection scheme is the economical use of materials; the total length of each pipeline for cold and hot water is practically equal to the distance from the entry point to the end of the communication.

The disadvantage is the following circumstances:
- The need to disconnect all wiring during repairs or maintenance.
- Drop in water pressure in the system when several water intake points are turned on simultaneously.
Watch the video
[sociallocker]
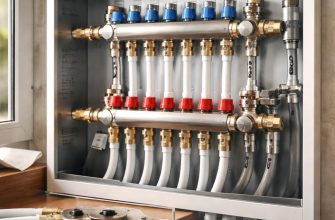
Algorithm for replacing pipe materials in a manifold layout
This method involves installing a distribution station—a manifold—from which water is distributed to the water consumption points. A 20 or 25 mm pipe is used to connect to the manifold during replacement, while 16–20 mm pipes are used for individual branches.
The device itself consists of a metal or plastic housing, from which branches extend, each equipped with a ball valve. Naturally, separate manifolds are installed for the cold and hot water supply. When replacing, each branch is connected to the corresponding faucet or mixer.
This method of distributing water throughout the system allows, if necessary, to disconnect the corresponding branch on the collector and carry out repair work.
Watch the video
If flexible polyethylene or polypropylene pipes are used for the replacement wiring, pieces of the required size are measured and cut from the coil to the actual dimensions. A ruler is printed on the outer surface for this purpose, allowing for length determination without unnecessary measurements, even in tight spaces.

When used to replace PVC pipes, assembly is carried out in sections on a workbench. It's very inconvenient to work with a soldering iron while hangingOnce the section is welded together, it is finally suspended with the help of a partner.
The pipes are secured to the walls using a plastic bracket. It is screwed into a hole with a dowel, and the pipe is inserted into the grooves on the bracket. Subsequently, all pipes can be covered with a wall-mounted box.
When using seamless branches, they can be hidden in the wall, but the amount of chasing required is quite significant.
ATTENTION! This wiring method is strictly not recommended for threaded or soldered joints. If a leak is detected, locating it is virtually impossible, requiring the removal of a large section of the wall to repair it.
The brackets are installed on the wall at a distance of no more than a meter from each other, as well as at the entrance and exit of the turn. Upon completion of installation, if replacement is required, pressure testing of a new water supply system.
Pressure testing of the water supply system
 This is a mandatory procedure; it can be outsourced to professionals, but it's also quite easy to do yourself. The equipment required for this—a powered or manual pressure tester—can be purchased at a hardware store, or you can simply rent one for a few days at the arena.
The system pressure test is carried out in the following order:
- Review the original specifications for the pipes regarding the maximum allowable pressure. This value is specified in the quality certificate and must not be exceeded.
- Study the unit's instructions and act in accordance with its recommendations.
- Fill the system with water and connect the device.
- Bring the pressure in the system to 4.8 atmospheres (working pressure), check for leaks, and, if necessary, eliminate defects.
- Continue pumping liquid to a pressure of 7.2 atm (5.8 x 1.5), repeat the control operation.
- To be completely sure, increase the pressure in the system to 9 atmospheres and leave it in this position for 24 hours.
Ideally, after this time, the pressure in the system should remain unchanged.
Check the remaining circuits in the same way.
Replacement of riser, sewer and drain pipes
 This is the simplest operation, but it requires attention and precise execution.
Internal distribution of gravity water supply systems is carried out using 30-40 mm pipes, and if there are a large number of water intake points, 50 mm pipes are used. When installing socket pipes during replacement, a slope of at least three millimeters per meter of the system length must be maintained.
Replacement of this communication in an apartment building is carried out by the operating organization.
In a private home, the riser can be replaced independently using a 100mm or 80mm pipe. Particular attention should be paid to the installation of the drain section.
Watch the video
When replacing the pipes, you need to adjust them accordingly a stretched string with a slope of no more than five millimeters per meterThis requirement stems from the fact that the liquid in the sewer line is a suspended solid. When draining at a steep angle, the liquid drains faster than the solid particles, which settle on the walls, causing a blockage.
How to change a faucet
To replace this device you need to:
- shut off the water supply to this circuit on the collector;
- unscrew the flexible hot and cold water supply lines from the mixer;
- unscrew the clamping nut and remove the mixer from the socket;
- install the new device in reverse order;
- Turn on the water in the circuit, check the connections for leaks.
Watch the video: Changing a Faucet
Replacing a bathroom faucet pipe is necessary when a leak is detected and it cannot be shortened. This can be done independently without the help of a plumber.

What you need to know about replacing a heated towel rail
Replacing a heated towel rail in a bathroom with plastic pipes is only possible if the heating water temperature does not exceed 75 degrees Celsius. It must be connected to the heating circuit and securely mounted to the wall.
Watch the video on how to replace a heated towel rail.
The system must include a valve to release the air lock from the heated towel rail, otherwise there will be no circulation of the coolant.