Heating houses and cottages with underfloor heating systems is popular today and is considered one of the simplest and most cost-effective methods.
The most common type, especially in the presence of an individual boiler room, are warm water floors laid on a concrete base, which private homeowners often install themselves.
- We will determine whether the room is suitable for installing a water-heated floor.
- Installation of a water-heated floor on a concrete base in a private home
- Water circuit diagrams
- Design
- Calculation and selection of materials
- Selecting pipes
- Insulation
- Manifold components
- How to install a water-heated floor correctly – step-by-step installation instructions
- The operating principle of the device
- Arrangement of the collector cabinet
- Installation of the first layer - subfloor
- The second stage is the damper tape
- The third stage is thermal insulation
- The fourth stage is marking and waterproofing
- Stage five – installation of pipes
- Step six: connection and crimping
- Step Seven - Reinforcement
- Step eight: pouring the screed
- The ninth stage is final finishing.
- Commissioning and rules of use
- Video instructions
We will determine whether the room is suitable for installing a water-heated floor.
Hydronic structures can be used as either the primary or secondary heating system. They are more commonly recommended for individual homes. In multi-story buildings, such floors are rarely installed due to the risk of flooding neighbors below. Furthermore, the structure is heavy and places significant stress on the floors.
The optimal solution is considered to be installing a hydronic system during the construction phase of a building. However, installing such an underfloor heating system in an existing home during renovations is entirely possible, provided the space meets a number of requirements:
- sufficient ceiling height - after all, the thickness of the water floor "pie" reaches from 8 to 20 cm;
- the corresponding size of doorways is not less than 210 cm in height;
- a strong concrete base - to withstand the weight of the cement-sand screed, wooden floors may not be able to withstand such a load;
- a level and clean concrete subfloor - differences in level of more than 5 mm are contraindicated, as they can impair the thermal performance of the structure;
- the room must be plastered and windows installed;
- The heat loss level should not exceed 100 W/m2; otherwise, insulation will be required.
Installation of a water-heated floor on a concrete base in a private home
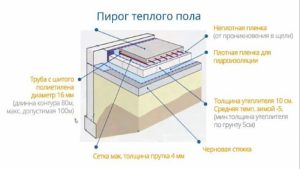
A hydronic underfloor heating system installed on a concrete floor is a pipe filled with a coolant, filled with concrete. Its "pie" is a multi-layered structure, each layer having its own function and playing a vital role in the proper operation of the system. Therefore, the order of installation is important—this must be kept in mind when constructing the system yourself.
The "pie" of a warm water system is:
- subfloor - made of concrete screed or floor slabs;
- the waterproofing layer is a regular thin polyethylene film, although if the floor is installed not on the ground, but on a concrete base, it is possible to do without waterproofing;
- Thermal insulation - it is recommended to use extruded polystyrene foam, as it has low thermal conductivity, is durable and inexpensive;
Please note! The thermal insulation material must have a density of 40 kg/m³ and a minimum thickness of 300 mm.
- waterproofing - the ideal material for laying in a private house is considered to be polyethylene with a thickness of 110 - 155 microns, it is laid in two layers;
- reinforcement - rods no less than 4 mm thick, cells 50 by 50, or 100 by 100, the mesh is attached to the ceiling, and not to the sheet of thermal insulation material;
- heating element - it is mounted to the grid using clamps, the standard pipe size is 16 mm (for a room area of 50 m2);
- screed - a cement-concrete mortar with added plasticizer is used, the minimum layer thickness is 50 mm;
- substrate - cork material, thick cardboard or foamed polyethylene are suitable for the arrangement;
- floor coverings - tiles, laminate, linoleum.
So, What does a water-heated floor "pie" look like?, with a minimum thickness of 140 mm. Additionally, where the concrete mortar touches the walls, a damper tape must be installed to provide compensation during heating.
In addition, it will be necessary to install a manifold unit and a pump, which improves the circulation of the coolant.
Water circuit diagrams
Before starting work on independently constructing water-heated floors in a private home, it is necessary to think through the layout of the heating elements.
There are two main options for arranging pipes on a concrete surface:
- The "snake" installation method is the simplest for installing underfloor heating in a private home. The downside of this method is the temperature difference between the coolant entering and exiting the system, so the second section of the pipeline will be cooler. The pipes are laid parallel to the walls in a loop.

- The advantage of this method is its ability to distribute heat evenly, but installing the heating element yourself using this design is more difficult. The underfloor heating circuit is arranged in a spiral from the walls to the center and back.
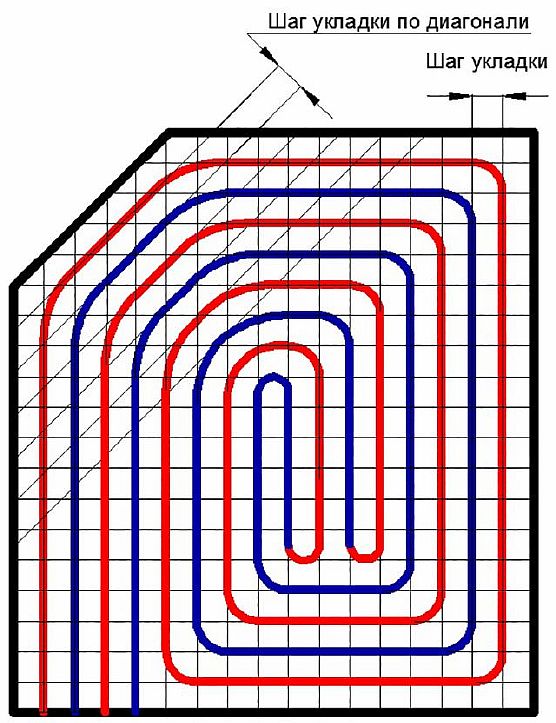
To improve floor efficiency and save material, cottage owners should consider a combined underfloor heating system. This involves placing the main line in a "snail" pattern in the center of the room and a "serpentine" pattern around the perimeter. With proper installation spacing, the temperature will be optimally comfortable.
Please note: When choosing a water-based underfloor heating system for a private home, consider the room's configuration, the length of the pipe, and the planned temperature conditions.
Design
Installing hydronic underfloor heating in a private home is a win-win solution if you have a gas boiler, although using solid fuel is also acceptable. This option is efficient, affordable, and considered energy-efficient compared to electric underfloor heating.
Flawless operation of the system is possible with a competent, professional design and installation. Therefore, installation of underfloor heating in a private home begins with a project.
First, you need to decide on the temperature level of the heated floor:
- for residential premises - 21 - 27 degrees is recommended;
- in walk-through rooms and corridors - 30;
- in the bath and pool - from 31 to 33 degrees.
We suggest you find out how to do it yourself install heated flooring in the pool under the bypass lanes and the pool bowl.
When designing, it's important to consider the length of the loops; they should all be approximately the same size. For a standard piping diameter of 16 mm and a room area of 50 m², the optimal loop size is 70 to 90 meters. If the area is larger, it should be divided into several parts. For a 17 mm diameter, the acceptable pipe size is 90 to 105 mm, and for a 20 mm diameter, 120 mm.
The spacing of the heating elements also plays a crucial role in the floor's heat transfer efficiency. The recommended spacing is 10 to 30 cm. Near external walls and in bathrooms, the recommended spacing is 100 to 150 mm, and in the center of the room, the recommended spacing is 200 to 300 mm.
Please note! The underfloor heating system is a low-temperature device; the coolant supplied to the main line should not exceed 60 degrees Celsius.
If you are not confident that you can make the drawing and calculations yourself correctly, it is better to entrust this work to specialists.
Calculation and selection of materials
According to the rules, a hydronic underfloor heating system in a private home should last for several decades, so the selection of components must be approached with the utmost responsibility.
Avoid skimping on materials by choosing inexpensive and low-quality options. Preference should be given to products with a long service life, as concrete structures are difficult to repair.
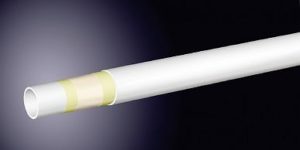
Selecting pipes
When installing DIY water systems, cross-linked polyethylene pipes (PE-X and PERT) are most often used. The advantage of PE-Xa products is their high cross-link density, which provides a memory effect.
This means that a circuit stretched or deformed by the heated coolant can return to its original shape. Furthermore, this model is equipped with axial fittings, so it can be safely embedded under a concrete screed.
PERT products, however, have push-in fittings, meaning they can only be installed using a dry method. Therefore, these pipes are recommended only for screed-filled installations where the fittings are located where the circuit attaches to the manifold.
Many people are attracted to polypropylene pipes because they are inexpensive, but they are often of low quality, so experts do not recommend them.
Copper pipes are a good option; they're durable and have high heat output, but they're quite expensive. Metal-plastic pipes, on the other hand, offer excellent value for money. They don't corrode, are lightweight, and are easy to install because they bend easily.
Please note! Professionals do not recommend using a composite frame with aluminum foil, as the metallized surface may peel off.
If increased insulation is required, it is better to use a product with an internal polyvinylethylene coating.
For water heating units installed on concrete floors, pipes must have a wall thickness of 2 mm and a diameter of 16, 17, or 20 mm. This information can be found on the products themselves.
When choosing a contour, it's best to choose proven and well-known manufacturers: Rehau and Valtec, Tece, KAN, and Uponor. Furthermore, when purchasing, it's mandatory to check for a certificate of conformity.
You will also need to purchase clamps to secure the heating element to the concrete base. If you're using pre-studded mats as insulation, there's no need for them.
Read the detailed article How to choose the right pipes for an underfloor heating system.
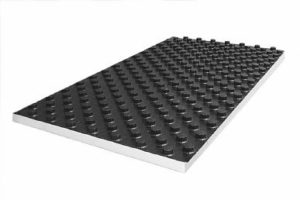
Insulation
Thermal insulation is an essential layer of underfloor heating. Its purpose is to separate the heat generated by the pipes from the concrete base and direct it upward. Recommended underlayments include:
- foil-clad polyethylene - especially for floors with minimal thickness;
- profile polystyrene mats - it is better to choose a product with protrusions for laying pipes and the presence of locks for fixing the sheets together - this will facilitate the installation process;
- extruded polystyrene foam boards - they have increased strength and a good level of thermal insulation.
Mineral wool is not recommended for placement in the "pie" of a heated floor laid using the "wet" method, as it absorbs some of the moisture from the solution.
For your information! The thickness of the thermal insulation material depends on the characteristics of the room.
On the first floor, the insulation layer should be thicker. On average, the thickness is 10 cm when laid on the ground, 5 cm above an unheated basement, and 3 cm above a heated room.
In addition, you will need to purchase fasteners with which the insulation will be fixed to the floor (dowels).
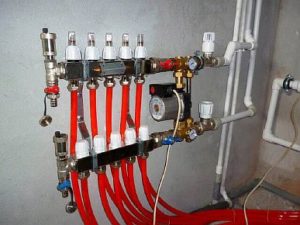
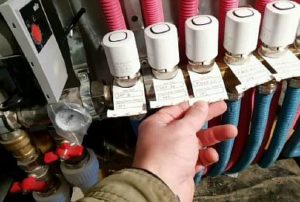
Manifold components
The manifold and mixing unit is the center of the entire structure, distributing and directing the coolant into the main line. It also monitors the unit's operation and regulates the temperature.

Manifolds aren't sold as complete kits, so you'll need to purchase components separately. It's best to trust a professional, but if you decide to do it yourself, remember to include the following parts:
- collectors with adjustment valves;
- fittings for connecting the circuit - they are selected individually;
- automatic air vents;
- brackets for mounting the device to the wall;
- drainage drain taps;
- metal cabinet;
- mixing tank and pump to ensure circulation of the coolant;
- thermometer for determining temperature levels.
Correctly selected manifold assembly components contribute to the efficient operation of the device.
In addition, to install underfloor heating, you will need to stock up on cement, sand, plasticizers for preparing concrete mortar, a damper tape 100–150 mm wide, and a reinforcing mesh.
How to install a water-heated floor correctly – step-by-step installation instructions
In fact, anyone can build a warm water structure on a concrete floor in a private home.
The main thing during installation is to strictly adhere to the technology, purchase good-quality materials and prepare an installation diagram for the water system.
The operating principle of the device
Before you start constructing heated floors yourself, you need to understand how a heated floor system works.
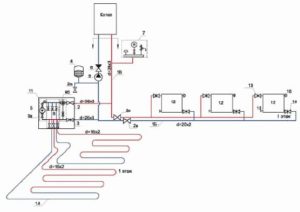
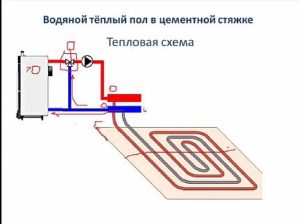
The process is simple: water is heated in the boiler and, driven by a pump, flows into the mixing unit. There, the coolant combines with cooled, waste water to the required temperature (40-50°C) and is then directed to the distribution unit, to which all the underfloor heating loops are connected.
The feeder directs water into the pipeline. The pipes transfer heat to the screed and finish coating, after which the cooled water returns to the manifold and from there to the boiler for heating.
Arrangement of the collector cabinet
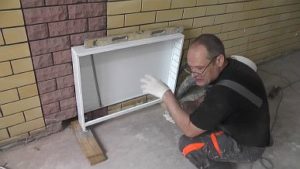
When installing a domestic hot water system in a private home, you should begin by placing the manifold cabinet in the planned location. If you want to recess the cabinet into the wall, you'll need to carve a niche for it and also cut passages for the pipes through the building slabs.
The cabinet is placed at an equal distance from all floor hinges. All this dirty work must be completed before laying the "pie."
Additionally, the manifold cabinet must be equipped with all required components (manifold, pump, air vent, and drain valve). The mixing unit must be located between the manifold and the heating boiler. It is also recommended to install a shut-off valve between the manifold and the pipeline.
Installation of the first layer - subfloor
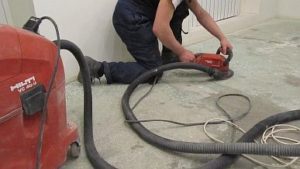
If you plan to install the foundation yourself during the house construction phase, and the foundation will be built on the ground, you will need to pour a rough concrete screed.
Before this, it is necessary to lay and compact a layer of sand, cover it with plastic film, and only then pour the solution.
If you already have a concrete floor, you should clean it of debris and smooth out any unevenness. Only minor imperfections are acceptable.
The second stage is the damper tape
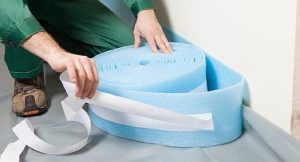
The purpose of the damper tape is to compensate for thermal expansion of the concrete mortar. It should be applied around the perimeter of the room.
You should not neglect this process, as it will affect the quality of the floor.
The third stage is thermal insulation
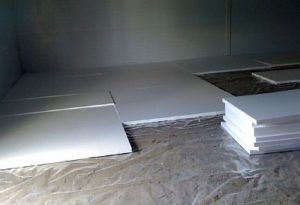
Before laying the insulating layers, mark out strips on the wall to indicate the level of the future finish. If there is a damp basement below, it is recommended to install a layer of waterproofing membrane. It should be laid overlapping, extending up the walls.
After this, you can lay the insulation material—expanded polystyrene boards—on top. Laying should begin from the outermost corner of the room, placing the material flush against the walls with the marked side facing up.
If you are installing the floor yourself and are using mats with a lock, you should lay them so that the protrusions of adjacent elements coincide and, when clicked, form a single sheet.
The slabs must be placed strictly horizontally, which can be checked with a laser level. When installing the second layer of insulation, it is positioned perpendicularly.
The slabs are fixed with plate dowels to the concrete rough surface at the joints and in the center of the sheet, and all joints are sealed with construction tape.
The fourth stage is marking and waterproofing
To simplify the process when installing the underfloor heating element, you should mark the insulation boards yourself according to the provided diagram. If you're using profile mats, they'll already have markings.
For waterproofing, polyethylene should be laid over the entire area of the room—this will ensure reliability and durability. A 50 mm overlap should be left on the walls, and this excess should be carefully compacted with a spatula between the "pie" and the walls.
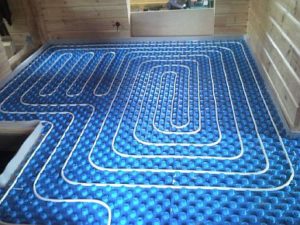
Stage five – installation of pipes
To begin installing the heating element yourself, you need to unwind 15-20 meters of the circuit and attach a heat-insulating sleeve and connecting fitting to its end.
Important! Since there is a risk of kinking the tubular product when uncoiling it, it is recommended to use a special tool for uncoiling the coils. Doing this yourself is much more time-consuming and difficult.
The pipe should be laid on the floor surface in accordance with the markings. The pipeline should be laid starting from the manifold cabinet, using a "snake" or "snail" pattern, and ending with the other end also leading to the manifold.
The contour is positioned freely, without tension, and secured with harpoon clamps. Transition pipes, which pass through walls or transition areas, are additionally insulated.
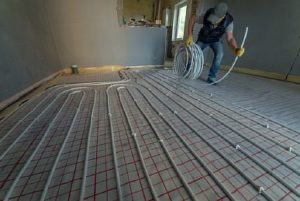
The standard laying step is 30-40 cm, at turns 15-20 cm. The contour must be bent carefully to avoid kinking.
When using polystyrene foam boards with bosses, the process of installing pipes is significantly simplified.
The heating element is placed in the grooves between them, and thus is firmly fixed.
Step six: connection and crimping
Both ends of the circuit, placed in a thermal insulation sleeve, are connected to the corresponding manifold outlets using fittings. One is connected to the supply outlet, the other to the return outlet. Thus, all floor circuits must be connected.
Pressure testing involves checking the quality of the installed pipeline. This is essential, as any problems that arise after the screed is poured will be difficult to correct.
Pressure testing involves filling the system with water under high pressure. The test pressure should be twice the operating pressure. During the first 30 minutes, the pressure may be reduced by no more than 10%, and over the next two hours, by 15% of the initial pressure, while maintaining the water temperature. The test period is 24 hours or more.
Step Seven - Reinforcement
When installing a water-heated floor heating system in a private home, it's important to remember that the structure must not be mobile. Therefore, it's necessary to reinforce the floor by laying a reinforcing mesh. The mesh size is equal to the installation pitch of the contour. A product with a rod diameter of 3 mm is suitable.
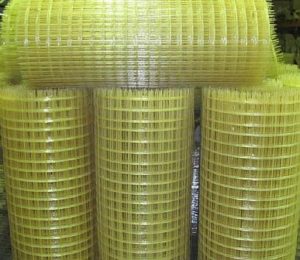
The mesh should be laid over the heating elements, overlapping them by one mesh cell. The elements should be connected using plastic ties or wire. Additionally, the mesh should be secured to the pipe with ties in several places.
For your information! It is better to use a metal product, the reinforcement is rough and can damage the surface of the circuit.
A good option would be plastic mesh; it is inexpensive, soft, so it will not damage the underfloor heating pipes, and is available in rolls, which simplifies the installation process.
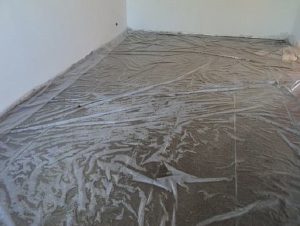
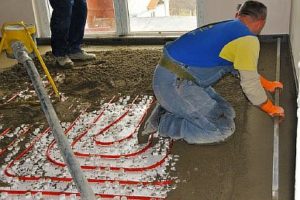
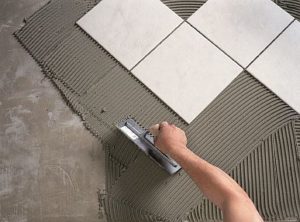
Step eight: pouring the screed
Pouring a concrete screed over a heated water floor requires a system pressure of 5 bar. Any ready-mixed concrete with good thermal conductivity is suitable for this purpose.
When making your own mortar, you can use cement grade M300 or higher. Since the screed will be subject to high mechanical and thermal stress, it's essential to add plasticizers and fiber to the mixture; these enhance its mobility and strengthen the future surface.
The mobility of the mortar is crucial when pouring underfloor heating, as it must adhere well to the pipes on all sides. The cement-to-sand ratio for screed pouring is 1 to 3. The water content per kg of cement is 0.45.
The screed solution must be of high quality, so when making it yourself, you need to use specialized equipment: a concrete mixer or a construction mixer. Mixing time in a mixer is 5-7 minutes, while in a concrete mixer, it's 3-4 minutes.
If you plan to apply the mortar yourself, it's recommended to use leveling strips to ensure a level floor. A metal profile is suitable for this; it's fairly rigid and has a smooth surface. The height of the leveling strips should be the same as the finished floor, minus the topcoat.
To secure the profile, you can make "spots" of concrete mortar into which the beacons are sunk. The beacons should be placed no more than 30 cm from the wall, and no more than 1.5 meters apart. Otherwise, the mortar will settle, causing holes to form.
The screed must be laid in one go, so if you're doing the work yourself, you'll need an assistant to ensure the process continues uninterrupted. The room where the screed will be installed should be free of drafts and direct sunlight.
Start pouring from the far corner of the room, in strips. Each section should be leveled immediately and any unevenness smoothed out using a straightedge. After 48 hours, clean the surface and trim off any excess damper tape. The next day, remove the markers, and fill and level any depressions.
Next, the screed is moistened and covered with a film. The floor should be sprayed periodically for 10 days. After that, the solution is left undisturbed until it sets completely. In total, it will take about 28 days from the time the screed is poured until it dries.
Important! Do not turn on the device until the solution has completely hardened.
The ninth stage is final finishing.
Homeowners install various flooring materials over hydronic underfloor heating. When choosing a material, it's important to familiarize yourself with the product's specifications and check the packaging for any markings indicating that it's suitable for use over heated floors. Most often, tiles or laminate are installed over hydronic systems. Tiles can be secured to the surface using a special adhesive.
When installing laminate flooring over heated floors, thermal insulation is not required. The key is to ensure the material is certified and compatible with heated floors, as it can release harmful substances when heated. Furthermore, when using laminate flooring, it is essential to provide adequate ventilation gaps in the floor. To achieve this, allow 10-15 mm of space from the walls, which will then be covered with baseboards.
Laminate flooring should be placed on a heated floor to equalize its temperature before being laid.
Commissioning and rules of use
Commissioning of water-heated floors In a private home, the process begins with balancing. This procedure involves regulating the flow rate of the coolant using balancing valves.
This indicator must be consistent across all circuits. If you don't have any experience with this work, it's best to entrust it to professionals.
If you decide to carry out the balancing yourself, the sequence is as follows:
- the collector is connected to both main lines: supply and return;
- in all circuits, the inlet and outlet valves, as well as the automatic air vent valve, are opened;
- the pump is turned on, the mixing unit is set to the maximum value, but the boiler is not connected (at first, a coolant at room temperature is used);
- the operating pressure is set to 1–3 bar;
- then all circuits are closed except for the longest one, on which the coolant flow rate is determined;
- one by one, all the contours are opened and this indicator is adjusted according to the longest loop.
Ultimately, the coolant flow rate should be the same in all circuits. After this, these adjustments should be made with heated water. Start at 25 degrees Celsius and increase by 5 degrees Celsius each day until you reach 45 degrees Celsius.
To ensure that your homemade underfloor heating system lasts a long time, you should follow a few rules:
- do not turn the system on to maximum immediately after a period of inactivity, but increase the degree gradually;
- the coolant when supplied to the circuit should not have a temperature higher than 45 degrees;
- It is not recommended to turn the device on and off frequently;
- maintain optimal room humidity.
As you can see, installing underfloor heating in a private home, while labor-intensive, is straightforward, and almost anyone can install this heating system themselves, thereby ensuring a healthy and comfortable indoor climate.


