Every year, heated floors are gaining popularity, especially in private homes.
Properly connecting heated floors to the heating system and following the operating instructions allows for the beneficial combination of these two heating sources. Find out more How to connect underfloor heating to a central heating system in an apartment.
- Standards and restrictions
- How to connect to central heating
- Connection from a radiator
- How to connect to the boiler
- Three-way valve diagram
- Two-way valve
- Connection diagram via a pump-mixing unit
- Schematic diagram with a thermostatic kit for one loop
- How to connect to a single-pipe system
- Scheme with a mixing unit
- Hydraulic separator
Standards and restrictions
The main feature of hydronic underfloor heating is that it doesn't handle high temperatures. According to regulations, the heating medium in this system shouldn't exceed 55 degrees Celsius. However, in practice, 35 to 45 degrees Celsius is considered the standard.
It's worth noting that the temperature of the liquid circulating through the pipes differs from the floor heating temperature. If the water temperature is 35–45°C, the surface will warm up to an average of 28°C.
According to regulations, the recommended floor temperature for private houses or apartments is:
- kitchen, bedroom, living room - 26 degrees;
- in rooms where people are not constantly present (bathroom, toilet, hallway) - 31.
A warm water floor is an independent main line, which can be single-circuit, double-circuit, or even multi-loop, Therefore, the design requires a separate circulation pump..
It can be built into the boiler or located separately. It not only moves the water but also regulates the temperature difference between the incoming and outgoing liquid. According to regulations, the permissible difference is 10 degrees.
Important! When choosing a pump, it's important to choose the right power. The maximum permitted coolant flow rate is 0.6 m/s.
Based on these standards and restrictions, you can assemble a heated floor yourself.
How to connect to central heating
Connecting water-heated floors to a centralized heating system in a private home is possible, but requires obtaining a special permit.
Permission to install hydronic floors in apartments is rarely granted, as there is a risk of lowering the temperature in neighboring radiators.
The equipment will operate effectively if two conditions are met:
- the water in the pipeline should not have a temperature higher than 55 degrees, overheating can damage the floor covering;
- The flow rate of the coolant in the loops must be calculated in such a way that it does not cause a decrease in the temperature in the radiators; otherwise, the installation of heated floors will not lead to a change in the level of heating of the room.
Connection from a radiator
Power the underfloor heating from a radiator that operates both from the central heating system and from an independent boiler (How to choose, power calculation, boiler connection diagrams) is the easiest way. The connection can be made directly Connecting the ends of the circuit to the battery supply and return pipes, we suggest you familiarize yourself with various connection diagrams.
Proper operation of the device, with this method of connecting underfloor heating, can be achieved:
- if the common boiler has the automatic ability to maintain the temperature in the system;
- if the size of the heated room is maximum 10 m2;
- in the presence of a powerful pump to ensure liquid circulation;
- if each radiator is equipped with a separate manifold.
This type of underfloor heating connection in a private home is not considered the best option because:
- Water moves along the easier path, that is, through the main line and radiators. However, through the underfloor heating loops, the fluid circulation rate will be much slower, leading to a drop in temperature.
- If you increase the temperature in the system, the floor surface will overheat.
An alternative solution in this situation is to install a thermostatic valve.
How to connect to the boiler
A cost-effective option for any home with its own boiler (gas, steam, oil, or solid fuel) is to connect hydronic underfloor heating directly to it. This is very convenient, as the underfloor heating will operate independently of the room's heating, even in summer if needed.
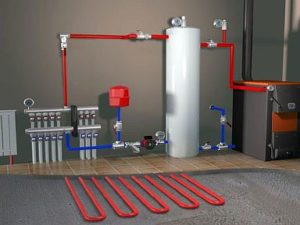
All necessary fittings are connected to the boiler. A circulation pump is connected; some modules come with it already built into the tank. From the tank, water flows to the manifold unit, where it is distributed along the floor contours. After passing through the loops, the liquid returns to the heat generator through the return pipe.
The advantage of this method is the ability to adjust the boiler to the heating level of the coolant required for underfloor heating.
The main features that need to be taken into account when installing such a structure:
- When using a gas appliance, it is recommended to connect a condensing boiler - this will achieve the highest efficiency of the system and extend the service life of the heat exchanger.
- When using a solid fuel boiler, a buffer tank will be required. Without one, it's difficult to regulate the heating level of such appliances.
If you have a stove in your home, you can use it instead of a boiler and connect the underfloor heating directly to it.
However, this requires installing a heat exchanger above the firebox, to which the floor pipes are connected. A pump for circulating the liquid and a mixing unit for diluting the water to the required temperature will also be required.
Three-way valve diagram
Connecting underfloor heating to a heating system in a private home is most often accomplished using a three-way valve. To construct such a system, you need:
- heating radiators with a coolant heating level of up to 70 - 80 degrees;
- underfloor heating circuits with water heated to 40 C.
The main challenge is cooling the water coming from the radiator to the desired temperature. This can be solved by using a three-way thermostatic piston. It is installed on the supply pipe, followed by a circulation pump. During this process, the hot water mixes with the cooled water coming from the underfloor heating return pipe until the desired temperature is reached.
However, this combined heating system has one drawback: the inability to regulate the flow of waste coolant. This will result in the circuit being periodically supplied with either excessively hot or cold water. This drawback affects the efficiency of the floor.
The differences can be partially compensated for with the help of concrete screed. But It is difficult to calculate the optimal thickness of the concrete layer.
It is impossible not to mention the advantages of this method:
- ease of installation;
- reasonable cost of equipment.
This option is feasible for small private homes. Furthermore, using a three-way valve allows for DIY assembly.
Two-way valve
An alternative to the three-way valve is the two-way valve, also known as a feed valve. It provides intermittent rather than continuous water addition. This means the valve's design allows for either the addition of hot coolant or its isolation from the system.
The specific design is simple and prevents the floor from overheating. The downside is that the heating area is limited, no more than 200 meters.
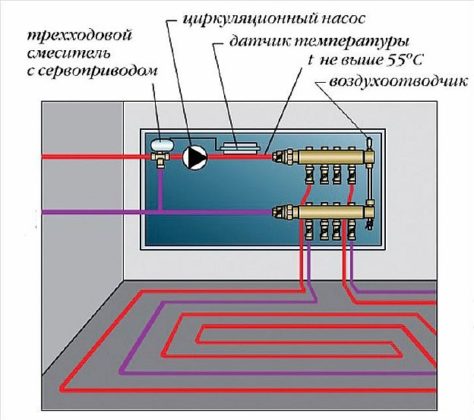
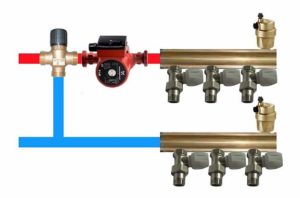
Connection diagram via a pump-mixing unit
This system is also a combination of radiators and underfloor heating. However, this method requires a more expensive device—a pump-mixing unit—rather than a three-way valve.
The method involves mixing cold water with the hot water coming from the boiler. This method allows for the dosage of waste water to be regulated using a balancing valve. This allows the coolant, which enters the heated hydrofloor through the manifold, to be heated to a predetermined level.
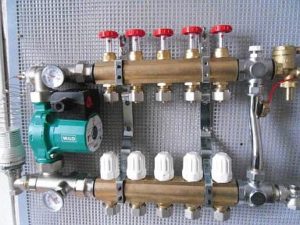
This design is considered effective and can easily create comfortable conditions in the home. A pump-mixing unit can be purchased ready-made or assembled yourself in various variations. Your needs and budget influence the manifold's configuration. The unit may consist of:
- thermostatic control valve;
- temperature sensor for coolant;
- balancing tap with a locking clamping screw;
- circulation pump;
- threaded sleeve for external temperature sensor, with a fitted socket;
- immersion thermometer;
- valves: for restarting the system, rotary drainage, ball;
- automatic air vent;
- restart bypass;
- taps for connecting the supply and return hoses.
Video: Working with a pump-mixing unit
If desired, you can install heated floors using this design yourself in a private home.
Schematic diagram with a thermostatic kit for one loop
To install underfloor heating with a controller in a home, you'll need a small heating installation kit designed to connect only one circuit. This method eliminates the need for a complex mixing unit. This system is designed to heat a room no larger than 20 square meters.
Thermal mounting kit is a small plastic box consisting of:
- temperature limiter for the coolant;
- limiter for regulating the air temperature in the heated room;
- air vents.
In this design, water enters the underfloor heating circuits directly, rather than through a manifold. The liquid is supplied to the circuit at a temperature of 80 degrees Celsius, and cooling occurs within the circuit.
The process is as follows: high-temperature coolant is introduced in portions, after which the thermostatic head shuts off the flow. The water cools in the loops, and the next portion is introduced.
When using a low-temperature coolant, such a kit is not required.
Since there is only one coil, there is no need to install a special pump to move water through it; the one already in the boiler will handle this task.
Basically, such kits are recommended for connection as underfloor heating in a private home:
- If you plan to heat small rooms (toilet, bathroom, balcony), this allows you to save on the purchase of a manifold unit;
- in the presence of rooms with a large area of heated floors on the first floor, and the installation of such a structure in small rooms on the second floor;
- if you want to make another turn, but there are no more outputs at the distribution node.
In any case, installation is simple: the kit is connected to a nearby radiator, riser, or manifold. The result is a finished branch.
The disadvantage of this device is its low comfort level. If the boiler is properly heated, the water-heated floor will have an increased heating level. Another drawback is that the system can only operate effectively with a two-pipe system. Connecting it to a single-pipe system is difficult; a bypass and balancing valve will be required.
How to connect to a single-pipe system
If there's only one pipe, the system is called a single-pipe or "Leningradka" system. This was previously how all houses were connected to the heating system. This system is reliable and trouble-free. The main drawback is a decrease in temperature as the water moves.
This means the radiator is hotter at the beginning than at the end. And if you connect underfloor heating to this system, the temperature will drop even further, and the hydraulic resistance will increase, requiring the installation of an additional circulation pump.
To balance such a device, a number of conditions must be met:
- In order not to reduce the temperature in the radiators, the installation of a warm hydrofloor should be done after all the batteries;
- use DN pipes;
- This scheme should be used if there are no more than 5 radiators;
- provide the structure with a three-way mixing valve to maintain the floor temperature at the required level;
- equip the device with an additional pump for forced circulation of water;
- The distance between the inlet and outlet taps must be at least 30 cm.
Connecting to a single-pipe system is not often used when installing underfloor heating, as this method is not considered reliable. Furthermore, accidents are possible, so it's better to connect the hot water circuit to the boiler; this is more expensive but more reliable.
Scheme with a mixing unit
When installing underfloor heating in a large room, connecting it to an existing radiator heating system is not an option. This raises the question of how to connect underfloor heating to the heating system in a private home—a separate main line and a distribution manifold will be required.
Connection according to this scheme is possible in several ways:
- For circuits up to 50 meters long, the manifold is equipped with thermostatic heads that sense the return temperature of each circuit separately. The main pump circulates the coolant.
- Installation of a mixing unit with a manifold, plus a two-way or three-way valve. When using a two-way valve, it is responsible for mixing hot water and is installed on the supply pipe. Control is provided by a thermostatic valve with a remote sensor, installed in the manifold pipe or mounted externally. As the water temperature rises, the sensor exerts pressure on the valve stem, thereby closing it. Implementing this system requires the installation of an additional pump.
When installing a three-way valve, the operating principle is the same, but the device is more efficient and is designed for a large volume of coolant.
The disadvantage of this method is the high cost of the equipment and complex installation.
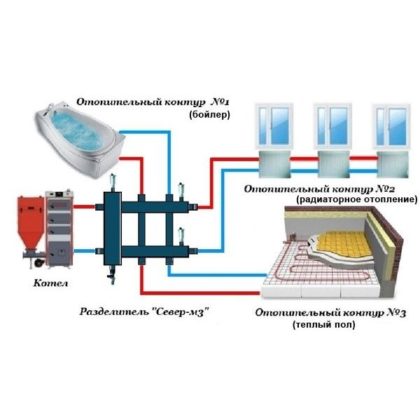
Hydraulic separator
The use of a hydraulic separator when installing a combined system allows for the separation of radiator heating from underfloor heating.
If the radiator heating system is equipped with a circulation pump, installing a second one in the mixing unit will disrupt the hydraulic system. To ensure they operate in parallel, a hydraulic separator or heat exchanger is installed.
By considering the specifics of each system and following the expert advice we've outlined in this article, you can install a heated water floor in your home yourself.


