Ventilation on the balcony should be hermetically sealed glazing To remove moisture vapor and exhaust air, a smoking area should also be provided if necessary.
To ensure air exchange on the loggia, separated from the living area by a partition, two vents are installed. On the balcony adjacent to the apartment, an exhaust hood or an intake duct from a ventilation unit installed in the adjacent room is permitted.
We'll discuss ventilation types, layouts, and installation methods in more detail in this article. We'll also explore the ventilation system calculation algorithm and answer common questions.
- Problems with poor balcony ventilation
- Types of balcony ventilation
- Supply system
- Exhaust system
- Supply and exhaust network
- Natural ventilation scheme
- Mechanical ventilating circuit
- Mixed ventilation scheme
- Selecting and calculating ventilation according to balcony parameters
- Instructions for installing ventilation
- Natural influx
- Installation of window ventilators
- Installation of a wall valve
- Natural ventilation
- Mechanical extraction
- Supply and exhaust mechanical ventilation
- Channel diagram
- General building ventilation system with a recuperator
- Maintenance and care of the ventilation system
- Causes of condensation and how to eliminate it
- Recommendations for choosing a ventilation system
- Answers to current questions
- Video about balcony ventilation
Problems with poor balcony ventilation
In old apartment buildings, ventilation of balconies and loggias was never a pressing issue. Ventilation was provided through numerous cracks in the weathered wooden windows and primitive siding made of tin or other sheet materials.
Many balconies and loggias remained open after the building was commissioned, freely exposed to the wind.
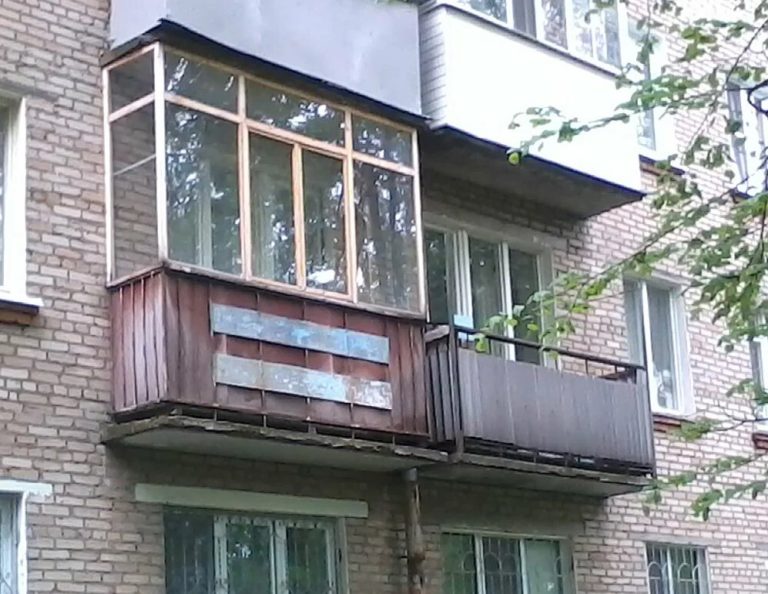
With the advent of glazing technology using plastic and aluminum systems equipped with energy-saving double-glazed windows, apartment owners have begun to desire to expand their usable square footage by using balcony space.
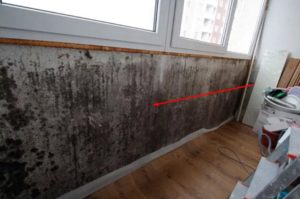
The new sealed siding is completely free of gaps. This blocked the flow of fresh air from outside and the removal of moisture vapor from the room. Condensation became a problem.
Vapors settling on the glass drip down onto the windowsill and walls as water droplets. High humidity creates favorable conditions for mold growth. Mold leaves black spots that destroy the finish. The pores, spreading throughout the apartment, cause respiratory illnesses in people and pets.
The second problem with the sealed space is the unpleasant odor. The balcony and loggia are often used for food storage. Smokers leave the main space to avoid smudging the apartment.
However, in a confined, sealed space, the smell of spoiling food and tobacco smoke have nowhere to escape. The only clear entry is when the balcony door opens.
The problem of removing condensate and unpleasant odors is solved arrangement of supply and exhaust ventilationYou should think about installing the system when glazing your balcony or loggia.
Types of balcony ventilation
Air exchange is possible when there is an inflow and outflow of air. A complete ventilation system is considered to be a supply and exhaust system. Since the utility network consists of channels where air flows in different directions under the influence of specific forces, each system has its own name.
Depending on the direction of air movement, ventilation can be either supply or exhaust. Based on the forces that create the airflow, utility systems are divided into natural, mechanical, and mixed systems.
Supply system
Fresh air intake vents bring in fresh air from outside. A single vent is sufficient for a balcony. The outdoor intake vent is covered with a grille to prevent birds, rodents, and large debris from entering the room.
Ventilation efficiency is increased when the vent is equipped with a fine filter and a valve. Air passing through the filter element is cleaned of dust, allergens, and other contaminants. A valve shutter prevents the draft from reversing.
A single supply network is suitable for an apartment with a combined balcony or loggia. The absence of a balcony partition allows for the exhaust of waste air to be directed to an exhaust hood in the adjacent room.
Advantages of the supply network:
Disadvantages include the impossibility of proper air exchange without an exhaust system. To ensure air flow from a combined balcony or loggia through the adjacent room, transfer holes must be installed in the interior partitions and doors.
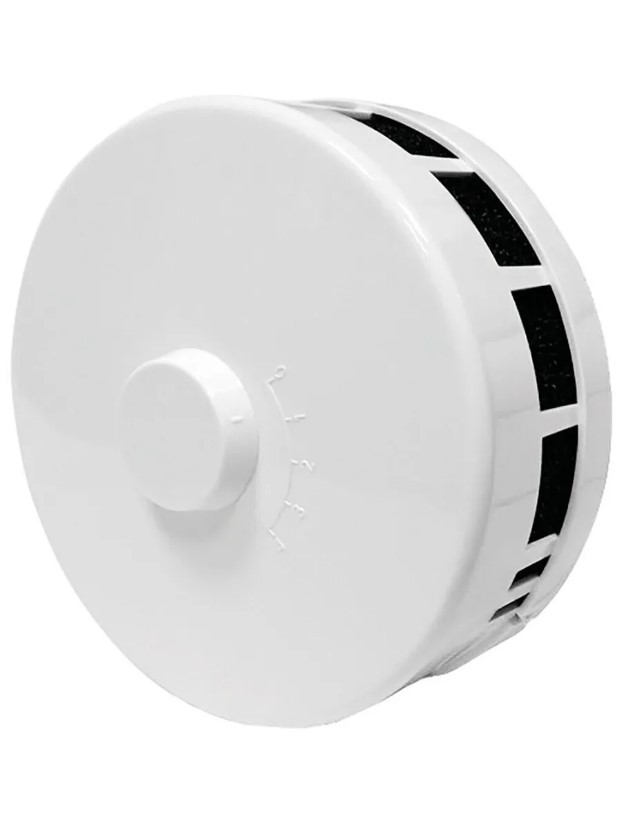
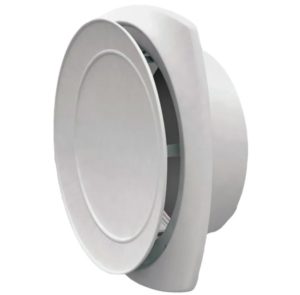
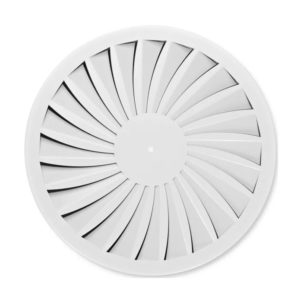
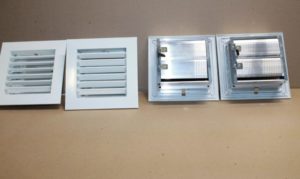
To install the inlet, you'll need a wall or window valve. An anemostat is suitable for fitting the through-hole. A budget-friendly option is to install a diffuser or decorative grille with a built-in valve.
Exhaust system
The exhaust hood removes stale air and moisture vapor. The vent is located at the top of the room on a wall or ceiling and is discharged through a duct to the outside or into a common building shaft.
Exhaust ventilation operates when there is an inflow. If the loggia is separated from the apartment by a partition, the exhaust is installed in the balcony space where the inflow vent is located.
When a balcony is connected to a living space, the exhaust duct from an adjacent room can be used for exhaust. If the loggia is designated for smoking, a range hood with a fan is installed above it.
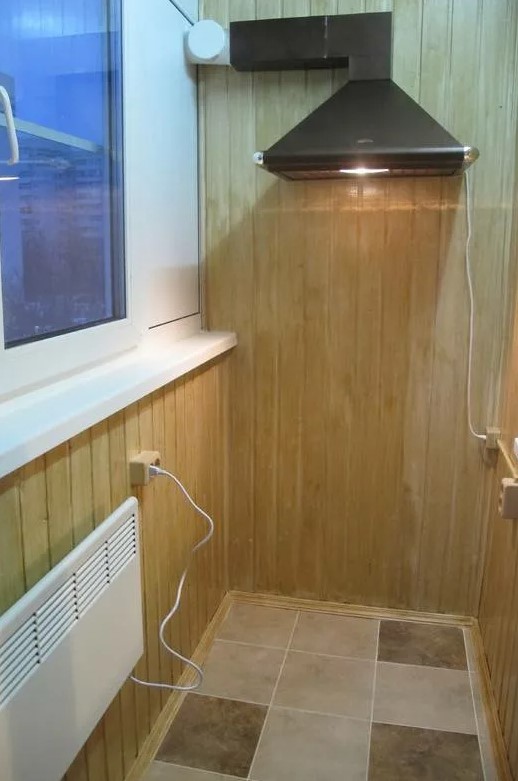
An inexpensive option is to install a kitchen exhaust hood with a duct leading outside.
Advantages of the exhaust network:
- Removal of dirty air saturated with moisture vapor from a closed loggia.
- Creating conditions for the supply of fresh air through the inflow.
The disadvantages include the complexity of installing an exhaust system compared to a supply system. For the exhaust system to work on the balcony, you'll need to install ductwork or a fan.
Budget option – install under the ceiling of the loggia anemostatA diffuser or ventilation grille with a valve is recommended, but the quality of air removal will depend on the wind direction and strength. In calm weather, a budget hood will not work.
Supply and exhaust network
The design combines supply and exhaust ventilation. Air intake and exhaust vents are located on the balcony, separated from the apartment by a partition.
When a loggia is combined with a living space, it is permissible to use an air inlet or an exhaust vent in the adjacent room. One reciprocal vent is required on the balcony.
First example - air inflow to the loggia, hood in the kitchen. Second example - exhaust duct on the balcony, air inlet in the bedroom or living room.
Advantages of the supply and exhaust network:
- Ensuring adequate air exchange in accordance with sanitary standards.
- By regulating the volumes of incoming and outgoing air, it becomes possible to create a favorable microclimate in the room and reduce heat loss.
Disadvantages include the complexity of calculations and installation when it comes to laying ducts and installing equipment. A popular device is a breezer or recuperator, operating for both supply and exhaust.
Additionally, air entering the balcony is filtered and heated. Installation and maintenance costs increase, but balcony ventilation does not cause heat loss in winter.
In a budget-friendly solution, the question of how to close off the ventilation can be solved by installing grilles, diffusers, anemostats, window and wall valves on the vents. Devices are selected based on their operating principle and the intended purpose of the vent—intake or exhaust.
Natural ventilation scheme
Natural ventilation is considered an economically and technically advantageous solution for ventilating a balcony space. Air exchange occurs through the circulation of air masses driven by temperature and pressure differences.
Cool air from outside enters the room through an inlet at the bottom. Warm exhaust air rises to the ceiling and is exhausted through the exhaust hood.
Advantages of natural ventilation:
- No power consumption.
- Easy and inexpensive installation.
- Silent operation.
One disadvantage is its dependence on weather conditions. When it's completely calm outside or in the summer heat, and the room is cool, air exchange stops.
Sometimes the opposite effect occurs—draft reversal. If you plan to set up a smoking area on your loggia, natural ventilation won't be able to vent smoke outside.
A natural system requires no fans or other electrically dependent equipment. The ductless system consists of vents covered with grilles and a check valve.
Air intake is often arranged through a slightly open window vent or by setting the sash to ventilation mode. The ducted design includes the installation of air ducts. The pipes are concealed under the finishing, and the ventilation openings are exposed.
Mechanical ventilating circuit
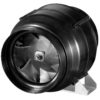
In a mechanical system, forced ventilation is achieved by moving air flows through fans. The equipment is installed for both air intake and exhaust.
The design is usually ducted with air ducts. A ductless design with a fan installed in the supply and exhaust openings is also possible.
Advantages of mechanical ventilation:
- Independence of air exchange from weather conditions.
- Possibility of maintaining the recommended sanitary standards of air and humidity in the room.
- The ability to create a favorable microclimate on the balcony using devices with air filtration, humidification, heating, or cooling functions.
Disadvantages include the complexity of installing and maintaining the utility network. The equipment is expensive, consumes electricity, and creates noise.
Mechanical ventilation is rarely used for ventilation of a single balcony. This option is useful when the loggia is converted into a dining room for smoking guests, where natural ventilation is not sufficient to ensure adequate air exchange.
The main components in the mechanical design are fans and check valves. In a more complex design, a ducted heat recovery unit is used. A simpler option is to install a breezer operating both inlet and outlet.
Mixed ventilation scheme
In a mixed design, one of the ducts is equipped with a fan. Typically, the exhaust is mechanical, while the air intake is natural. This option is suitable for creating a single smoking area on a balcony.
Advantages of mixed ventilation:
- Good price/quality ratio for ventilation.
- Easy to install and maintain.
- Low power consumption.
The design has no serious drawbacks that require widespread publicity. Inexpensive ventilation is sufficient for air exchange in a small balcony space.
A window or wall fan serves as the exhaust system. A kitchen exhaust hood is often installed over the smoking area. If the hood is vented to the outside via a pipe, an axial fan is installed in the duct opening.
Selecting and calculating ventilation according to balcony parameters
The ventilation network is designed to suit the space's parameters. Structurally, a balcony is an extension extending beyond the façade. A loggia does not protrude beyond the building's load-bearing walls.
In both design options, we have a separate room. The location of the loggia and balcony relative to the main building is less important for ventilation than the area and volume.
The room size is the determining factor in the calculation. Norms and standards are specified in GOST 23704-79. Obtain the data from the apartment's technical documentation or, for accuracy, take your own measurements.
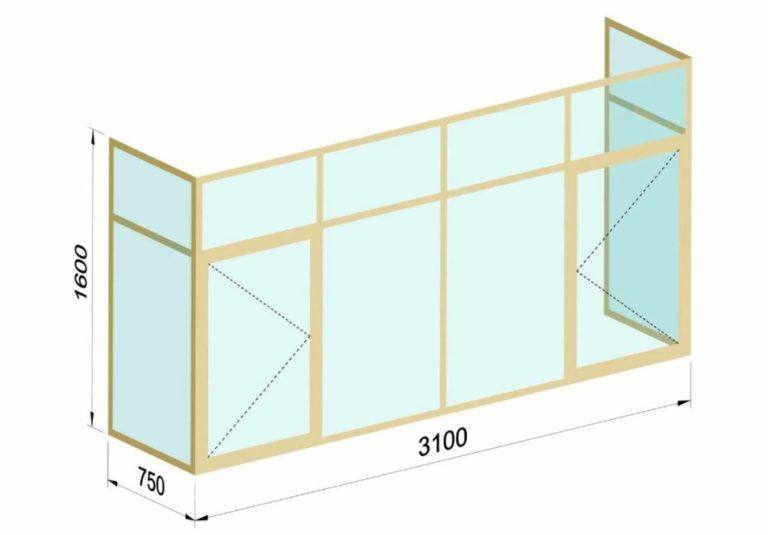
The average area of a standard rectangular balcony is 6 m2To obtain accurate data, multiply the width by the length. Parameters may vary for apartment buildings of different years of construction.
For example, a new loggia can be up to 6 meters long and 0.7 meters wide, while a Khrushchev-era balcony can measure 2.8-3.1 x 0.65-0.8 meters. A six-meter slab can be shared between two adjacent apartments.
To take measurements, you need to take the half of the room where you plan to arrange a room with sealed glazing and ventilation.
Modern homes often feature unusually shaped balconies, such as circles and trapezoids. To calculate the area, use the formula corresponding to the geometric shape.
To find the volume, multiply the area by the height. On a covered balcony, the average distance from floor to ceiling is 1.8 to 2 m. If the area is 6 m2, the average volume will be 10.8-12 m3Select the ventilation equipment capacity based on the calculated cubic capacity.
When converting a loggia into a children's playroom or a smoking area, increase the calculated figure by 50%. If the room's volume and the expected number of people is larger, use your own data in the calculations. Increase the air exchange rate by installing multiple vents or increasing the diameter of one exhaust and supply vent.
When calculating mechanical ventilation, consider the performance of the fans, breezer, or recuperator. Technical parameters are provided by the manufacturer in the accompanying documentation for the devices.
If you install equipment with a lower capacity, the air exchange will not meet the standard. A large reserve is also undesirable. Operating powerful equipment will create a draft on the balcony and increase energy consumption.
After calculating the ventilation performance, pay attention to two factors:
- Climatic conditions of the region where the house is built.
- The location of the loggia relative to neighboring high-rise buildings.
In cold regions, install heated air inlets to reduce heat loss from the living space. This feature is built into some breezer and recuperator models.
You can use a wall valve with a heater. If you install a standard grille with a damper, position the inlet above the radiator. This will warm the incoming air from outside in winter.
When the hood is running, the air supply is usually due to the vacuum created in the room, regardless of interference from the neighboring building.
Instructions for installing ventilation
Ventilating a loggia yourself is easy and can save you money. First, decide on a design and do the calculations.
Having a general idea of the parameters of the future utility network, consider how to provide ventilation on the balcony with the required performance and with less labor costs.
Natural influx
To install natural inflow units, you'll need a drill, a hammer drill, a set of drill bits, and a concrete or wood hole saw. The exact tool list depends on the type of work being performed. Additionally, you'll need a screwdriver, pliers, a tape measure, a marker, and a utility knife.
Installation of window ventilators
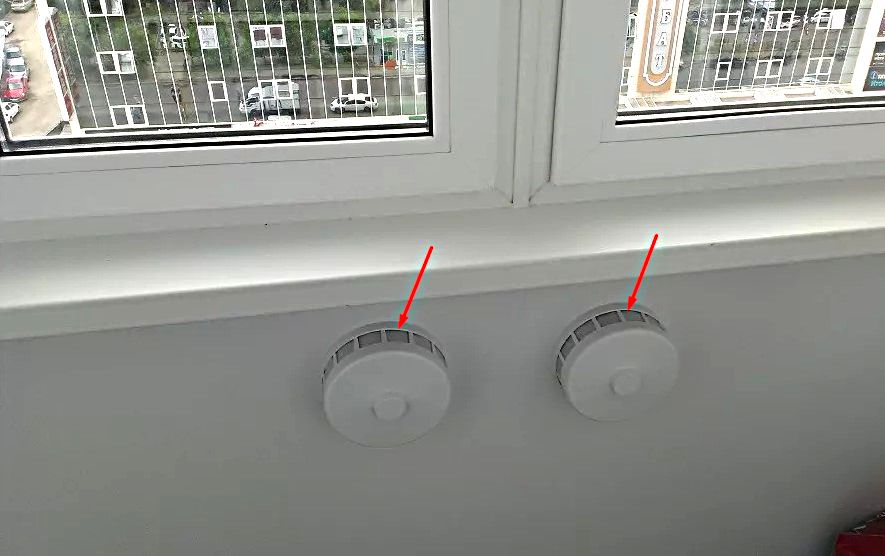
To ensure natural airflow, install window vents on your plastic windows. The installation method depends on the model you choose.
When glazing a loggia, it's easier to order window systems that are factory-equipped with a vent in the area of the opening sash handle. This element is made of a decorative cover with a grille. An air flow control damper is located inside.
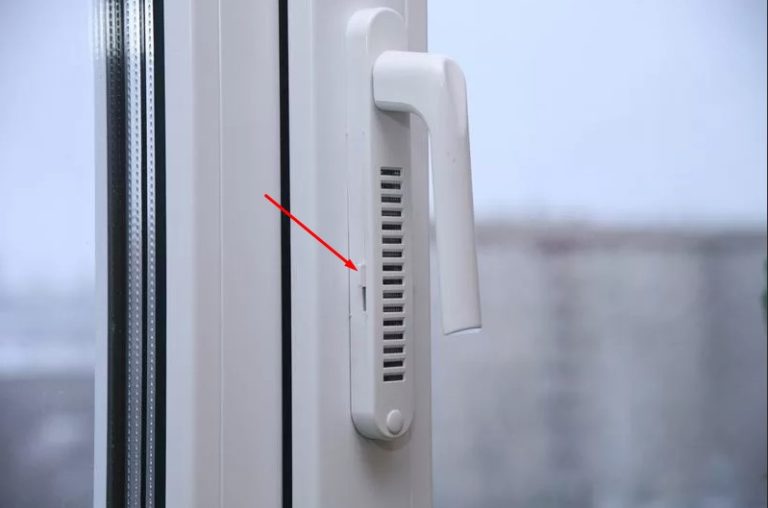
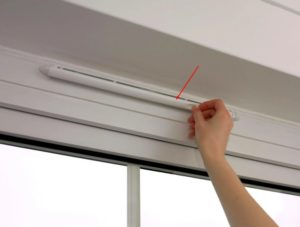
A more complex option is to install an overhead window ventilator on the window vent. This device consists of an internal strip with a damper and sealing strips that replace a section of the window's original rubber seal.
To install, follow these steps:
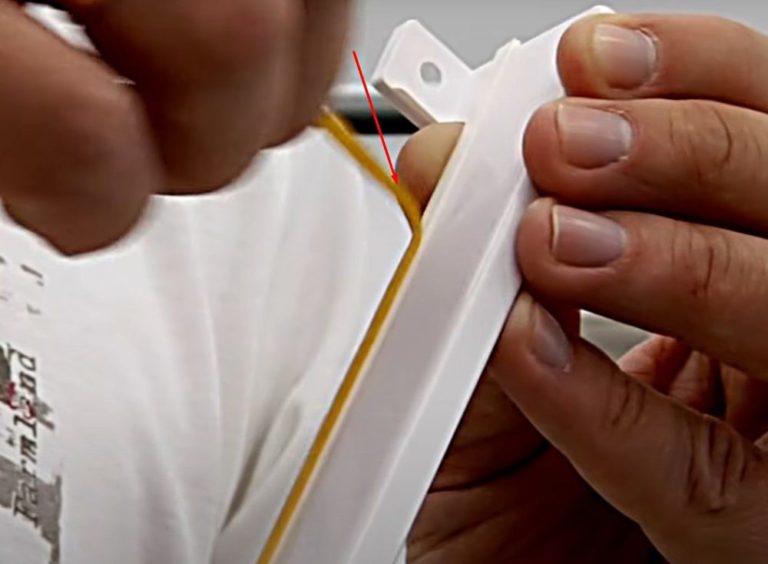
- Place the damper adjuster strip against the top edge of the sash. Center the element. Use a marker to mark the cut points of the original seal on the sash along the strip's length.
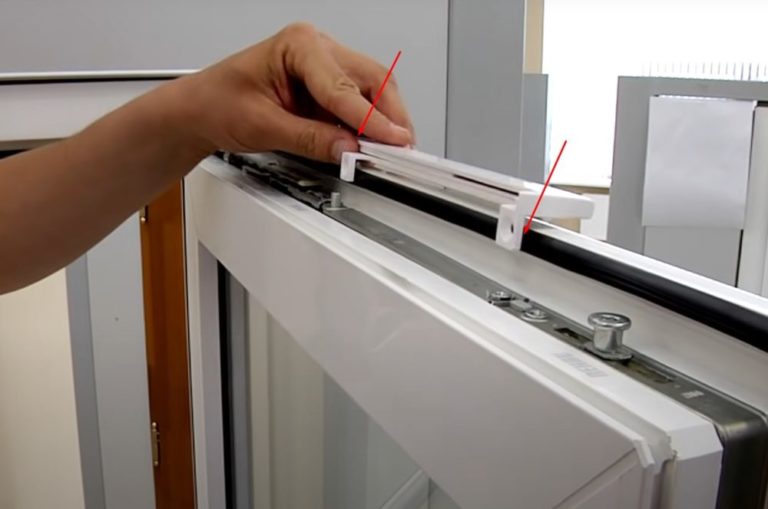
- Using a utility knife, cut the rubber seal and remove it from the mounting groove. The valve comes with mounting clips for secure fastening. Insert the elements into the freed groove in the sash where the screw fixing points are located.
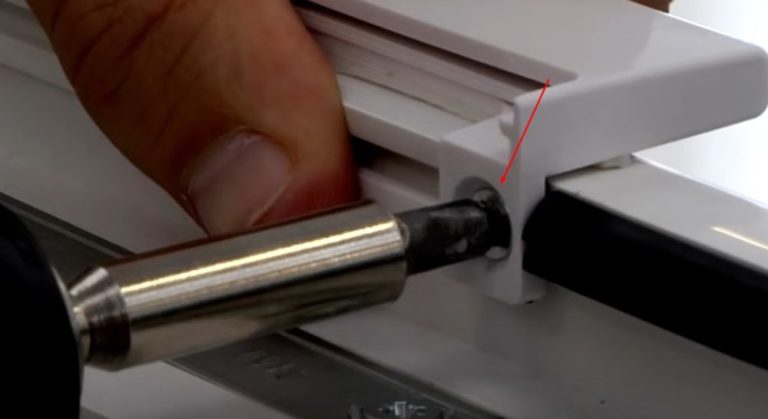
- The strip has a strip of double-sided foam tape. Remove the protective film. Place the strip on the sash with the removed seal and clips inserted. Press it against the frame by hand to adhere the tape. Screw the strip to the sash through the holes where the mounting clips are located.
- Take the included sealing cord. It's thinner than the original window seal, which is necessary to create a ventilation gap. Insert the cord into the groove in the frame.
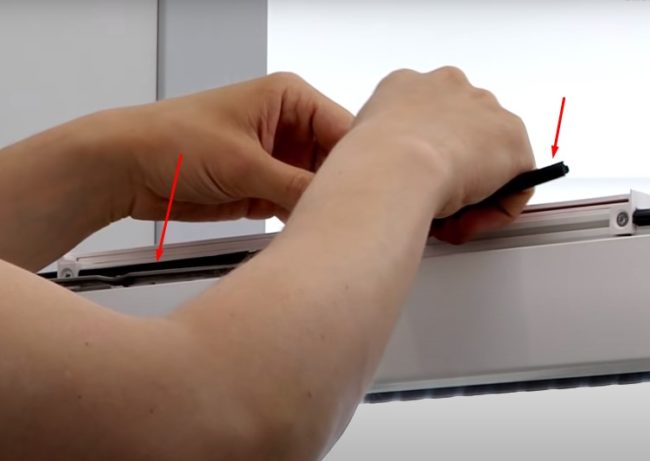
- Close the window sash. Mark the location on the main frame where the vent strip will meet, so you can insert a thin piece of cord to replace the original seal. Install the vent strip in the same manner.
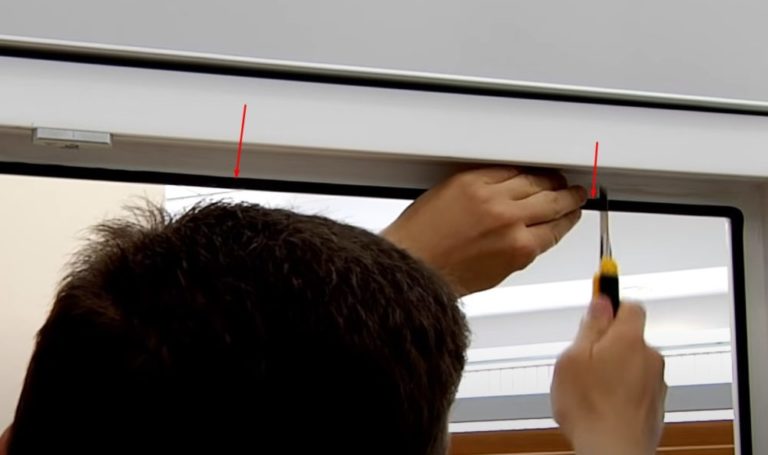
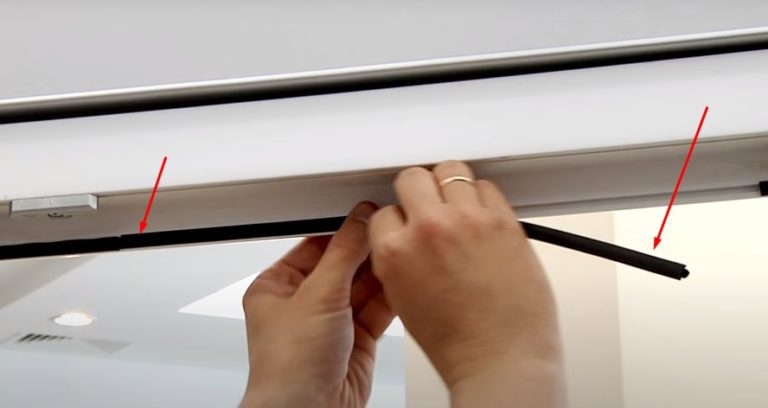
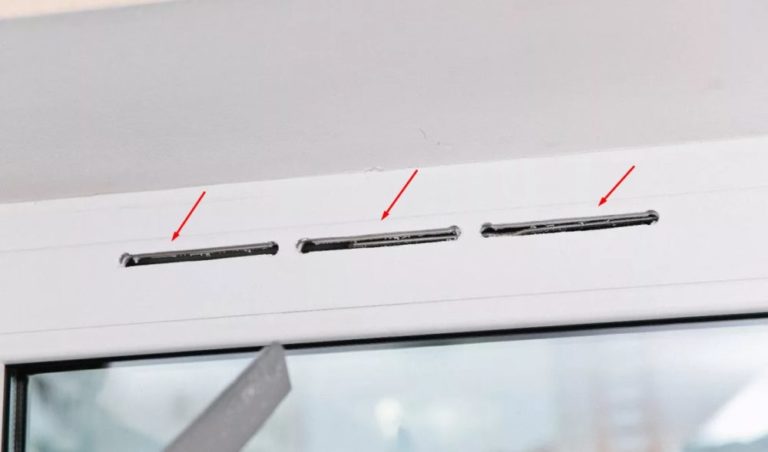
A gap has formed between the sections of the thin new seal. When the window is closed, air enters the ventilator bar housing. The air flows through the vents into the room. The damper lever controls the airflow intensity.
Surface-mounted ventilators come in various models. Some valves have two strike plates—internal and external. The installation principle is similar to the single-element model.
Installing a recessed ventilator in a window frame is an even more complex process. The valve consists of two strike plates and an adjustment flap. A recessed ventilator is designed for fixed windows without a transom. To install it, drill a hole through the frame where the strike plates are attached.
On the indoor side, attach the inner strip with the damper and regulator to the frame using screws in the area of the drilled holes. Attach the corresponding grille-shaped element with a canopy to the other side of the frame facing the outside.
Installation of a wall valve
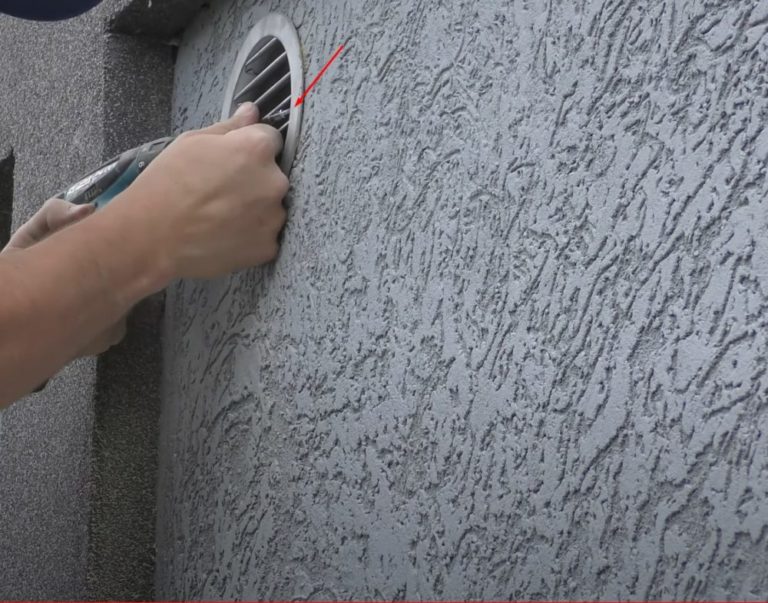
Installing an air inlet through a through-wall opening allows for larger airflow units to be installed. Several options are available: a grille with a valve, a diffuser, an anemostat, or a wall valve. Air inlet units vary slightly in design, but operate on the same principle.
The installation technique involves drilling a through hole to insert an insulated sleeve. One of the listed types of air handling units is then attached to the prepared socket.
Let's take a step-by-step look at how to install a supply ventilation valve to supply air to the balcony from the apartment side:
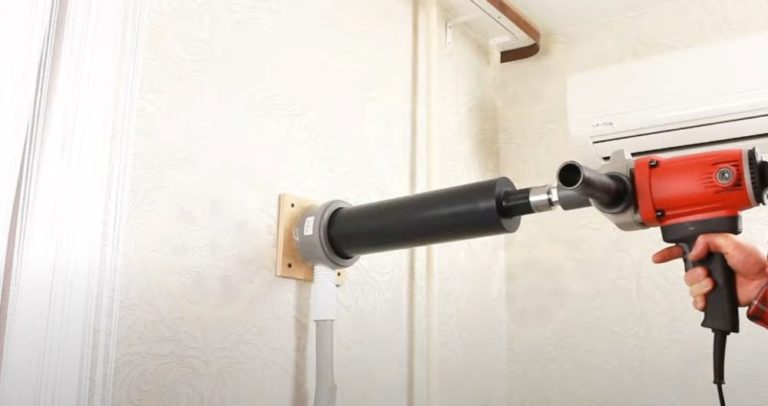
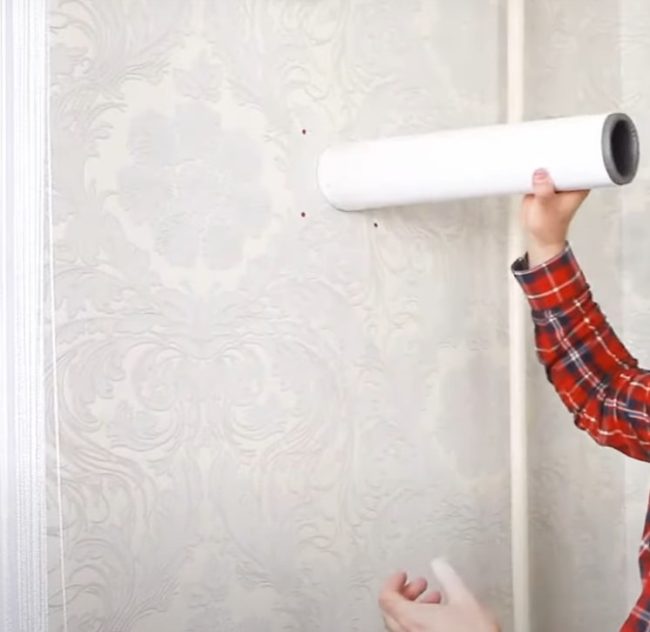
- In our example, we propose installing the valve on a balcony separated from the apartment by a partition. A cut-in hole will be made in the interior wall to allow air to flow from the adjacent room through the transfer vents. One of the most challenging aspects of installation is figuring out how to make a through hole for the sleeve. The first step is to attach a template with a vacuum cleaner outlet tube to the wall at the drilling point using screws.
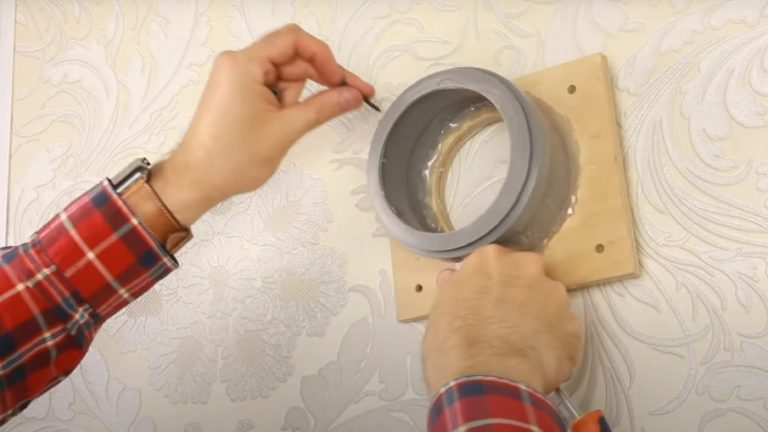
- Connect a vacuum hose to the nozzle to suck up the drilling waste. Insert the diamond core drill bit into the template hole and drill through the wall.
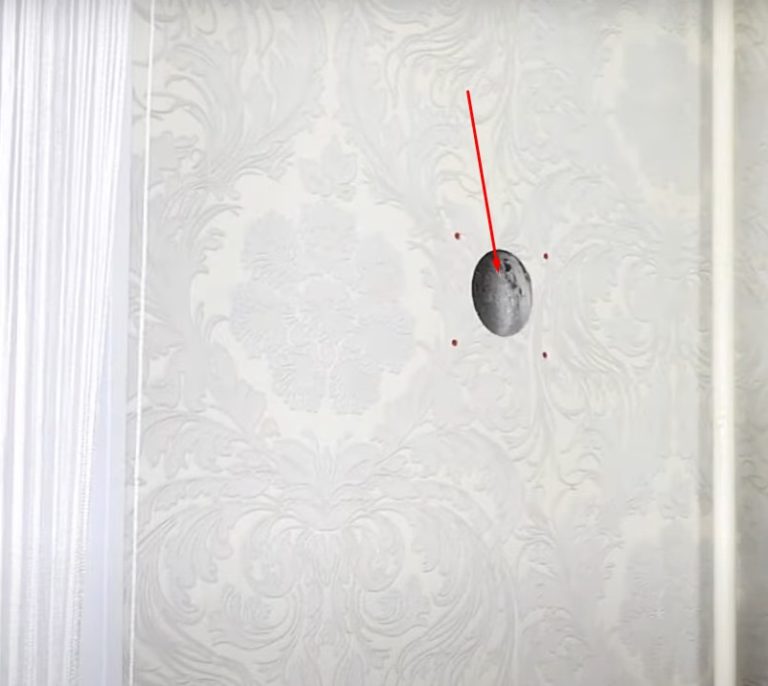
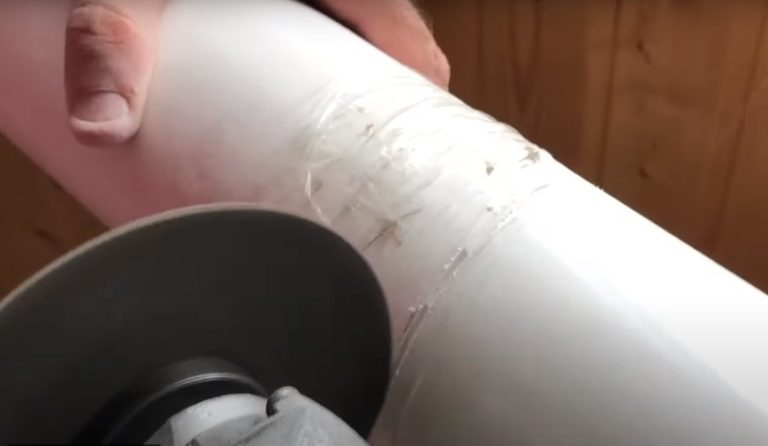
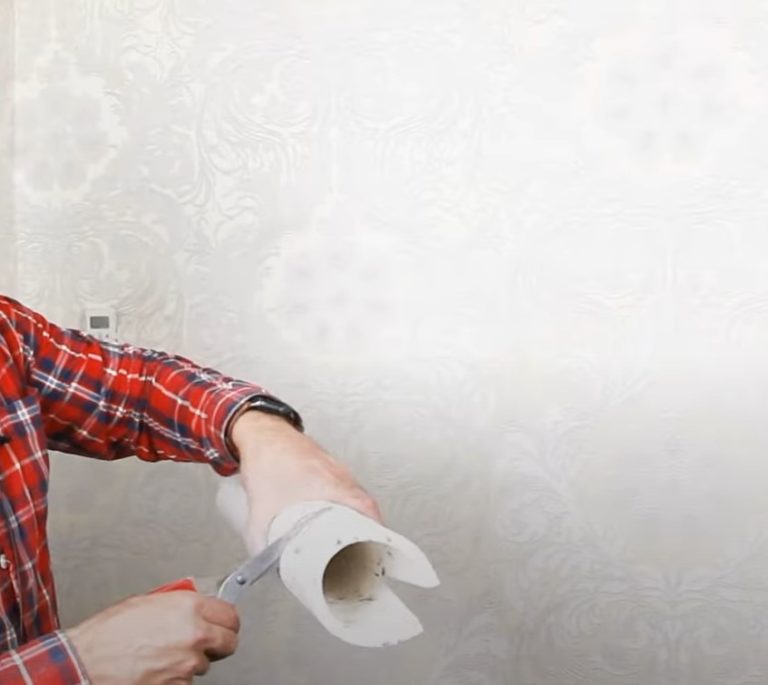
- Insert a plastic sleeve into the hole. Mark the length and cut the pipe with a grinder or hacksaw so that the edges are flush with the wall. Wrap the sleeve, once it's cut to size, with one layer of foam insulation.
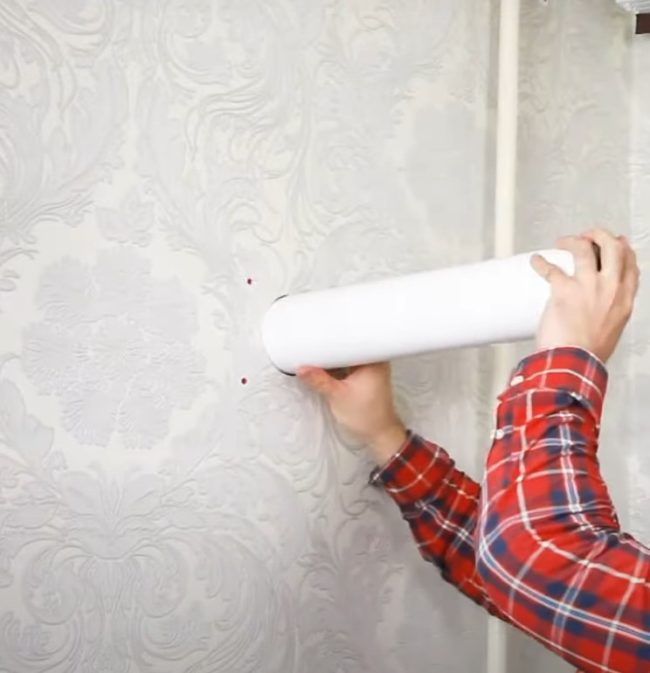
- Install the insulated sleeve into the hole in the wall. Seal any gaps with sealant.
- Secure the check valve flanges to both sides of the wall in the area of the opening using screws. Install the damper mechanism and decorative caps.
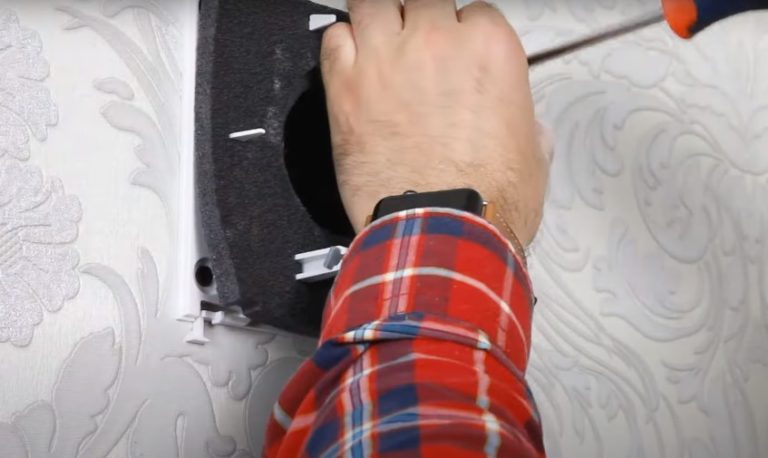
The wall valve mounting technology may vary slightly depending on the model, but the general principle is the same. It's important to install the valve in the correct direction.
The valve should open to allow air to flow to the balcony and close to prevent backflow into the apartment. Instead of a wall valve, you can insert an anemostat, diffuser, or grille with a damper and air flow control mechanism into one end of the sleeve.
When arranging an air vent from the apartment to the loggia, place the vent not at the bottom of the wall, but roughly in the middle. The air won't come directly from the street. The air passing through the apartment from the adjacent room will warm it.
Warm air rises according to the laws of physics. A vent installed on the interior wall will direct air from the living room to the balcony space.
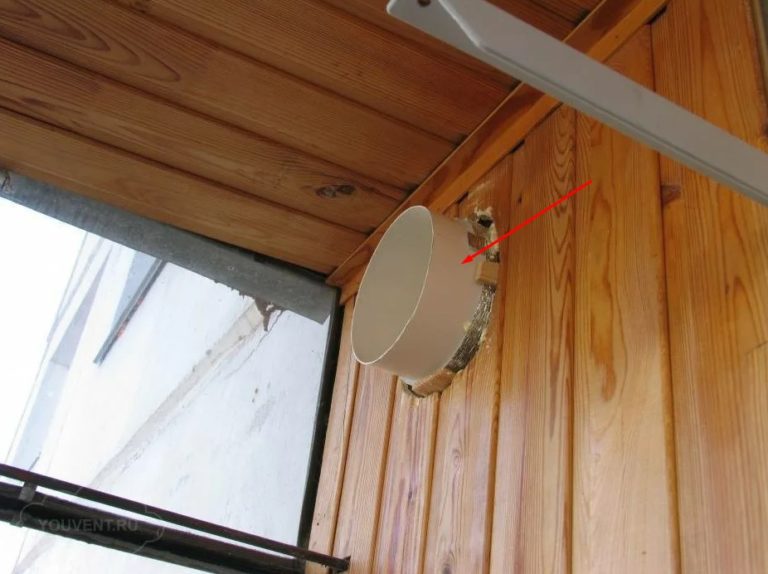
Natural ventilation
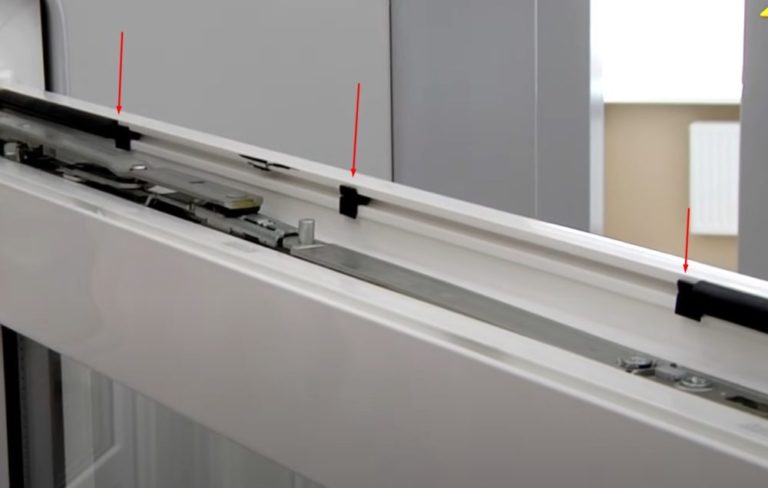
Ventilate the loggia through a through-hole to the outside. Locate the vent under the ceiling. It's easier to cut a hole in the glazing elements, where the space between the PVC profiles is covered with a blind plastic insert.
Install one of the same devices used for the supply air in the exhaust vent. However, the check valve should be facing the air outlet from the room.
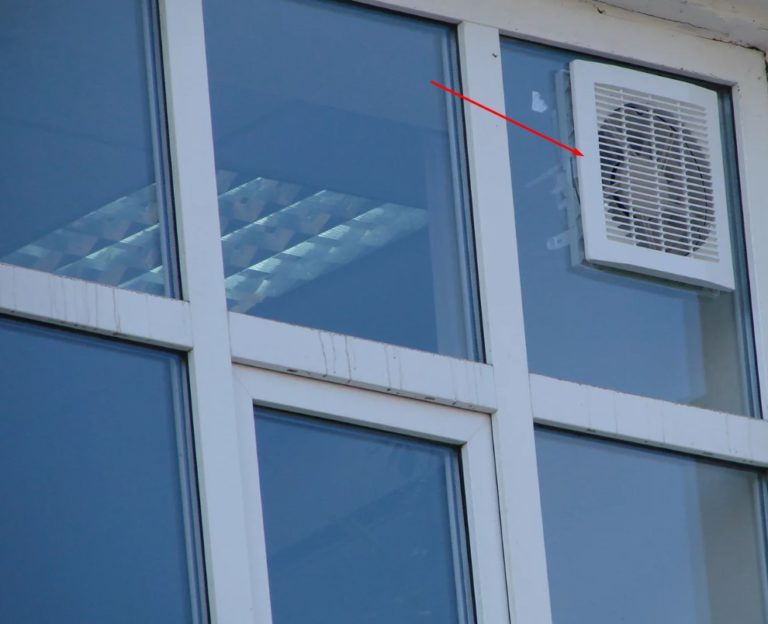
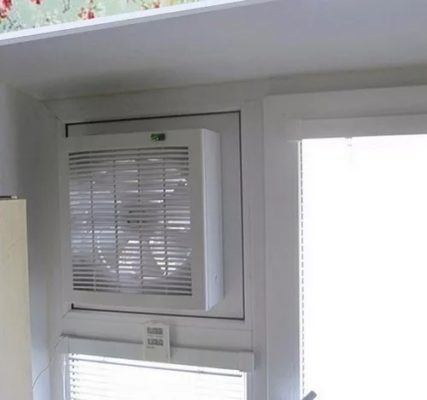
Mechanical extraction
A simple forced or mixed ventilation system can be implemented by installing a mechanical exhaust system. It differs from a natural system by the presence of a fan.
Install an exhaust fan in the vent cut into the ceiling or in place of the glazing. Add a check valve to the fan to prevent reversal of draft when the hood is not in use.
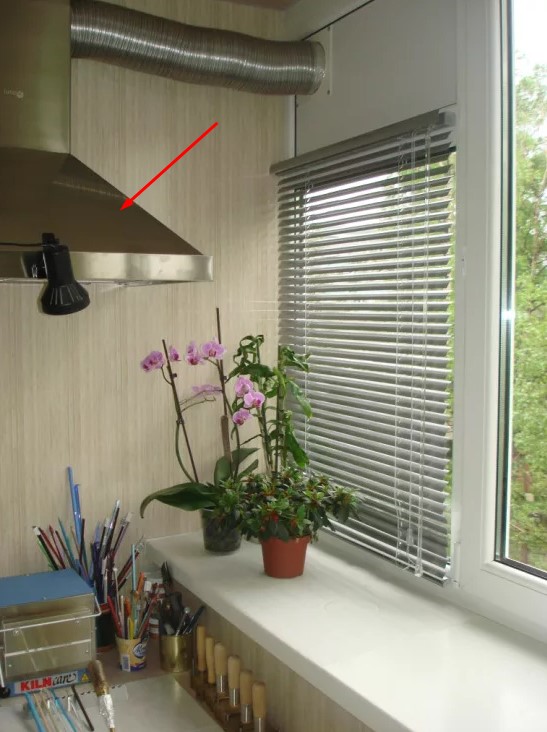
If the balcony has a designated smoking area or soldering work area, you can use a kitchen hood as a range hood. Install a dome-type unit with a ducted exhaust system that exhausts stale air outside.
Supply and exhaust mechanical ventilation
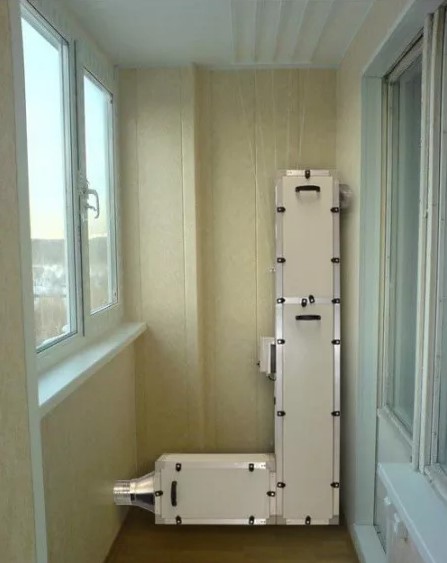
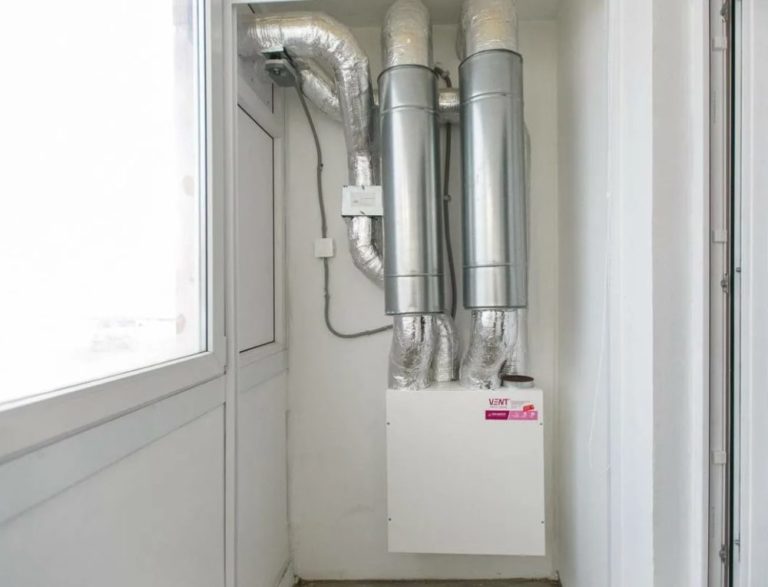
Breezers, compact wall-mounted recuperators, have been developed for providing supply and exhaust mechanical ventilation in a single room. These units operate for both supply and exhaust. Additional functions include filtration, heating, humidification, and ionization.
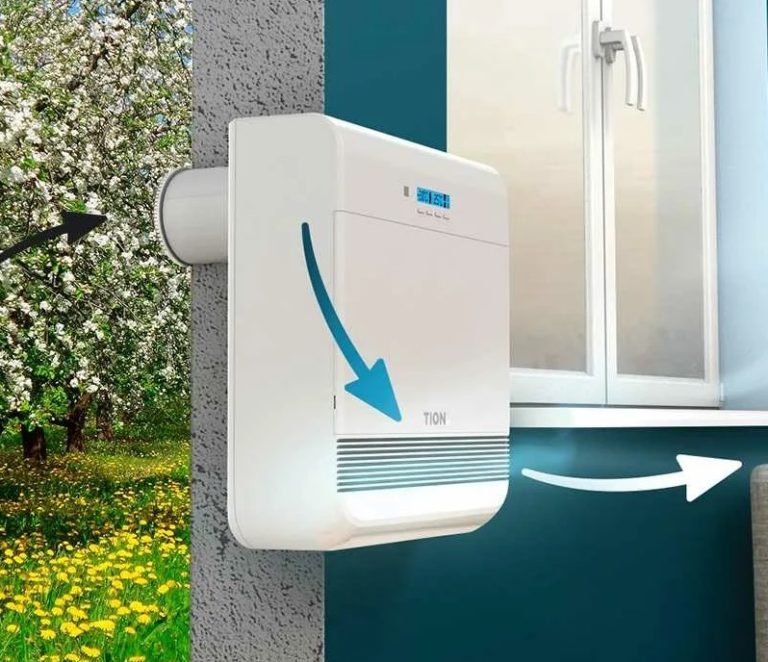
The installation procedure for the breezer and compact recuperator is similar to that of a wall valve. A sleeve is inserted into a drilled hole. The device body is secured from the inside. From the outside, the opening is covered with a grille. The device is connected to the power supply for operation.
A breezer or recuperator is an expensive device suitable for ventilating a living room. It's not a cost-effective option for ventilating a balcony.
Channel diagram
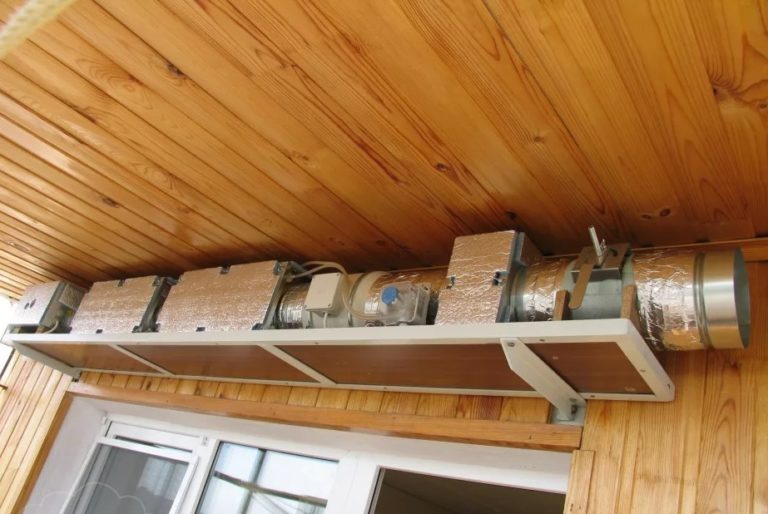
In a ducted mechanical system, supply and exhaust air are provided through air ducts. The ducts are equipped with axial fans. A ducted system is rarely implemented for a single loggia. The system is more often used as a supplement to the building's general ventilation system.
Two through-holes are drilled in the wall from the room side. Air ducts are connected to the exhaust and supply ducts of the building's ventilation system, leading out to the balcony area and then concealed under the finishing.
The inlet and outlet openings are arranged on the finishing cladding and covered with decorative grilles for beauty and protection.
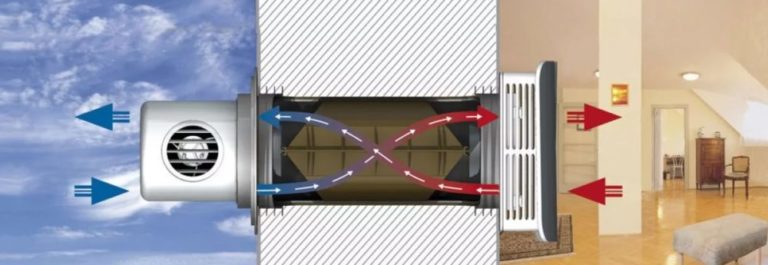
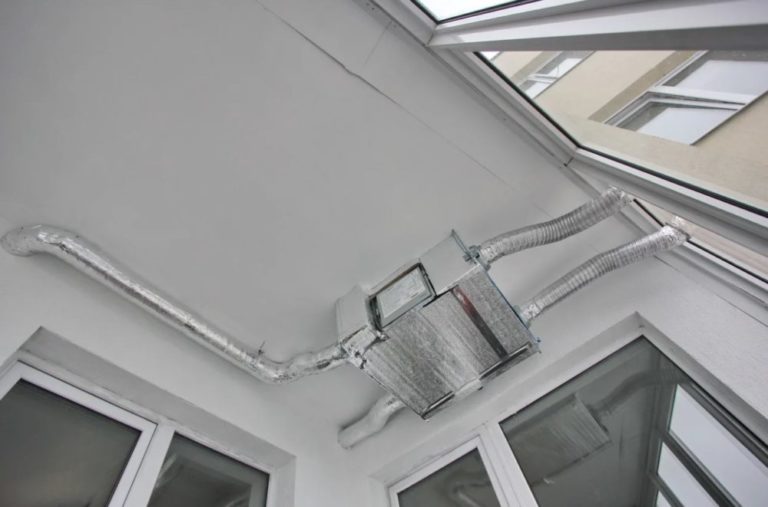
General building ventilation system with a recuperator
A building-wide ventilation system with a heat recovery unit is considered effective. One option for installing the unit is on the balcony, so that fan noise doesn't create discomfort in the apartment.
A space is allocated for the unit, electrical cables are laid, and a panel with circuit breakers is installed. A corrugated pipe is connected to the appropriate outlets of the recuperator to draw in outside air and discharge exhaust air.
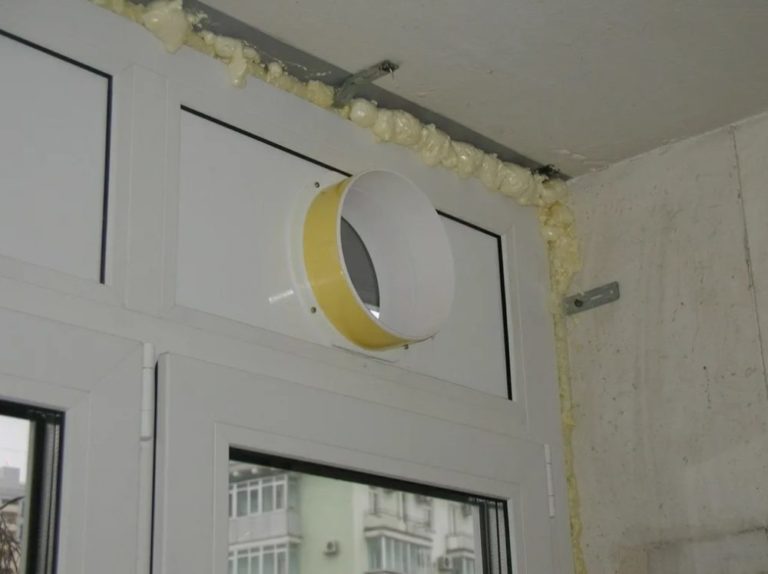
The ducts are routed through the through-holes in the balcony glazing. The street-facing vents are covered with grated caps.
A corrugated pipe is connected to the other two heat exchanger pipes for connection to the supply and exhaust ducts of the general building ventilation system. The air ducts are routed into the room through the through-holes in the balcony partition.
To ensure air exchange in the balcony space, tees are installed on the supply and exhaust ducts, equipped with vents with a check valve and a grille.
Maintenance and care of the ventilation system
To ensure reliable ventilation, clean the grilles and ducts of dirt at least once a year. Check the operation of fans, valves, and other equipment. If the damper does not operate properly when the draft is reversed, lubricate the rod with machine oil or replace the mechanism.
A fan's rattling noise indicates worn bearings. If lubrication doesn't help, replace the parts yourself or call a professional.
Filters installed in mechanical ventilation systems become dirty over time. Depending on the model, rinse the filter elements with running water or replace them.
Causes of condensation and how to eliminate it
When condensation forms on a ventilated balcony space, the problem stems from inadequate insulation. If the insulation is improperly selected and installed, the dew point shifts.
Poorly sealed cracks and joints in thermal insulation create thermal bridges. Condensation will continually form due to the temperature difference.
Ventilation won't eliminate moisture without a new balcony renovation that incorporates proper thermal insulation. As a temporary solution, ventilate the room more frequently by opening windows. Increase the heating during cooler months.
Recommendations for choosing a ventilation system
When choosing a ventilation system for your balcony, consider its simplicity and intended use. Natural air intake and exhaust through vents is sufficient for a loggia where you periodically step out the windows to admire the surroundings.
When creating a workshop, smoking area, or dining area, consider installing a mechanical exhaust system. If your apartment has ducted ventilation, it's easier and cheaper to install ductwork to the balcony.
To rationally distribute funds, time, and labor costs, develop a ventilation network diagram in advance, indicating the locations of work units.
Answers to current questions
Cover the exhaust ducts with decorative paneling or a suspended ceiling.
If the loggia simply has a vent in the wall to the outside, cover the opening on the indoor side with a grille with a check valve. Install a cover on the outside, also equipped with a grille.
The range hood shouldn't be vented from the house onto a closed balcony. Condensation and unpleasant odors will accumulate in the unventilated room. The range hood can be vented through a duct through the balcony to the outside.
The walls, floor, and ceiling must be insulated. Common materials used include polystyrene foam, basalt wool, and polyethylene foam. Glazing is done with plastic or aluminum systems with energy-efficient double-glazed windows.


