One of the most important questions that arises when building a private home is how to properly install a heating system yourself for comfortable living.
Today, hydronic underfloor heating systems are popular in country houses. Despite the labor-intensive installation process and the high cost, the system will pay for itself within five years.
Important! When building a house, it is recommended to plan the heating system in advance.
For proper installation DIY heated floors, you need to complete the following steps: lay the waterproofing, then the insulation, connect and fill the contours, install beacons, prepare the solution and pour the screed.
- Design
- Installation of underfloor heating
- Methods of laying the contour
- Selection and calculation of materials
- Pipes
- Insulation
- Manifold components
- Installation manual
- Subfloor
- Waterproofing
- Installation of damper tape
- Laying thermal insulation
- Marking and laying pipes
- Installation of reinforcing mesh
- System pressure testing
- Laying cement screed
- Commissioning
- Laying floor coverings
- Fuel options and cat types
- Connecting the boiler
- Connecting underfloor heating to the main heating system of a private home
- Direct connection from the radiator
- Single-pipe wiring and connection to it
- Video instructions
Design
Installing a water circuit in cottages with gas boilers is considered a particularly cost-effective and optimal solution. This design is less energy-intensive and easier to operate, making it the most efficient.
The system can only function flawlessly if it has a professionally designed project and is installed correctly.
So before we start installation of water heating in a frame house Or at a dacha, the first step is to prepare a plan. When creating a plan, consider the type of material that will be used to create the "pie" and the thickness of each layer.
Additionally, a pipe layout plan needs to be created. This can be done on a standard piece of graph paper, with each cell representing a step in the circuit layout.
The pitch depends on the climate of the region. In areas with moderate climates:
- with good thermal insulation in the house - a step of 20 cm;
- in the absence of high-quality insulation of walls made of brick, concrete or wood - 10 cm;
- In large rooms, if there are warm and cold walls, the step is different: for warm walls it is larger, for cold walls it is smaller.
Installation of underfloor heating
The "pie" of a warm water floor — a multilayer structure with a liquid coolant inside. The main element of a heated floor is a metal or polymer pipe through which water or antifreeze circulates. Each layer has its own purpose and plays a vital role in the efficient operation of the entire system. Therefore, a strict sequence must be followed during construction.
The "pie" of a water floor looks like this:
- base - made of wood or concrete slab;
- waterproofing - polyethylene film (0.1 mm);
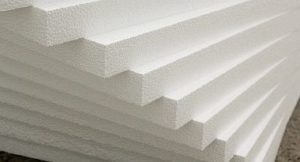
- thermal insulation - polystyrene foam boards or other insulation with a density of 40 kg/m³ and a thickness of 300 mm;
- water circuit - pipeline;
- reinforcing mesh - ensures the density of the screed, the permissible thickness of the rods is 3 - 5 mm;
- concrete screed - a solution of concrete and cement with plasticizers;
- Finishing coating - any material compatible with heated floors.
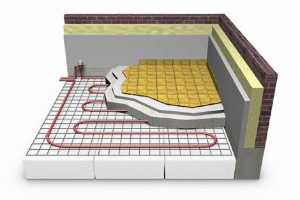
In total, the thickness of this structure in a private home can range from 7 to 15 cm. The underfloor heating circuit is connected to the manifold unit.
Water structures are:
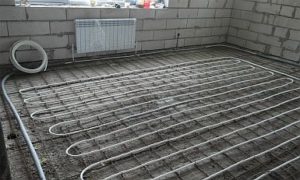
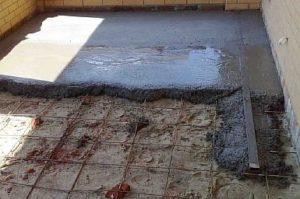
- Heavy (wet) screeding is one of the most common options. The sub-base plays a crucial role here, with waterproofing and thermal insulation, pipes, and reinforcing mesh laid on top, all then poured with concrete. This method is recommended for brick cottages with concrete floors that can support the weight of the screed.
Important! The concrete layer under the contour must be at least 3 cm thick.
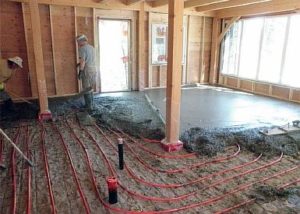
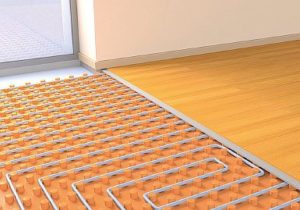
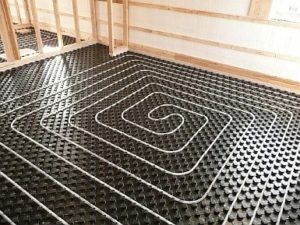
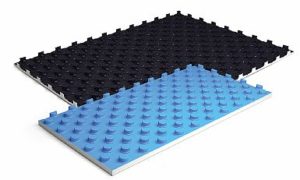
- Lightweight – the pipes are supported by polystyrene foam boards. These are laid on the subfloor, and the water circuit is mounted on them. Since the boards are equipped with bosses that secure the pipes, no additional support is required. Thermal insulation boards are laid on top, and the flooring is then laid on top.
For your information! This option is suitable for private houses with wooden floors that are not capable of supporting a heavy structure.
- On wooden slats—that is, the wood will serve as the base, to which the heating elements are mounted. This structure is covered with gypsum fiber and a finishing coating. However, this method is unreliable, so it is recommended for installation only in extreme cases.
Methods of laying the contour
There are three main ways to install a circuit in a private home yourself, but they all have one thing in common: the pipes are installed from the walls towards the center:
- The "snail" design lays the circuit in a spiral from the walls to the center and back. The design tapers toward the center of the room. When designing the layout, remember to leave space between the pipes to allow them to return to the power source. This design ensures uniform heating of the flooring while reducing hydraulic resistance. The amount of pipe material required for this type of installation is less than with other methods. The main drawback is complex installation.
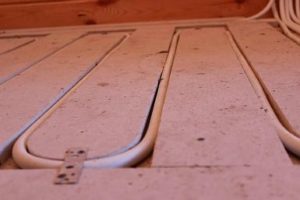
- The "snake" design involves placing pipes along the walls in loops. This is a lightweight option, but it doesn't provide uniform heating across the floors, as the temperatures at the inlet and outlet vary significantly.
- The combined method combines both systems. It's suitable for rooms with cold walls. The circuit is laid in a "snake" pattern along the walls and in a "spiral" pattern in the center. This method allows for savings on pipes and increases the unit's energy efficiency.
Selection and calculation of materials
After developing the design, it's necessary to calculate the required materials. You can use an online calculator to do this yourself. If you're unsure of how to accurately calculate the required materials for underfloor heating, you should consult a professional.
These calculations use standard parameters that are unaffected by the installation method and conditions, such as the room's area and characteristics, boiler and pump capacity, and pipe diameter. The heat transfer coefficient (HTC) must also be calculated, which is affected by the wall material, insulation level, and window size. If the HTC is 100 W/m², then this type of underfloor heating is intended for use in private homes solely as a supplemental heating source.
Pipes
The length of the pipes is calculated using a prepared drawing/diagram. A continuous water circuit is essential, so for large rooms, the pipeline should be divided into several sections, each no longer than 100 meters.
The standard formula for calculating pipeline size is the room area in square meters, divided by the installation pitch in meters, and then the length of the curls and the distance to the manifold.
For a water structure in a private house installed by yourself, It is recommended to use a rolled pipe product, with a diameter of 16 and 17 mm. Experts do not recommend using a 20 mm diameter circuit (although it is acceptable), as it increases the screed thickness. The thicker the screed, the less efficient the system. The optimal pipe wall thickness is 2 mm.
Average pipe consumption per 1 m2:
- 10 meters with a step of 10 cm;
- 6.75 m - at 15 cm.
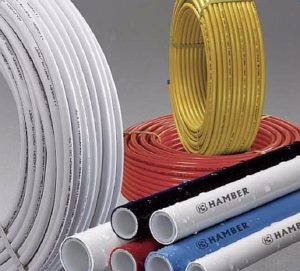
The main material from which pipes for water floors are made:
- Cross-linked polyethylene (PE-X) and PERT. The advantages of PE-Xa include shape memory due to the high cross-linking density. This means that a stretched and deformed circuit, when exposed to a hot coolant, returns to its original shape. It's worth noting that PE-Xa circuits with axial fittings can be safely filled with screed, while PERT, equipped with push-in fittings, must be open at the connection points. Therefore, it is recommended to install PERT in screed only as a single piece, and to install fittings only at the points where they are attached to the manifold.
- Metal-plastic pipes are often used in water-heated floor systems because they are inexpensive and easy to install (they bend easily).
- Copper is an expensive product and requires protection from the alkalis found in concrete. Therefore, it is rarely used when installing hydronic underfloor heating in a private home.
Professionals do not recommend installing aluminum-coated composite pipes in a home, as there is a risk that the metalized layer may peel off.
It is better to buy a product with a polyvinylethylene layer inside if more reliable insulation is required.
Insulation
The purpose of thermal insulation is to separate the heating elements from the base, allowing warm air to flow upward and not into the ground. Insulation is a must when installing underfloor heating. Without it, the floor will not function effectively, defeating the purpose of its installation.
The most common insulation materials include:
- Extruded polystyrene foam offers increased mechanical strength and low thermal conductivity. It's also moisture-resistant, making it suitable for kitchens, bathrooms, and swimming pools. EPSPS is easy to install, thanks to its special grooves on the sides. Sheet sizes are 600 x 1250 and 500 x 1000, and thicknesses range from 20 to 100 mm.
- Profiled mats with grooves for securing pipes are expensive, but they significantly simplify the installation of the circuit. The mats are only 1–3 mm thick.
Determining the insulation thickness for underfloor heating in a private home isn't difficult. It all starts with the installation conditions:
- on the ground - a 10 cm layer is required;
- above the basement - 5;
- if the room below is warm - 3 cm.
In addition, you need to purchase fasteners with which the slabs will be fixed to the floor (plate dowels).
Manifold components
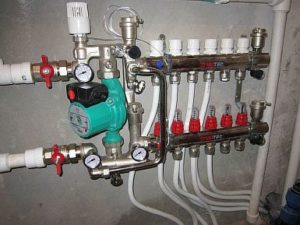
For the system to function, a collector-mixing unit will need to be installed. This unit directs the heated coolant into the underfloor heating circuits and regulates the temperature.
The manifold assemblies are not included in the kit, so you'll have to select the components yourself. If you're unsure about properly assembling the manifold cabinet yourself, it's best to seek professional help.
The collector unit includes:
- manifolds with valves;
- connecting fittings;
- automatic air vents;
- brackets for wall mounting;
- drain taps;
- metal cabinet;
- mixing unit and pump;
- thermometer.
Since underfloor heating systems are most often poured over a concrete screed and intended for long-term use, it's important to choose the material carefully. Avoid cheap and low-quality products; all materials—pipes, insulation, and components—must be high-quality and durable.
Installation manual
Installing a water-heated floor in a private home yourself is a step-by-step process.
Subfloor
It's best to begin installing a water-heated floor system during the building construction phase. If the house lacks a foundation and the structure is being installed on the ground, a sand "cushion" must first be poured. The sand must be well compacted and covered with a polyethylene film for waterproofing. After this, you can begin pouring the cement screed.
To install the subfloor, you can buy a ready-mixed mortar or mix it yourself. Since the subfloor requires a level base, it's best to pour the surface yourself using benchmarks.
To do this, mounds of mortar are made at regular intervals across the entire area of the room, and metal profile markers are installed in them. The screed is poured and leveled according to this level. Only slight differences are allowed; any overhangs of 1–2 cm should be sealed.
When installing a water-heated floor on the ground, heat loss will be higher, so the coolant circulating through the main line must have a higher temperature.
If the installation of a warm water floor is carried out on a finished base, it must be cleared of debris, and cracks and depressions must be sealed.
Waterproofing
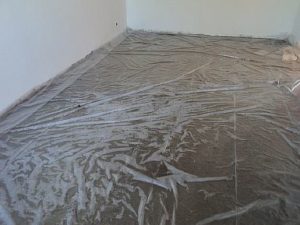
Before laying the waterproofing material, mark out strips on the walls to match the finished floor level. Remove any debris caused by this work before proceeding with the waterproofing.
Thick polyethylene film or glassine insulation is suitable for vapor and waterproofing. The waterproofing material should be laid overlapping each other and on the walls.
When using film, the joints between the strips are sealed with tape. If using glass insulation, the overlapping areas should be coated with bitumen mastic. Only after the mastic has completely dried should the glass insulation be laid down, and the joints should be sealed with a gas torch.
Please note: Bitumen mastic is toxic, so work should be carried out with the windows open.
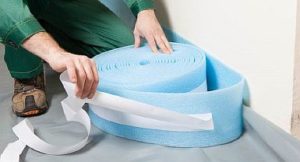
Installation of damper tape
The main purpose of the damper tape is to compensate for the thermal expansion of the screed. Its standard thickness is 5 mm, and its height ranges from 10 to 15 cm.
The room is sealed with tape around its perimeter; it should be positioned above the concrete screed. Any excess tape will need to be trimmed off with a knife after the screed is poured.
Laying thermal insulation
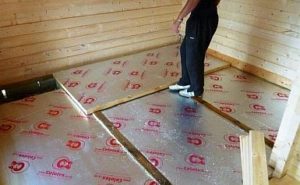
The insulation boards are laid tightly and joined together using the side grooves. Installation begins in the far corner of the room. When using extruded polystyrene foam, the sheets are laid with the marked side facing up.
The slabs are secured with plate dowels at the corners and center, and the seams are sealed with tape. If a second layer of insulation is required, the installation direction must be reversed.
To avoid damaging the slabs during installation, you need to walk on thin boards.
Note: If large gaps form between the sheets and the wall, they can be filled with insulation scraps or foam.
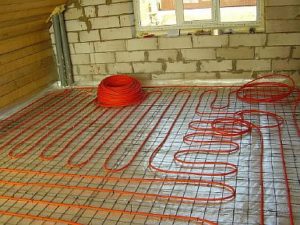
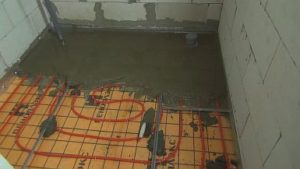
Marking and laying pipes
Using insulating material with markings simplifies the process of laying the heating element. If there is no marking, you must make one yourself. To do this, use a marker to mark the surface of the boards, taking into account the installation pitch of the contour. Using a string, mark the pipe installation line along the marks, then draw the line with a marker.
Before installing the pipeline, the manifold cabinet is installed and all connecting valves are prepared.
The rules for laying the water circuit are as follows:
- 20 meters of pipe are unwound from the coil; it is better to do this using special equipment to avoid kinking the product;
- a heat-insulating sleeve and connecting fitting are put on the end;
- the end is connected to the collector;
- the contour is laid out according to the markings and diagram;
- the pipes are secured with harpoon clamps;
- The pipeline is laid in such a way that the second end returns to the manifold and should also be connected to it.
Important! The size of all hinges must be written on the opposite wall.
If there are transit pipes that pass through the walls, they should be additionally insulated.
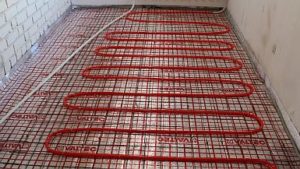
Installation of reinforcing mesh
To strengthen the structure, a reinforcing mesh is laid over the heating circuit. A suitable option is a metal mesh with 10 x 10 cm mesh and 3 mm thick rods. Plastic mesh can also be used. The mesh sheets are fastened together with wire.
System pressure testing
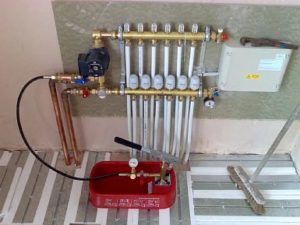
Before pouring the concrete screed, it's necessary to test the system's operation by performing a pressure test. This is essential, as any leaks in the system after the screed has been poured will make troubleshooting difficult.
To do this, the main line is filled with water and left for 24 hours, with the pressure set to 5 bar. If a leak is detected, it is sealed and the process is repeated. If the pressure drops during this time, this indicates a leak, which should also be addressed before pouring the screed.
Laying cement screed
When installing a screed in a private home yourself, it's necessary to increase the pressure in the system to 5 bar. Also, install beacons beforehand; these will make the concreting process easier.
Important! The screed installation must be completed in one go, so you'll need an assistant.
To create a screed, you can use a ready-made mixture or prepare it yourself. However, a simple cement mortar is not suitable; it must contain a plasticizer and fiber, as the surface will be subject to both mechanical pressure and thermal stress.
Pour the concrete mixture from the far corner of the room, in strips along the guides, with the last strip near the door. Each strip must be leveled immediately. The concrete layer above the outline must be at least 3 cm thick.
After pouring, the surface is left for two days to set. Then, excess damper tape is trimmed off, and the concrete floor is sanded until marks appear. It is cleared of debris, lightly sprayed, and covered with plastic for a day.
After this, the beacons are removed, and the holes left by them are filled with mortar and leveled. The surface is again wetted and covered with plastic film. This procedure should be repeated daily for 10 days.
It takes about a month for the concrete to dry completely, only after which the floor covering can be laid and the system turned on.
Commissioning
When the concrete has hardened, balancing is carried outThis procedure involves adjusting the coolant flow rate using valves. It's important to ensure that this flow rate is consistent across all circuits. This procedure should be performed first with cold water. If everything is working properly, then the test is performed with hot coolant.
If you are not sure that you can carry out the balancing correctly on your own, you should invite a specialist.
Laying floor coverings
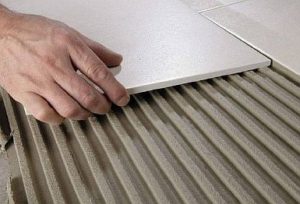
The final layer in the underfloor heating system is the topcoat. It is installed on the dry concrete surface after the system's functionality has been tested.
When choosing a finishing material, you should ensure that it's compatible with heated floors, either on the packaging or in the instructions. If the room has high humidity, ceramic tiles are the ideal choice.
Fuel options and cat types
When choosing a heating boiler for a water-heated floor, you should start from the coolant, and also consider:
- energy costs;
- thermal power level;
- convenience and ease of operation of the boiler;
- easy process of connecting the boiler to the underfloor heating elements.
The water heater must circulate water heated to 45 degrees Celsius. If the unit is connected to the building's main heating system, the boiler's capacity is selected based on the radiator's requirements. If there are no radiators, a low-temperature boiler can be installed.
The following types of boilers are suitable for DIY installation in a private home:
- solid fuel;
- gas;
- electrical;
- automatic.
If your home is connected to gas, it's more practical to use a gas boiler. With the right power, you'll be assured of comfort.
If power outages are frequent, it's recommended to choose a floor-standing boiler with an open combustion chamber. This option is less expensive than purchasing a generator.
If you decide to heat your underfloor heating system with wood, you'll need to install a solid fuel boiler piping system, as it will require space to dissipate heat. Furthermore, such a boiler is unable to heat water to temperatures above 40°C (104°F), as the minimum required liquid temperature is 55°C (122°F). Attempting to maintain the temperature below this will lead to condensation, corrosion, and reduced boiler efficiency.
Connecting the boiler
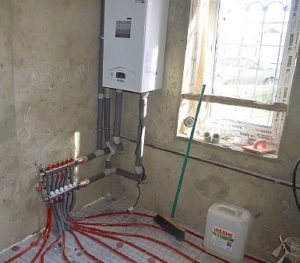
As mentioned above, when choosing a boiler, you need to consider the area of the room you plan to heat. The most common boiler model suitable for a private home is a three-phase 12 kW boiler. The wiring cable used for this type of boiler should have 6 mm2 conductors.
When assembling faucets yourself, professionals recommend using tow and paste to secure the connections. If you don't have radiators, you can do without a mixing unit for hydronic underfloor heating.
Using bulbs and valves will allow you to balance the system, which will ensure the same flow and pressure in all rooms.
We invite you to read the manual, How to connect underfloor heating to a heating system in a private home — 9 connection methods in one article!
Connecting underfloor heating to the main heating system of a private home
The simplest option is to install a heated, water-based floor heating system yourself. However, this method isn't always practical.
In apartments, such a connection requires special permission, as it will affect the heating system of the entire building.
For the equipment to function effectively, two rules must be followed:
- Do not allow the coolant to overheat above 55 degrees Celsius. This can damage the flooring and, in some cases, cause the release of harmful substances. Furthermore, the floor will overheat, making it uncomfortable to walk on.
- Ensure the correct consumption of heat resources, otherwise the temperature in the radiator will drop, and the overall heating level of the room will not change.
There are several options for installing a water-heated floor in a private home.
Direct connection from the radiator
Connecting a water circuit to a radiator is the easiest method. One end of the device is connected to the supply line, and the other to the return line. However, achieving the required heating will require following a few rules:
- a common boiler for heating water needs to be automatic so that it can maintain the required temperature of the coolant;
- the area of the room should not be more than 10 sq. m;
- the presence of a powerful pump for good circulation of the coolant.
However, experts do not recommend this method for installing hydronic underfloor heating in a private home. It has several disadvantages:
- the coolant will be directed primarily to the main pipes and radiators, and its movement along the underfloor heating circuit will be slower, which will lower its temperature;
- When the temperature rises, the floor will overheat.
However, if you choose this option, it's best to entrust the work to specialists, as self-installation without experience could result in a leak.
To properly install underfloor heating pipes, you'll need a radiator valve (installed on the supply side) and an RTL temperature controller. The step-by-step connection process is as follows:
- A tee is inserted into the supply pipe. In addition to the tee, sections of polymer fittings and three triple 90-degree elbow adapters are installed in the return pipe. Both outlets should face upward—this will facilitate the connection process.
- A vertical line is marked with a level; a clip for polymer pipes is screwed to this place and secured with dowels.
- The output is soldered and fixed in the clip (now both outputs for the taps are ready).
- The taps are installed, taking into account the markings; the arrow shows the direction of the coolant.
- Heads are installed at both ends of the underfloor heating circuit; they must have threads: an internal one for the return and an external one for the supply.
- All terminals are connected using a corrugated steel pipe.
- The final stage is installing a thermal head on the supply valve.
Important! Before starting the system, check for leaks.
Single-pipe wiring and connection to it
A single-pipe system is defined by a single pipe through which water flows. This model is reliable, but its only drawback is that the temperature drops as the coolant moves. Therefore, connecting a water circuit to it will result in an additional temperature drop and increased hydraulic resistance, necessitating the installation of an additional pump.
For this design to work properly, a number of rules must be followed:
- To prevent the temperature in the radiator from dropping, the underfloor heating circuit should be connected after all the radiators;
- This connection can only be made if there are no more than 5 batteries;
- To maintain the floor heating at the same level, a three-way mixing valve should be connected to the system - it is capable of mixing hot water with cooled water;
- It is necessary to equip the system with a forced pump, it will ensure the circulation of the coolant.
This system is not often used because it is unstable. Therefore, installing a pump will create pressure that will direct water into the floor pipe. When the valve opens, the pressure is transferred to the radiator, and the hydraulic resistance causes an imbalance in the radiators and changes in water flow.
With this type of heating system, emergency situations are possible. Therefore, professionals recommend installing underfloor heating in a private home by building the floor directly from the boiler, using a manifold assembly.
If you want a comfortable atmosphere in your home at all times, then hydronic underfloor heating is the right solution. Anyone can install it themselves, the key is to choose high-quality materials and follow the installation procedures.


