Today, in the pursuit of comfort, heated floors installed in screeds have replaced conventional heating. They are no longer a luxury, and have firmly established themselves in the construction market.
Installing underfloor heating in a screed is a critical process that requires a serious approach. The final result—heat distribution, the reliability and safety of the structure, and even the consumption of heating resources—depends on how well all the work is performed.
Instructions on how to do it water and electric underfloor heating without cement screed in one day!
Despite the apparent complexity, if desired, the installation can be done independently.
- Types of screeds: which one to choose for underfloor heating
- Structure and thickness
- Preparation before installing underfloor heating
- Design of the structure
- Preparing the floor base
- We install thermal and waterproofing
- Installing a damper tape
- We are installing the mesh
- Installation of underfloor heating
- Water-heated floor heating
- Electric underfloor heating
- Pouring the screed
- Selection and installation of finishing coating
- Video instructions
Types of screeds: which one to choose for underfloor heating
Various ready-made mixtures are used as screeds for underfloor heating, and there are many available on the construction market. Depending on the properties of the mixture, they are designed for different conditions. There are two types of screeds: wet (concrete or cement-based) and dry.
Options base preparation: dry and semi-dry screed, on the ground, overlay method and in a concrete base — all methods in one article!
Wet plaster is popular today because it's inexpensive, retains heat well, and can be done by virtually anyone. However, installation takes longer because it takes a month for the plaster to dry, which is a major drawback.
Dry screed is a lightweight, loose-fill material that is layered with chipboard or plywood sheets. Installation is simple, and thin layers can be applied, making it particularly suitable for low-ceiling rooms. The mixtures are ready to use immediately and require no drying time.
A polyethylene film is spread on the floor, and the dry material is poured onto it. It is leveled, after which the final coating can be installed.
Since it's water-free, it can be installed at any temperature, including below freezing. The main drawback of this screed is its sensitivity to water, making it unsuitable for damp rooms or over underfloor heating.
Structure and thickness
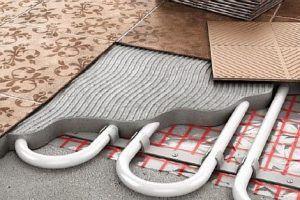
Underfloor heating under a screed is a multi-layer structure. A sub-layer is installed underneath to level out any unevenness in the base. If the base is a level concrete slab, this layer may not be necessary.
The second layer is only used for electric floors; it's poured over the waterproofing layer. The third layer is required for any type of underfloor heating; the final coating is laid over it.
The most popular wet screeds:
- Concrete with small fractions is used for installing subfloors or water-heated systems.
- Cement- and sand-based compounds—mixtures with added plasticizers—are used in the installation of electric underfloor heating.
On the volume of cement in the screed depends on the type of flooring that is planned to be laidIf heavy material is used—parquet, laminate, or ceramic tile—add 5 parts sand and 0.7 parts water to 1 part cement.
When installing linoleum or carpet as a finishing surface, the ratio is as follows: sand, cement, and water (1-4-0.7). If crushed stone is added to the screed, then the ratio is: 1 part cement, 3 parts sand, and 5 parts crushed stone.
There are no specific requirements for screed installation technology, but there are a number of rules that determine the reliability of the entire structure. First, it must be of a certain thickness and level, otherwise the system may malfunction. This can result in cracks and uneven heating of the floor, which can lead to overheating of the heating elements.
Underfloor heating systems are installed using a concrete screed, 3–7 cm thick in residential spaces and up to 10 cm thick in industrial spaces. When installing a hydronic system, the layer above the pipes should be 4–7 cm thick. A 3–5 cm thick coating allows for almost immediate and even heating of the floor and room as soon as the heating is turned on.
For low ceilings that don't allow for a screed of 3 cm or more, it's recommended to use self-leveling mixtures. Applying them to the pipes in a 2.5 cm layer is sufficient to ensure the strength of the structure.
Preparation before installing underfloor heating
Surface preparation and waterproofing and thermal insulation are crucial before installing a heating system. Otherwise, the system will perform less efficiently.
Design of the structure
Any construction project should begin with project preparation. Heat transfer and the spacing of underfloor heating pipes or cables must be calculated. All structural layers must be selected correctly, and costs must be calculated. Furthermore, the final coating must be determined, as it determines not only the thickness of the screed but also the spacing of the heating elements.
Preparing the floor base
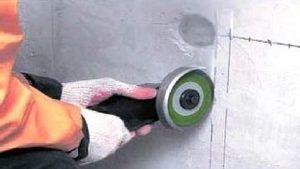
The foundation required for installing a heating system, regardless of its type, is a clean and level surface. Therefore, experts recommend preparing the areas for the main line beforehand and making grooves for the wires to avoid creating a mess later.
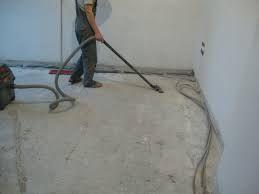
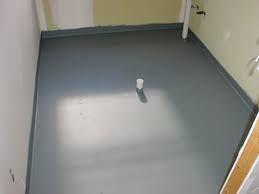
If there are any cracks, they must be repaired. If the base is significantly uneven, a thin subfloor (a mixture of cement and plasticizers) can be poured under the underfloor heating. Allow it to dry before proceeding. If there is no need for a subfloor, sweep up any debris and vacuum the floor to remove dust.
Important! Subfloor differences of 5 mm are allowed; any more will contribute to the formation of air pockets, which will negatively impact the functioning of the system and the uniformity of heating.
We install thermal and waterproofing
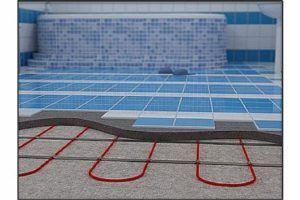
Insulation (foam or mineral wool) is placed on the base. This durable material is secured with a special adhesive. This layer helps reduce heat loss and heating costs. For water-heated floors, foil-faced insulation is recommended.
A waterproofing layer is placed on top. When installing underfloor heating in a multi-story building, special attention should be paid to this layer, as it can affect the condition of the neighbors' ceilings below in the event of a leak. If the apartment is on the ground floor, a vapor barrier is required, as vapors from utility lines can leak from the basement.
It's also important to remember that the waterproofing will be located under heated floors, so it must be able to withstand high temperatures. The following material is recommended for use with heating systems:
- ordinary polyethylene film, not thinner than 200 microns;
- A cement-polymer mixture is an ideal option, it is elastic, completely waterproof and has high heat resistance;
- membrane made of liquid silicone or PVC;
- roll products.
Polyethylene film is more commonly used due to its low cost. It is laid with an overlap of 10-15 cm, and the joints are sealed with adhesive tape.
Installing a damper tape
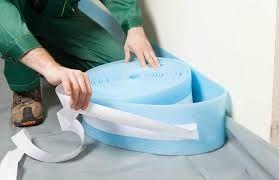
A damper tape is a foamed polyethylene material with a self-adhesive backing. Its typical thickness is 6–8 mm. The tape compensates for the expansion of the screed during the heating season. It is installed around the entire perimeter of the area, where the walls meet the floor.
The tape is fitted with a so-called "apron" made of PET film. This covers the joint between the tape and the thermal insulation, preventing the mortar from leaking into the gaps during pouring. The tape's height depends on the screed thickness, with the top edge positioned above the floor covering.
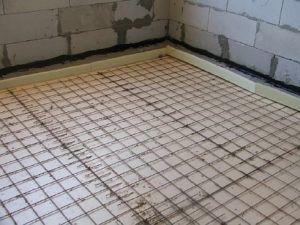
We are installing the mesh
The reinforcing mesh can be laid either under or over the underfloor heating pipes or cables, or on both sides. A more convenient option is to place the mesh under the heating elements, as they are attached to it.
Underfloor heating mesh: purpose and types, selection criteria and how to install it yourself.
There's no need for special clips to secure the parts. However, it doesn't reinforce the base, unlike the mesh on top, which holds the mortar together and creates a single, monolithic structure. However, with high-quality cement, the mesh can be omitted or replaced with fiber.
Installation of underfloor heating
Once all preparatory steps have been completed, you can proceed to the installation of the heating system.
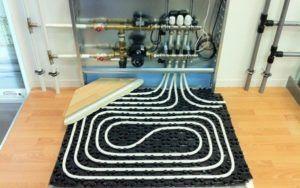
Water-heated floor heating
When installing a water-heated floor, metal or polyethylene pipes are used. They have good thermal conductivity, are easy to bend, and are sold in coils, which is convenient since there are no joints inside the slab.
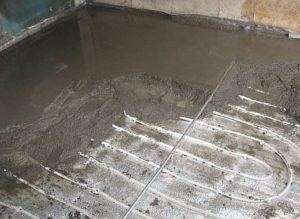
The main stages of the process of laying underfloor heating in a screed are as follows:
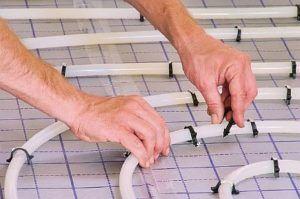
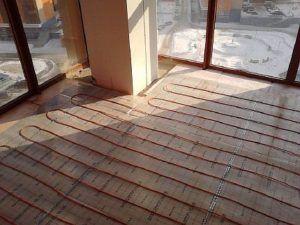
- Lay out the pipes according to the prepared diagram. Popular pipe layouts include a serpentine or snail-shaped pattern. Pipes are laid 10-30 cm apart. It is recommended to keep the maximum loop length to no more than 80 meters. Bends should be smooth; sharp bends can cause pipe rupture. Bends in metal pipes must be especially careful; this can be easily accomplished using a special spring.

- Securing the elements. This can be done using a fastening profile, which is attached to the floor with dowels, secured to a reinforcing mesh, or laid on polystyrene foam mats.
- Connecting the supply and return pipes to the floor is done using a manifold distribution unit, which is the best method. The pipes are connected to the manifold using compression fittings. First, connect one end of the circuit, and then the other once installation is complete.
- Test the structure. This procedure must be completed before pouring the screed. To do this, increase the system pressure to 4 BAR and then monitor the progress. If the pressure remains normal, the screed can be poured.
Electric underfloor heating
In an electric floor, the heating element is a cable.
Steps for installing cable-based underfloor heating in a screed:
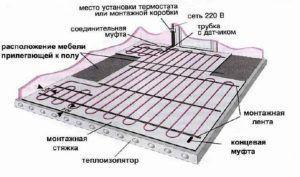
- System layout. Cable locations and element spacing are determined. At least 5-10 cm of clearance should be maintained from walls, heating appliances, and furniture.
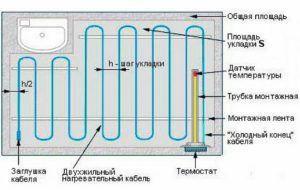
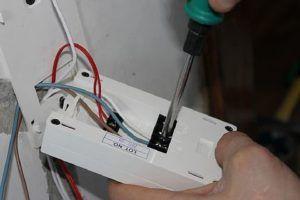
- Preparing the location for the temperature sensor and thermostat. Grooves are prepared for the corrugated pipe that will hold the sensor and wires during concreting; otherwise, the floor will be uneven.
- Laying the system. If cable installation is planned, a cement-sand mortar will be required, but if a heating mat is used, a cement pad is not required.
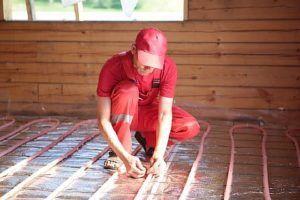
The cable is laid, starting with securing its end and coupling with mounting tape. It is then laid out according to the diagram across the entire area. If the cable is not secured to the mesh, turns must have a radius of at least 5 cm. Cable crossings are not permitted.
- Cable fastening. When installing electric underfloor heating on a reinforcing mesh, the cable is secured using it. Another option is to secure it with staples and mounting tape.
- Connecting the system. The cable is connected to the power element and hidden in the sleeve. Then, the power cable is connected to the thermostat.
Important! Each system must have a separate thermostat..
- Checking the electric underfloor heating. After all the wires are connected, the unit is tested for functionality by connecting it to the power supply, and only then can the pouring begin.
Pouring the screed
The screed is applied at above-zero temperatures. The entire area is poured at once. To prevent air pockets from forming, the surface must be pierced in several places with a thin metal object, as air cannot escape from under the heavy cement layer.
We invite you to read the article about How to properly install a water-heated floor – 3 methods with instructions and a video tutorial!
If the room is large, special beacons are installed after the underfloor heating is installed. These serve as levels for pouring an even layer of mortar. The beacons are placed 0.5 meters from the wall and spaced less than the rule size apart.
Concrete is poured from the far corner toward the door. The mortar is poured between the beacons, evenly distributed, and leveled; its level should not exceed the beacons.
To ensure a high-quality screed, it requires maintenance. To do this, wet the surface with water 2-3 times a day for a week, as the solution needs to harden and not dry out. The underfloor heating system should be turned on after the screed has completely dried.
Overall, the pouring process is simple. If you follow the instructions and the mortar preparation technique, anyone can do it themselves.
Selection and installation of finishing coating
When choosing a finishing coating, consider the requirements of the heated floor. These coatings are marked on the packaging to indicate their compatibility with heated floors.
Furthermore, the product should be selected based on the room's intended use. In a bathroom with high humidity, ceramic tiles are best, as they are resistant to water and chemical detergents and are easy to maintain.
Furthermore, tiles are the best heat-conducting material and are ideal for any type of underfloor heating. Tiles are secured with a special adhesive, applied in a 50 mm layer. Crosses are placed at the corners to serve as guides for placing the next tile.
When choosing wood, it's worth noting that it's a poor conductor of heat, so it's best to choose exotic woods. Laminate, linoleum, and carpet also have lower thermal conductivity than ceramics and are less environmentally friendly. However, they are more aesthetically pleasing and can create a stunning interior. They are best installed over electric underfloor heating.
Laminate flooring is installed on a heated floor, with a thin underlayment laid over the screed. Laminate installation is standard: by clicking together two adjacent planks.
Linoleum or carpet is very easy to install. Once the surface is dry, clean it of dust and lay a waterproofing membrane (polyethylene film) over it. After that, you can lay out the material.
If the area is large and several strips are needed, they are laid end-to-end and cold-welded. As you can see, installing underfloor heating in a screed is easy and within anyone's reach. The key is to correctly design the structure and select the appropriate material.
Video instructions
Watch the video
Video


I've always believed that you can do a lot of things yourself. When I installed underfloor heating, I installed it exactly where it was needed. And most importantly, I'm confident everything will work. Nothing complicated.