Anyone who thinks that installing bathroom pipes themselves is a difficult task is gravely mistaken. Thanks to modern technology, anyone can handle this task.
Communications
First, you need to accurately determine the number of plumbing fixtures to be installed. This could be:
- A shower stall or bathtub. It will need cold and hot water and a drain.
- Sink. Cold and hot water and a drain are supplied to it.
- Toilet. It must be connected to cold water and a flush.
- A washing machine. It will need two types of water and a drain.
 For the specified number of devices, you will need to purchase valves:
- One common one for hot water supply.
- One common one for cold water supply.
- One before connecting the water to the washing machine - We also suggest you read the article on how to connect a washing machine yourself..
- One before connecting the water to the toilet. Not everyone installs this faucet, but it's necessary. In case of a tank leak You won't need to turn off all the water, just the one in front of the tank.
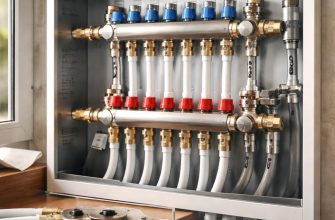
Pipe laying diagram
Once the number of units is determined, it's time to decide where they will be located. The locations should be marked, and it's recommended to remove the plumbing fixtures from the room during the work. Otherwise, they will become an obstruction.

The bathroom and toilet piping layout is first drawn on paper. When creating it, follow these rules:
- When laying them, it is not allowed to cross.
- It's recommended to install water and sewer lines very close together. Otherwise, they'll be difficult to conceal within the box.
- After plumbing installation, access to areas where pipes are connected with flexible hoses should not be blocked.
- There is no need to complicate the whole system.
- The main pipes are run from below.
- The water pipes are brought out using a tee, perpendicularly upwards.
- Sewer branches may be without a vertical section.
Location of plumbing
 Before you install pipes in the bathroom and toilet yourself, you need to accurately determine the locations for installing plumbing equipment.
- It is recommended to install the toilet in the first row of fixtures from the sewer riser. It is also important that the toilet drain be routed through a fitting directly into the riser, or with a minimum number of turns. The drains from fixtures located behind the toilet are routed through it. This minimizes the risk of sewer clogs.
- It's also best to position the shower stall or bathtub closer to the riser. Otherwise, slope issues arise. Equipment such as a washing machine or sink can be located further away.
- Most plumbing fixtures are connected in the same way, but other solutions do exist. Therefore, it's recommended to obtain a wiring diagram from the seller when purchasing the equipment and follow the instructions strictly.
Pay special attention to the toilet's wiring diagram. Its flush can be angled differently, and it can be directed toward the wall or the floor.

If you're installing a large corner bathtub with a load-bearing frame rather than on legs, you'll need to refer to the frame diagram. Because it's not always possible to install a drain using a traditional design.
Do-it-yourself plumbing installation
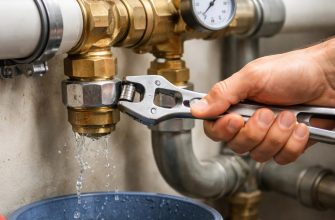
To install and assemble a polypropylene system yourself, you'll need a soldering iron. Buying one just for one project isn't cost-effective; it's better to rent one. This service is available at stores that sell rolled pipe materials.
Working with this tool is not difficult, but you need to remember the safety rules, because it gets very hot.
Fittings are used to connect pipes and bend them at the desired angle. They must be selected strictly according to the cross-sectional size.
IMPORTANT! The connection made with a soldering iron is permanent. To repair it, you will have to cut away the damaged section of the workpiece.
At the end of the installation, a pipe is soldered to the union nut fitting on one end. A flexible hose is connected to the thread on the other end.
 See the photos to see how plumbing is installed in bathrooms and toilets. You can install the pipes yourself using the following steps:
- Directed from the device located at the edge in the direction of the water supply riser.
- The connection is made by soldering and directed from the riser to each unit.
Watch the video
Sewerage system
When installing a sewer system yourself, you don't need to use a soldering iron. Pipes can be inserted into each other or fitted with fittings. This system is very easy to assemble and can be quickly disconnected and rebuilt at any time.
Watch the video
For this work you need to remember the following:
- The sewer pipe is laid at an angle From the appliance toward the main riser. This slope should be at least 3 cm in height per meter of pipe.
- For the bathtub, washing machine and shower stall, 50mm diameter pipes are installed, and for the toilet drain - 110mm.
- The connection of the sewer network is made in such a way that a product with a smaller diameter is inserted into a fitting or pipe with a larger diameter.
IMPORTANT! The sewer system should not be complicated. It is recommended to connect all plumbing fixtures one at a time. Otherwise, overlaps will occur during simultaneous flushes, leading to a blockage.
To facilitate further cleaning of the sewer or sink, a tee fitting should be installed on the sewer pipe. Its opening at the top is closed with a special plug. This fitting will be used to clear blockages from the system.

When connecting sewer system components, it's important to ensure that rubber gaskets are installed at each joint. Failure to do so will result in an unpleasant odor emanating from the pipeline.
What wiring should I use?
 Bathroom pipes can be installed either concealed or exposed. From an aesthetic standpoint, a concealed route is preferable. However, such a network must meet the following requirements:
- It must be reliable. When concealing a pipeline in a box or wall, you must be completely confident that it will not break down over time. The quality of the materials and the reliability of their installation play a major role here. Copper and polypropylene are considered the best materials for this type of wiring.
- Condensation that accumulates inside the wall has a negative impact on the condition of the pipeline.High humidity can cause the system to gradually deteriorate due to deterioration. To prevent this, hot water pipes are positioned above the cold water supply. Both lines are covered with a special tubular seal (merilon).
- The open installation method is most often used for cost savings, due to reduced material costs and labor. The end result is an unattractive appearance, and pipes that constantly condense during the cold season.
Watch the video: Layout of a standard bathroom and toilet: Part 1
Related materials for piping
For the sewerage and water supply system to function, it is not enough to simply install and connect the pipes in the bathroom.
Video: Layout of a standard bathroom and toilet: Part 1
For full functionality, you will need to use some other plumbing products.
The most important thing is the shutoff valves, the quality of which requires due attention. This directly affects the ability to control each point of water consumption.
 Next we need to think about the water meter, because the installation of this device is not carried out without using a check valve and liquid purification filter.
A filter is necessary for the meter to function properly. And check valves are installed according to water utility standards to prevent unscrupulous individuals from backing up the meter.
Many modern water heaters and boilers require unacceptable high water pressure. In these situations, a pressure reducer is installed. This device stabilizes water pressure within the system and extends the life of the units.
In conclusion, it must be said that the gasket or Do-it-yourself replacement of pipes in the bathroom must be carried out in accordance with the installation requirements for specific types of pipelines. This type of work requires a lot of research.
Only with this knowledge can you handle this task yourself and install high-quality piping yourself, as well as choose the correct connection scheme for the bathroom and toilet.