DIY installation of underfloor heating pipes is becoming increasingly popular. This type of heating system can be used as both a supplemental and a primary heating system.
To properly install a heating system, you need to know about its features.
Read also: step-by-step installation instructions DIY heated floors With installation videos and photos. This article will cover waterproofing, insulation installation, connection and filling of the circuit, installation of beacons, and more.
- What material is best to choose for pipe rolling materials?
- How to calculate the footage of elements for assembling a system?
- Water-based underfloor heating installation diagrams
- Methods for installing underfloor heating
- Installation of contours on profile thermal insulation mats
- Modular and slatted types of heated water floors
- Sequence of laying pipes in concrete screed
- Installation of a warm water floor with or without a reinforcing mesh
- Choosing the optimal step
- Important nuances of installing a heating system in concrete
- Methods of contour fixation
- Installation of lighthouses
- Solution for underfloor heating screed
- Pressure testing
- Connecting circuits to collectors
- Where can I mount it?
- Adjusting the coolant temperature
- Distribution by contours
- Conclusion
What material is best to choose for pipe rolling materials?
 To install water-heated floors, you can use products made from the following materials:
- copper;
- cross-linked or linear polyethylene;
- combinations of aluminum and polyethylene or polypropylene;
- composite of polyethylene and polyvinylethylene (fiberglass).
Copper piping offers the best performance. It has the highest thermal efficiency, is extremely durable, and is corrosion-resistant. However, copper products are expensive and require additional equipment for installation. Furthermore, such a system must be protected from alkalis.
 The best option for installing heated floors is to choose polyethylene products. These can be cross-linked (PE-X) or linear (PE-RT).
Advantages of the products:
- High level of thermal conductivity.
- Long-lasting wear resistance.
- Increased flexibility.
- The inner walls are smooth, so they become clogged with deposits very slowly.
- The material does not corrode.
- It can withstand repeated freezing of the coolant.
- Self-installation of such network elements is simple, since their correct installation does not require the use of special tools and devices.
PE-XA is the most reliable. This material has the highest cross-linking density (85%). This gives it a pronounced "memory" effect. In other words, After thermal expansion, the network elements always return to their original stateThis makes it possible to use axial fittings with sliding rings, which can be easily embedded in the screed.
PE-RT alternatives do not exhibit the "memory" phenomenon. Therefore, only push-in fittings are used with them. They cannot be walled in. However, when system circuits are laid in continuous sections, all connections will be made only at the manifold. In this case, the use of PE-RT is justified.

Manufacturers also produce underfloor heating pipes from composite materials. In this case, the top and bottom layers are made of polyethylene, with aluminum foil (PE-X-Al-PE-X or PE-RT-Al-PE-RT) bonded between them. The metal reinforces the underfloor heating elements and acts as an oxygen barrier.
A disadvantage of aluminum-plastic is its heterogeneity. Different rates of thermal expansion between the metal and polymer can lead to delamination of the material.
Therefore, the best choice would be polyethylene products reinforced with polyvinylethylene (EVOH). This significantly reduces oxygen penetration into the water coolant through the pipe walls. This reinforcement can be either a top layer or placed between layers of polyethylene. The latter option is preferable.
Water heated floors can be installed using pipes of the following sizes:
- 16×2;
- 17×2;
- 20×2 mm.
How to calculate the footage of elements for assembling a system?
Before installation, it's necessary to calculate the water-based underfloor heating system. For this purpose, a system diagram with water circuits is created. What to consider during the calculation:
- There is no need to install pipes where furniture, floor equipment, and appliances will be located.
The length of 16 mm diameter circuits should not exceed 100 m. The length of 20 mm diameter pipes for underfloor heating systems should not exceed 120 m. Otherwise, the pressure in the heating network will be low. Therefore, each circuit should be located within an area of no more than 15 m².
- The difference in their lengths should be no more than 15 meters. In other words, they should be made approximately the same length. A large room should be divided into several heating branches.
- The optimal spacing for hydronic underfloor heating pipes is 15 cm, provided effective thermal insulation is used. In harsh climates with frequent frosts of -20ºC or below, the spacing between turns near external walls is reduced to 10 cm.
- With 15 cm spacing between pipes, the required pipe consumption is approximately 6.7 m per 1 m² of floor area. With 10 cm spacing, the required pipe consumption is 10 m.
Water-based underfloor heating installation diagrams
The layout of underfloor heating pipes can be done in a “snake”, “snail” or combined manner.

The serpentine installation of the water circuit is the simplest. It is done using loops. This installation scheme is optimal for a room divided into functional zones where different temperature settings are planned.
When the first loop is installed around the perimeter of the room and a single coil is installed inside, hot water will sufficiently heat half the area. The other half of the room will be circulated with cooled coolant, keeping it cool.
Another variation of this design is the double serpentine. In this design, the supply and return water lines run side by side throughout the room.
The third variation of this design is the corner serpentine pattern. It's used in corner rooms where two walls are exterior.
The coils of the snake can be installed evenly. However, the bends of the water loops will be severely curved in this case.
The advantage of this diagram is that the serpentine layout of the underfloor heating pipes is simple. It's easy to plan and install.
Cons:
- temperature difference in one room;
- The bends in the pipeline are excessively sharp, which, when laid at a small pitch, can lead to kinks.
A snail-style underfloor heating system is also called a "shell" or "spiral" system. In this design, the supply and return lines are installed throughout the room and run in a spiral, parallel to each other. Installation proceeds from the perimeter walls toward the center of the room.
The supply line in the center of the room ends in a loop. A return line is installed parallel to it and runs from the center of the room along its perimeter to the manifold. If the room has a cold outer wall, a double line can be installed along it. snail (design features, pros and cons).
Laying underfloor heating pipes in a snail pattern has the following advantages:
- The room is heated evenly.
- The hydraulic resistance in the system is low.
- Installing a shell requires less materials than installing a snake.
- The bends of the turns are smooth, thanks to which the step between the turns can be made smaller.
The downside of the snail is the complex planning and labor-intensive installation.
Not all rooms are rectangular, and a room may also have two external cold walls. To keep them warm, you can use a combination of DIY contour installation.
To maximize heat gain, the supply pipe loops are placed along the exterior walls. It's best to install them at almost a 90º angle to each other.
Methods for installing underfloor heating
The methods for laying pipes for underfloor heating are divided into concrete and overlay.
In the first case, the heating network is walled up in a layer of screedThis method requires significant labor and time. The drying time depends on the thickness of the concrete surface. Only after the concrete has fully cured (approximately 28 days) can the floor covering be installed.
The overlay method uses ready-made materials. Since there's no wet work involved, installing underfloor heating is quick and easy. However, the cost of installing the system increases, as the necessary materials are expensive. The overlay method uses the following as a base:
- polystyrene insulation;
- wooden modular or slatted panels.
Installation of contours on profile thermal insulation mats
 This option for installing an underfloor heating system is the easiest. Polystyrene insulation boards are used as the base for the water-based floor. These mats, which are installed in 30x100x3 cm dimensions, are equipped with grooves and low posts. Underfloor heating pipes are manually snapped into these posts, and the final floor covering is laid on top of them.
This method does not require the use of a concrete screed. When the finishing coating floor tiles are used If you're using linoleum, you'll first need to lay gypsum fiber boards on the base. The sheets should be at least 2 cm thick.
Modular and slatted types of heated water floors
 Such systems are most often used in wooden houses. Pipes are laid on the subfloor or joists.
The modular system uses prefabricated chipboard panels for pipe installation. They are 2.2 cm thick. The modules have channels for aluminum mounting plates and pipes. With this installation method, the insulation is installed within the wooden floor.
The strips are installed at intervals of 2 cm. Based on the spacing between the pipes, strips of 15-30 cm in length and width are used:
- 13;
- 18;
- 28 cm.
To prevent heat loss, the plates are equipped with pipe clips. If the final floor covering is Linoleum (see which linoleum and which heated flooring are best to choose, instructions on how to install) A single layer of gypsum fiber boards should be laid over the pipes. If the final covering is laminate or parquet, it can be omitted.
The slatted version of decking systems is almost identical to the modular version. The difference is that instead of panels, it uses planks starting at 2.8 cm wide.
The spacing between the slats in the modules should be at least 2 cm. The slat system is laid only on the joists, spaced 40-60 cm apart. Expanded polystyrene or mineral wool is used as thermal insulation in this case.
Sequence of laying pipes in concrete screed
 Despite its labor-intensive nature, installing heating networks in concrete screeds is currently the most common method. The technology is as follows:
- First, the base is prepared. The subfloor is cleared of debris; any ridges or bumps are removed with a hammer drill.
- Then waterproofing is laid on the floors of the room.
- After this, thermal insulation is installed on top of it.
- Further, the installation rules require that a compensation (damping) tape be installed between the pre-calculated sections and along the perimeter of the room walls.
- The reinforcing mesh is being installed.
- The underfloor heating pipes are laid according to the selected layout. They are attached to the reinforcement bars manually using harpoons.
- To test the system, it is filled with water and pressure tested.
- Then the guide beacons are installed.
- Lastly, the cement-sand screed is poured.
Find out what to do if the need arises. connect the heating pipes together.
Installation of a warm water floor with or without a reinforcing mesh
There are two options for pouring heated floors with concrete screed: with and without the use of reinforcing and fastening mesh.
- If polystyrene foam mats with grooves for the contours are used as insulation, then mesh is not necessary. Concrete can be poured immediately after the underfloor heating is installed.
- When using conventional insulation, a thin metal or polymer mesh should be used to reinforce and secure the contours. It should be raised slightly above the insulation material.
Choosing the optimal step
The distance between pipes during installation depends on the type of room (find out what the distance between loops should be), heat loss from it, and the calculated heating load. Typically, the step is between 10 and 30 cm. It can be variable or constant:
- If the heating load is less than 50 W per square meter, the circuits are laid manually with a constant step of 20-30 cm.
- For high heating loads (80 W per square meter or more), the recommended distance between turns is 15 cm.
- In other cases, a variable pitch is used. For example, along external walls, through which heat loss is greatest, the distance between the network loops is kept to a minimum (10 cm). In interior areas of the room, the distance between the network loops increases (20 cm).
The number of turns with the smallest pitch is calculated during the heating design. A pitch of 25-30 mm is most often used in very large spaces. To deliver the coolant to these spaces, 20 mm diameter loops are used.
Important nuances of installing a heating system in concrete
The water heating network must be properly embedded in concrete. Therefore, several subtleties must be taken into account.
 Before installing the system on the first and basement floors, it's essential to waterproof the floors. This will protect the room from capillary moisture absorption from the ground. On subsequent floors, waterproofing will provide insurance against accidents.
In most cases, special polyethylene films with a thickness of 150-200 microns are used for waterproofing. A mandatory rule: sheets of these films on the floor should be laid with an overlap of 10 cm. Joints should be sealed with special tape. On the walls, sheets should also be laid with an overlap of at least 10 cm.
Extruded polystyrene foam is the best choice for insulating concrete floors. It offers the necessary strength and rigidity. Furthermore, it's moisture-resistant, so it doesn't require a vapor barrier.
For indoor use, 5 cm thick polystyrene foam boards are sufficient. Only in regions with very harsh climates is the insulation layer thicker than 10 cm. The insulation materials should be laid flush against each other, and the joints between them should be filled with foam.
 Before pouring the screed, the perimeter walls, as well as any obstacles (such as columns or overhangs), and contour boundaries must be sealed with damper tape. This prevents cracking of the mortar as it dries, shrinks, and expands due to thermal expansion. This is achieved by creating expansion joints. The damper tape is made of polyethylene foam, is 0.5-1 cm thick, 10 cm wide, and comes in rolls of 15 to 50 m.
Methods of contour fixation

Water heating systems can be installed using several methods:
- Polyamide clamps. They are used to secure the contours to the reinforcing mesh. Two clamps are required per linear meter.
- Steel wire. This is used to secure the mesh elements to the grid; the cost is the same.
- Using a construction stapler and staples. This method is suitable for quickly attaching contours to insulation.
- A locking track. This U-shaped PVC device snaps the system components into place during installation.
Installation of lighthouses
 To simplify the work, screed laying devices called "markers" are used. These are strips mounted at a precisely horizontal level and spaced evenly. The "markers" are flat metal profiles over which the screed will be poured. The strips determine the future level of the screed.
To find the zero level, use a laser or water level. Using these, mark points on the walls at a height of 30 cm around the perimeter of the room. Two are made in each corner and three or four along the walls. The marks are connected using a mark, creating a precise horizontal level.
Then, the height from the floor to the level axis is measured in the corners. Its minimum value is measured down from the level line and marked along the perimeter of the room. These marks are then connected with a spacer. The highest point is called the zero point. From this point, the beacons are installed, using screws or mortar.
Solution for underfloor heating screed
The screed mortar is made from M-400 Portland cement and coarse quartz sand (0.8 mm) in a 1:3 ratio. Water is added to the dry mixture until it reaches a consistency suitable for easy leveling. Liquid soap can be added to the mortar to increase its plasticity.
It's best to mix the components of the screed for a hydronic underfloor heating system in a concrete mixer rather than by hand. To increase the strength of the coating, polymer fiber can be added to the liquid solution.
Pressure testing
Pressure testing is performed after the circuits have been installed and connected to the manifold. The screed must not be poured until this procedure is complete.
Pressure testing ensures that the entire system is functioning properly, its connections are tight, and its circuits are free of defects. If any issues are identified during testing, they are promptly corrected before the screed is poured.
The system is filled with coolant and pressurized to maximum pressure. During testing, the network is expanded to its working size. This avoids excessive pressure on the screed during operation.
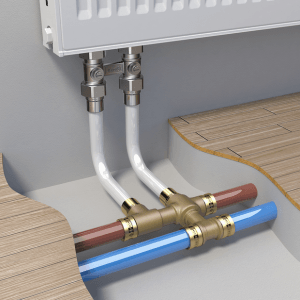
Connecting circuits to collectors
The collectors are placed in a special cabinet:
- the width and height of the box can be 0.5×0.5 or 0.4×0.6 m;
- thickness - 0.12-0.15 m.

Once the cabinet is installed, the supply (with heated water) and return (with cooled coolant) pipes should be connected to it:
- A manifold supplying hot coolant is connected to the supply line using a fitting or adapter (if the cross-section of the elements is different).
- A collector for a branch with cooled water is screwed to the return line.
A shut-off valve should be installed between the pipeline and the manifolds in case of emergency or repairs. A drain valve should be connected to the opposite end of the manifold. For precise floor temperature control, a regulating valve and mixing device should be installed on the manifolds.
Where can I mount it?
When installing an underfloor heating system, you should avoid common mistakes.
Underfloor heating is most often installed in private homes. The heating systems in Soviet-era apartment buildings were not designed for this type of heating. While it's technically feasible, the risk of leaving you or your neighbors cold is high.
Often, the entire riser remains cold because the hydraulic resistance of an underfloor heating system is much higher than that of a radiator heating system, which impedes the flow of coolant.
Therefore, management companies do not permit the installation of underfloor heating pipes in old buildings. If done without approval, you will be required to pay a fine and have the system dismantled.
However, in new buildings, underfloor hydronic heating is permitted and no permits are required. Their heating systems are designed for higher hydraulic resistance.
Adjusting the coolant temperature
To ensure comfortable foot bathing, the water temperature should not exceed 45ºC. In this case, the flooring will warm up to an optimal 28ºC. Almost all heating equipment cannot produce such temperatures (the minimum is 60ºC). Condensing gas boilers are an exception.
When using any other type of equipment, a mixing unit must be installed. This unit adds cool water from the return line to the heated coolant from the boiler.
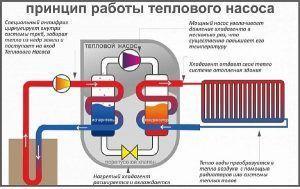
Operating principle of the device:
- Heated water from the boiler flows to the thermostatic valve. If the set temperature is exceeded, it opens to mix in coolant from the return line.
- There is a jumper with a two-way valve in front of the circulation pump.
- When it is opened, water is added from the return line.
- The mixed coolant flows through the pump to the thermostat, which regulates the operation of the thermostatic valve. Once a certain temperature is reached, the return flow is closed.
Distribution by contours
From the mixing unit, water flows to the distribution comb or manifold. It's one thing when underfloor heating is installed in a small room (for example, a bathroom). It may only have one loop of the network installed. In such cases, the instructions recommend not installing this unit.
When there are multiple coils, the water must be redistributed between them. It must then be collected and sent back to the return line. These functions are performed by the manifold. It consists of a pair of pipes on the supply and return lines. The circuit outlets and inlets are connected to them.
When underfloor heating is used in several rooms, the best option is to install a comb with adjustable heating medium temperature control. Different rooms often require different temperatures.
Conclusion
Installing an underfloor heating system will improve the comfort of your home during the winter. There are various installation options for this type of heating. The choice should be based on the heat load, the climate in your region, and your budget.